USER MANUAL Kylin Flat Toilet CD-W10V
Thank you for placing your confidence in us. Thank you for buying our products. You can learn from this manual about installation steps before initial start-up. We hope you can learn how to install the product through this manual. Please follow the instructions in this manual carefully. Please keep the manual properly stored for future reference. Regarding future product updates, the product is subject to change without prior notice. Illustrations in this manual serve as visual demonstration.
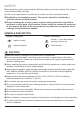
SAFETY Before using the product, please read the following safety instructions carefully. Pay attention to the following safety warnings. We will not be responsible for any loss due to violation of either requirement below. ■ Qualification of installation person: The product should be installed by a specially trained qualified plumber. ■ Before installing the product, please read the safety instructions right below and those in other parts of this manual.
SAFETY CAUTION! Please avoid faults or damage of the product due to misoperation. ■ The product is made of ceramic. Handle it gently in installation. Do not fix the ceramic with cement, otherwise the product will tend to get damaged; do not lock the nuts too tightly, otherwise the product may get damaged or crack. ■ After installation, do a water supply test first. ■ Leaning on the top cover when using the product may damage it. ■ When moving or installing the product, hold its body with hands.
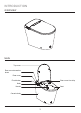
INTRODUCTION OVERVIEW MAIN Top cover Rear cover decorative sheet Rear cover Flush button Rear cover trim strip Knob Seat Nozzle Ceramic body 3
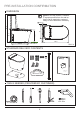
PRE-INSTALLATION CONFIRMATION DIMENSION 17.5 19.3 15 37.5 1 ≥ 0.4 1 Make sure the product is installed in a proper position from the wall so that it can be repaired or replaced easily in future whenever necessary. 26.9 22.8 Unit: in STANDARD DELIVERY CONTENTS USER MANU Kylin Flat Toilet CD-W10V TOOLS NEEDED (PROVIDED BY CUSTOMER) Ø 0.
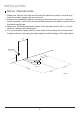
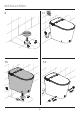
INSTALLATION INSTALL PREPARATIONS 1. Make sure that the floor tiles and the wall tiles have been paved, and that a pit tube and a water supply pipe are reserved. 2. Reserve the installation position according to the dimensions given in the figure below (symbols * refer to the recommended dimensions) to ensure normal use of the water supply pipe. 3. Make sure the distance between center of the pit tube and the wall, i.e., the pit distance, matches with the product. 4.
INSTALLATION 1 3 10s ≥0 in Make sure the product is installed in a proper position from the wall so that it can be repaired or replaced easily in future whenever necessary. 2 4 6 Φ0.4in 2.
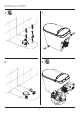
INSTALLATION 5 7 6 8 Filter 7
INSTALLATION 9 11 10 12 8
TEST 1 1 2 2 After installation, make the product stand for 24h before use.
OPERATION OPERATION KNOB Function Selfcleaning of the nozzle Bidet function Selfcleaning of the nozzle Hip washing Flushing Symbol Operation Remarks Turn the knob forward till the first position for self-cleaning of the nozzle, or to the second position for the bidet function. The water flow 1. The nozzle does not changes with rotation of the knob. stretch out in its self-cleaning. 2. The larger the rotating Turn the knob backward till the first angles of the knobs, the larger the water flows will be.
CLEAN & MAINTENANCE FILTER CLEANING The filter needs to be cleaned at regular intervals. If the product fails in water supply, has a water supply pressure smaller than ordinary time or cannot work normally, please clean the filter first. In cleaning, make sure the water supply switch is off; after cleaning, mount the filter back and inspect and make sure there’s no water leakage. 2 Filter NOZZLE CLEANING Pull out the jet pipe gently and pull it for at least 5 times.
TROUBLESHOOTING TROUBLESHOOTING If it is believed in that the product has a fault, eliminate the fault as below. If the product cannot work normally after that, please contact the local repair center or reach us through our service hotline. Fault phenomenon Cause analysis Solution Water leakage Loose hose connector Turn off the water supply switch and check whether the connector between it (or the product) and the hose is tightened.
Casta Diva(Xiamen) Network Technology Co.Ltd Email: service@castadivahome.com Website: www.castadivahome.com P\N: 568571 24-1.