
User Manual


!
!
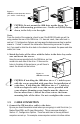
Now that you have located the empty drive bay and mounted your
drive in an adapter if necessary, you are ready to install the drive in
the computer.
1. Shut down your operating system and power off your
computer. Unplug the AC power.
2. Remove the cover of your computer.
Refer to your computer manual for a description of how to remove the outer
cover of the computer.
CAUTION: Make sure you keep track of all screws and
fasteners during this process.
3. Prepare the bay for installation.
Make sure the bay is free from any extra screws or plates. Refer to your
Computer user’s manual for more details on this step.
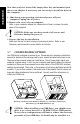
1.7 CONFIGURATION OPTIONS
Your ORB drive is shipped as a slave drive. Please see your computer installation
manual for details on the settings used by your system and what selections to use.
There are a few common scenarios listed below. One of these might match your
computer’s system setup. Look into your computer and identify where the various
connectors (there are three connectors on each cable) of the EIDE/IDE interface
cable(s) are attached. Then refer to the scenario illustrations and descriptions for
a match. If you do find a match, then make note of the possibilities for jumper set-
tings and cable attachments that are offered. You will need this information to
install your ORB drive.
Figure 6
Desktop and Tower with Primary channel (1), Secondary channel (2),
Hard Drive (3), CD-ROM/DVD Drive (4)
CAUTION: When installing your ORB Drive, you should never
place it as a slave device to a CD-ROM, DVD or ATAPI master
device; these configurations will limit or reduce the data rate
potential of your ORB drive. It should only be installed as a
6
INSTALLATION GUIDE