
Operation Manual


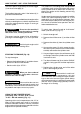


screw (4) using a screwdriver until the pin is
completely inserted (Fig. 4).
– Turn the chain tension adjuster screw (4) to ad-
just the chain tension (Fig. 4).
– Raise the bar and tighten the guard nuts securely
using the wrench (Fig. 5).
•
Machines with quick chain tension
adjuster
(SP 375Q, SP 405Q, C 38 T, C 41 T)
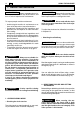
– Unscrew the handle (11) and remove the guard
to get to the drive sprocket and the point where
the bar is fitted (Fig. 1A).
– Remove the plastic spacer, (12); this spacer
must be used exclusively when transporting the
machine in its packaging and must not be used
at any other time (Fig. 1A).
– Mount the bar (2) by inserting the stud bolts in
the groove and push it towards the back of the
machine body (Fig. 2).
– Mount the chain in the right direction around the
drive sprocket and along the bar rail (Fig. 3). If
the tip of the bar has a nose sprocket, make
sure the drive links fit correctly in the sprocket
rims.
– Fit the guard back on without tightening the han-
dle (11). Check that the chain tension adjuster
pin (14) is fitted properly in the hole on the bar;
if it isn’t, turn the chain tension adjuster ring-nut
(15) until the pin is completely inserted (Fig. 4A).
– Turn the ring-nut (15) to obtain the desired chain
tension level (Fig. 4A).
– Raise the bar and tighten the handle (11) se-
curely (Fig. 5A).
• Checking the chain tension
Check the chain tension. The tension is correct
when the drive links do not slip out of the chain
guides if you hold the chain in the middle of the bar
(Fig. 7).
The machine is supplied with
the bar and chain dismantled and the oil and fuel
tanks empty.
Unpacking and complet-
ing the assembly should be done on a flat and
stable surface, with enough space for machi-
ne handling and its packaging, always making
use of suitable equipment.
Disposal of the packaging should be done in
accordance with the local regulations in force.
Always wear heavy-duty
gloves when handling the bar and chain.
Mount the bar and chain very carefully so as
not to impair the safety and efficiency of the
machine. If in doubt, contact your dealer.
Before fitting the bar, make sure the chain brake is
not engaged; this is done by pulling the front hand
guard right back towards the body of the machine.
Perform all operations
with the engine off.
BAR AND CHAIN MOUNTING
• M
achines with standard chain tension
adjuster
– Unscrew the nuts and remove the clutch cover to
get to the drive sprocket and point where the bar
is to be fitted (Fig. 1).
– Remove the plastic spacer, (1); this spacer must
be used exclusively when transporting the ma-
chine in its packaging and must not be used at
any other time (Fig. 1).
– Mount the bar (2) by inserting the stud bolts in
the groove and push it towards the back of the
machine body (Fig. 2).
– Mount the chain in the right direction around the
drive sprocket and along the bar rail (Fig. 3). If
the tip of the bar has a nose sprocket, make
sure the drive links fit correctly in the sprocket
rims.
– Check that the chain tension adjuster pin (3) of
the clutch cover is fitted properly in the hole on
the bar; if it isn’t, turn the chain tension adjuster
WARNING!
WARNING!
WARNING!
IMPORTANT
MACHINE ASSEMBLY 7
EN
4. MACHINE ASSEMBLY