
Operating Guide


7
ASSEMBLY
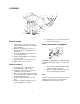
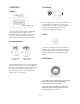
Feet Assembly
1. Set the frame of the unit on blocks to
provide sufficient clearance to install the
feet and wheels.
2. Align the mounting holes of the foot
bracket (2) with the mounting holes in
the frame.
3. Insert one 8 mm bolt (1) through each
set of mounting holes.
4. Install and hand tighten one 8 mm nut
(3) on each bolt.
5. Repeat steps 2 – 4 for the other foot.
6. Tighten all four nuts securely.
Wheel Assembly
1. Insert short end of axle (5) into the
mounting bracket on the frame.
2. Install one 10 mm nut (4) on the axle
and tighten securely to frame.
3. Place one large washer (6) on the long
end of the axle and install wheel (7) with
the bolt design facing out.
4. Install one large washer (6) onto the
axle.
5. Install one 10 mm locking nut (8) onto
the axle and tighten securely.
6. Repeat steps 1 – 5 for the other wheel.
7. Remove the blocking.
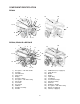
Battery Connection (If equipped)
RP6500 E and RP7500 E come with the battery
mounted in the battery holder. To connect the
battery:
1. The unit ships with the positive battery
cable (1) already connected.
2. Attach the cable with the black cap (2)
to the negative battery terminal.
Oil
Follow the Engine Oil Level-Check procedure to
add the proper amount of oil for the unit as
described in the Specifications chart.
1
7
6
4
6
2
3
8
5
2
3
2