©2022 Caterpillar. CAT, CATERPILLAR, their respective logos, “Caterpillar Yellow,” “Caterpillar Corporate Yellow,” the “Power Edge” trade dress as well as corporate and product identity used herein, are trademarks of Caterpillar and may not be used without permission. Baccus Global, a licensee of Caterpillar, Inc. ©2022 Caterpillar. Caterpillar.
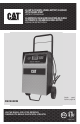
40 AMP AUTOMATIC WHEEL BATTERY CHARGER WITH ENGINE START INSTRUCTION MANUAL 40 AMPERIOS CARGADOR DE BATERÍA DE RUEDA AUTOMÁTICO CON ARRANQUE DEL MOTOR MANUAL DE INSTRUCCIONES CBC200EW SAVE THIS MANUAL FOR FUTURE REFERENCE. CONSERVE ESTE MANUAL PARA FUTURAS CONSULTAS.
This device complies with part 15 of the FCC rules. Operation is subject to the following two conditions: (1) this device may not cause harmful interference, and (2) this device must accept any interference received, including interference that may cause undesired operation. This equipment has been tested and found to comply with the limits for a Class B digital device, pursuant to part 15 of the FCC Rules.
• Ground fault circuit interrupter (GFCI) protection should be provided on the circuits or outlets to be used. Receptacles are available having built in GFCI protection and may be used for this measure of safety. Extension Cords • An extension cord should not be used unless absolutely necessary. Use of an improper extension cord could result in a risk of fire and electric shock, and will void warranty. • If an extension cord must be used, make sure your extension cord is in good condition.
SPECIFIC SAFETY INSTRUCTIONS FOR BATTERY CHARGERS WARNING: BURST HAZARD: Do not use the unit for charging dry-cell batteries that are commonly used with home appliances. These batteries may burst and cause injury to persons and damage property. Use the unit for charging/boosting a 12 volt lead-acid battery only. It is not intended to supply power to a low-voltage electrical system other than in a starter-motor application.
3. If it is necessary to remove battery from vehicle to charge, or to clean terminals, always remove grounded terminal from battery first. Make sure all accessories in the vehicle are off, so as not to cause an arc. 4. Clean battery terminals, taking care to avoid getting corrosive material in eyes. 5. Add distilled water in each cell until battery acid reaches level specified by battery manufacturer. This helps purge excessive gas from cells. Do not overfill.
3. Connect the Positive (RED) battery clamp to the Positive battery post (marked POS, P, + or red). 4. Stand as far back from the battery as possible, and do not face battery when making final connection. 5. Carefully connect the NEGATIVE (BLACK) charger clamp to the free end of the battery cable connected to the negative terminal. 6. When disconnecting charger, always do so in reverse sequence of connecting procedure and break first connection while as far away from battery as practical.
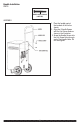
Handle Installation PARTS: HANDLE SCREW (4X30mm) (4 IN TOTAL) ASSEMBLY: 1. Place the handle against the top back of the unit as shown. 2. Align the 4 Handle Screws with the Unit Screw Holes as shown in the illustration. 3. Screw the Handle Screws into the Unit Screw Holes through each of the Handle Holes. Do not over-tighten.
CONTROLS AND FUNCTIONS 7 5 4 6 3 8 9 10 11 12 13 2 1 FEATURES 7. Handle 8. Battery Charge Button 9. Digital LCD screen (detailed view follows) 10. Engine Start Button 11. Alternator Check Button 12. Battery Voltage Check Button 13. Battery Recondition Button 1. Wheels (2 in total) 2. Base Stand 3. 120 volt AC cable and plug 4. Battery clamp storage bar 5. Positive (red) clamp 6.
LCD Display Detail DIGITAL DISPLAY (VARIES BY FUNCTION) AMPERES/ VOLTAGE/ SECONDS BATTERY RECONDITION INDICATOR INDICATOR CLAMP ICONS BATTERY CHARGE GAUGE FAULT ICON BATTERY RECONDITIONING ICONS ARROW ICONS BATTERY ICON ALTERNATOR ICON LOW SURROUNDING TEMPERATURE ICON OVERHEAT ALARM ICON ENGINE START ICON HIGH SURROUNDING TEMPERATURE ICON OPERATING INSTRUCTIONS Charging the Battery warning: TO REDUCE THE RISK OF INJURY OR PROPERTY DAMAGE: • Always disconnect the AC plug from the AC outlet first be
If the clamps are INCORRECTLY connected with regard to polarity, the LCD screen will display the following (the “+” and “–” inside the battery icon and the fault icon will flash and the clamp icons, the battery icon and the gauge without the pointer will light) and a warning will sound until the clamps are disconnected: Unplug the charger; then remove the clamps. Reconnect the clamps properly. 3. When the unit is properly connected, press the battery charge button on the control panel.
the following (the digital readout shows “F04”, the clamp icons, arrow icons, battery icon and the gauge without the pointer will light solid - the fault icon will flash): Disconnect the charger. Have the battery checked by a qualified technician. 4. When the battery is completely charged, the unit automatically goes into float charge mode and the LCD screen displays the following: The digital display shows “FLO” to indicate that the unit is in float charge mode.
Using the Alternator Check Function Set up the battery charger and connect to the battery following steps 1 through 2 in the “Charging the Battery” section. PART 1 No Load (turn OFF all vehicle’s accessories): The battery must be fully charged before testing the alternator. Run the engine long enough to achieve normal idle speed and verify there is a no-load voltage. 1. Press the alternator check button to start the check.
3. If the unit detects that the alternator is out of typical voltage range, the LCD screen will display the following: The fault icon and “ALT” will flash; and the alternator icon, and the gauge without the pointer will light solid. 4. Press the alternator check button again to stop the test. Notes: The unit may detect that the alternator is out of typical voltage range because someone has added a number of accessory loads on the charging system, thereby increasing current demand from the alternator.
3. When “0” is reached, a beep will sound, engine start icon ( ) will light solid. The vehicle is ready to start. 4. Crank the engine using manufacturer’s guidelines, typically in 3 to 5 second bursts. The digital display shows “5 sec.” indicating a 5-second countdown. 5. After cranking, the unit will automatically adjust the charging current to 3A for 5 minutes and then revert to charging mode. Pressing any button during this process will have no effect.
Please visit www.baccusglobal.com/registration within 30 days of purchase of the product to register your product. Baccus Global LLC, toll-free number: 1-877-571-2391. SPECIFICATIONS Input: Output: 120VAC, 60Hz, 660W 12VDC, 40A, 200A engine start (5 minutes OFF, 5 seconds ON) Baccus Global, LLC, 621 NW 53rd St., Suite 450, Boca Raton, FL 33487 www.Baccusglobal.
Este dispositivo cumple con la parte 15 de las normas de la Comisión Federal de Comunicaciones de Estados Unidos (FCC). La operación está sujeta a las dos condiciones siguientes: (1) este dispositivo no puede causar interferencia perjudicial y (2) este mecanismo debe aceptar cualquier interferencia recibida, incluida la in-terferencia que puede provocar una operación no deseada.
• Compruebe para saber si hay piezas dañadas. Una pieza que esté dañada debe ser reparada o sustituida por el fabricante antes de su uso posterior a menos que se indique lo contrario en este manual de instrucciones. INSTRUCCIONES DE SEGURIDAD ESPECÍFICAS PARA LOS CABLES ELÉCTRICOS • No tire del cable. Nunca transporte el aparato por el cable ni lo jale para desconectarlo del tomacorriente. Mantenga el cable alejado del calor, el aceite y los bordes afilados.
PELIGRO: Nunca modifique el cable o enchufe de CA suministrado; si no se adapta apropiadamente al tomacorriente, solicite a un electricista calificado que instale el tomacorriente. Una conexión incorrecta puede provocar una descarga eléctrica. INSTRUCCIONES DE SEGURIDAD ESPECÍFICAS PARA CARGADORES DE BATERÍA ADVERTENCIA, PELIGRO DE ESTALLIDO: No utilice la unidad para cargar las baterías secas que se usan normalmente con los aparatos domésticos.
• Los vehículos que tienen sistemas computarizados incorporados pueden resultar dañados si la batería del vehículo se arranca mediante puente. Antes de arrancar mediante puente, lea el manual del cliente del vehículo para confirmar que la ayuda externa para arrancar es adecuada. • Cuando trabaje con baterías de plomo-ácido, asegúrese de que siempre haya ayuda inmediata disponible en caso de accidente o emergencia.
Cuando la batería está instalada en un vehículo, siga estos pasos ADVERTENCIA: Una chispa cerca de la batería puede causar una explosión. Para reducir riesgo de una chispa cerca de la batería: 1. Mantenga los cables de CA y CC alejados del capó, la puerta y las partes moviles del motor. 2. Manténgase alejado de las paletas del ventilador, correas, poleas y otras partes que pueden provocar lesiones a las personas. 3. Controle la polaridad de los bornes de la batería.
CONSERVE ESTAS INSTRUCCIONES ADVERTENCIA: PARA REDUCIR EL RIESGO DE LESIONES: Siga estas instrucciones y las publicadas por el fabricante de la batería y el fabricante de cualquier equipo que tenga la intención de utilizar con esta unidad. Revise las indicaciones sobre precauciones en estos productos y en el motor. INTRODUCCIÓN Gracias por elegir el Cat® cargador de baterías de rueda automático. Con el cuidado y uso apropiados, que le dará años de servicio confiable.
CONTROLES Y FUNCIONES 7 5 4 6 3 8 9 10 11 12 13 2 1 CARACTERÍSTICAS 7. Manija 8. Botón de carga de batería 9. Pantalla del LCD digital (vista detallada siguiente manera) 10. Botón de arranque del motor 11. Botón de comprobación del alternador 12. Botón de verificación de voltaje de la batería 13. Botón de reacondicionamiento de la batería 1. Wheels (2 in total) 2. Soporte de base 3. Cable y enchufe de 120 voltios CA 4. Barra de almacenamiento de las pinzas de batería 5.
Detalle de la pantalla LCD AFFICHAGE DIGITAL (VARIE SELON LA FONCTION) AMPÈRES / TENSION / SECONDES INDICATEUR INDICATEUR DE RECONDITIONNEMENT DE BATTERIE ICÔNES DE LA PINCE JAUGE DE CHARGE DE BATTERIE ICÔNE D’ERREUR ICÔNES DE RECONDITIONNEMENT DE BATTERIE ICÔNES DE FLÈCHE ICÔNE DE BATTERIE ICÔNE ALTERNATEUR BASSE TEMPÉRATURE ENVIRONNANTE ICÔNE ICÔNE DE L’ALARME ICÔNE DE DE SURCHAUFFE DÉMARRAGE DE MOTEUR HAUTE TEMPÉRATURE ENVIRONNANTE ICÔNE INSTRUCCIONES DE OPERACIÓN Carga de batería ADVERTENCIA: P
mostrará lo siguiente (los iconos de las pinzas, los iconos de flecha, el icono de batería y el medidor sin el puntero sólido iluminar): Si las abrazaderas están conectadas INCORRECTAMENTE con respecto a polaridad, la pantalla del LCD demostrará lo siguiente (el signo “+” y el signo “–” dentro del icono de la batería y el ícono de fallo destellará y los iconos de la pinza, la icono de la batería y el medidor sin el puntero se iluminan) y una advertencia sonará hasta que las pinzas sean separado: Desenchuf
de la culpa y el icono de la batería destellará; y los iconos de la pinza, los iconos de flecha y el medidor sin el puntero sólido iluminar): Desconecte el cargador. Haga que la batería sea comprobada por un técnico calificado. IMPORTANTE: Si la batería no está completamente cargada (el indicador de carga de la batería no llega al 100%) después de 18 horas de carga continua, la batería puede tener daños internos y no aceptará la carga.
PARA COMPROBAR EL VOLTAJE DE LA BATERÍA EN MODO DE CARGA: Pulse el botón de verificación de la batería voltaje y la pantalla LCD mostrará lo siguiente: La pantalla digital muestra la tensión de la batería conectada durante 10 segundos. Durante este período, pulsar el botón de verificación de voltaje de batería devolverá la unidad al modo de carga. La unidad volverá al modo carga automáticamente después de 10 segundos.
1. Presione el botón de verificación del alternador para comenzar el chequeo. La pantalla LCD exhibirá lo siguiente para indicar que la unidad está analizando el alternador: “Check” destellará y el icono del alternador y el medidor sin el puntero se iluminará sólido. 2. Si la unidad detecta que el alternador es bueno, la pantalla del LCD exhibirá lo siguiente: “Good”, el icono del alternador y el medidor sin el puntero se iluminará sólido. 3.
Importante: Si 5 ciclos de reacondicionamiento no mejoran el funcionamiento de la batería, suspender y recicle la batería. El cargador pasará al modo de carga después de 24 horas automáticamente. Al desconectar el cargador, desconecte el cable de la CA, quite la abrazadera de chasis del vehículo, y después quite la abrazadera del terminal de la batería. Usando la función del comienzo del motor 1.
ACCESORIOS Accesorios recomendados para uso con esta unidad puede ser disponibles a través del fabricante. Si necesita ayuda con respecto a los accesorios, por favor póngase en contacto con el fabricante al 1-877571-2391. ADVERTENCIA: El uso de cualquier accesorio no recomendado para el uso con esta unidad podía ser peligroso. INFORMACIÓN DE SERVICIO Si usted necesita asesoramiento técnico, reparación, o partes genuinas del fabricante, póngase en contacto con el fabricante al 1-877-571-2391.