
Full Product Manual


9
9
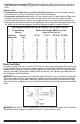
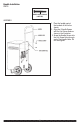
DIGITAL DISPLAY (VARIES BY
FUNCTION)
AMPERES/ VOLTAGE/ SECONDS
INDICATOR
BATTERY RECONDITION
INDICATOR
CLAMP
ICONS
FAULT ICON
BATTERY
RECONDITIONING
ICONS
BATTERY ICON
ALTERNATOR ICON
ARROW ICONS
HIGH SURROUNDING
TEMPERATURE ICON
BATTERY
CHARGE
GAUGE
LOW SURROUNDING
TEMPERATURE ICON
ENGINE START
ICON
OVERHEAT ALARM
ICON
LCD Display Detail
OPERATING INSTRUCTIONS
Charging the Battery
warning: TO REDUCE THE RISK OF INJURY OR PROPERTY DAMAGE:
•
Always disconnect the AC plug from the AC outlet first before disconnecting the charger from the
battery to be charged.
•
Ensure that all installation, operating instructions and safety precautions are understood and
always carefully followed by the steps outlined in the “IMPORTANT SAFETY INSTRUCTION”
section at the front of this manual.
1. Plug the battery charger’s power cord into an AC outlet. The LCD screen will display the following
(the clamp icon will flash, the empty battery icon and the gauge without the pointer will light):
2. The charger’s battery clamps are color-coded. Red is positive; black is negative. Connect the battery
clamps correctly to the corresponding connectors on the battery posts following the steps outlined
in the “IMPORTANT SAFETY INSTRUCTION” section at the front of this manual.
Notes:
If the clamps are correctly connected with regard to polarity and the unit is properly
connected to the AC outlet, the unit will be in Standby mode and the LCD screen will display the
following (the clamp icons, arrow icons, the battery icon and the gauge without the pointer light
solid):