
Manual


DECORATIVE EXTRACTOR HOODS
Dear client,
We are sure that the purchase of our extractor hood will fully satisfy all of your needs.
Please read this instruction manual carefully in order to obtain the best results from the use of the hood.
INSTRUCTIONS FOR INSTALLATION, MAINTENANCE AND USE
General indications
Before installing and using the hood, be sure that the voltage (V) and the frequency (Hz) indicated on the feature plate match
the voltage and frequency at the installation site.
The feature plate and technical data are shown on the inside of the product.
For better performance in extracting fumes we advise that tubing installed should be of a diameter not less than 120 mm. We
also advise using rigid PVC tubing.
ELECTRICAL CONNECTION
Connect the cord to a socket or double pole switch.
The manufacturer shall not be liable for failure to observe all safety regulations in force for the correct and normal operation of
electrical parts.
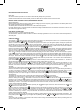
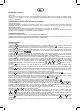
CONTROL PANELS:
On/off button (1
): Starts the motor at the first speed if the motor is off, and stops the motor if it is on, whatever the speed.
The ventilator symbol (A
) appears when the motor is switched on.
Button to increase the speed (2
): Increases the speed of the motor up to the highest speed, causing the speed bars
(symbol B) on the LCD screen to appear as the speed increases. Pressing the button once will increase the speed by one
level; by holding the button down for more than 0.5 seconds, the speed will continue to increase until it reaches the maximum
or the button is released. At the maximum speed, the turbo icon (C
) lights up.
Button to decrease the speed (3
): Decreases the speed of the motor to its lowest speed, causing the speed bars (symbol
B) on the screen to disappear. Pressing the button once will decrease the speed by one level; by holding the button down for
more than 0.5 seconds, the speed will continue to decrease until it reaches the minimum or the button is released.
Timer (4
): Pressing it activates the motor's automatic stopping process. When activated, the motor will continue to operate
at its existing speed for five minutes after which time it will reduce its speed to the level immediately lower at which it stays for
another five minutes. This cycle is repeated until the motor is operating at the lowest speed, which it does for five minutes and
then stops. When this function is activated, the timer symbol (D
) on the LCD screen will start to flash and the speed bars
corresponding to the active speed will remain in flashing mode while the process lasts. This function can be deactivated by
pressing the (1
), (2 ), (3 ) or (4 )button.
Light on/off button (5
): The extractor-fan light comes on at the intensity at which it was set when it was last on. The level of
the light intensity when disconnected will be stored in its memory unless there is a power cut.
Button to increase the light intensity (6
): Increases the light intensity. Pressing it once increases the intensity by "one
point"; if the button is held down for more than 0.5 seconds, the light intensity will continue to increase until it is at the
maximum or the button is released. This button has a second function of moving the clock forward when the (8
) button is
activated.
This button has a third function of adding to the time on the alarm when the (9
) button is activated.
Button to decrease the light intensity (7
): Decreases the light intensity. By pressing it once, the light intensity decreases by
one point; if the button is held down for more than 0.5 seconds the light intensity will continue to decrease until it is at the
lowest level or the button is released. At the minimum, the moon symbol (E
), representing the night light, appears.
Pressing the button once when the light is off will set the control at the night-light level indicated by the moon symbol (E
)
which lights up.
This button has a second function of moving the clock back when the (8
) button is activated.
This button has a third function of reducing the time on the alarm when the (9
) button is activated.
Button for setting the time (8
): This button is used to set the clock (F) which uses the 0h-12h format and AM-PM symbol.
Pressing it once causes the clock's digits to start flashing and activates the second function of the (6
) and (7 ) buttons
which are used to increase or decrease the time respectively. Each press of these buttons causes the time to move forward or
backward by 1 minute. If the buttons are held down for more than 0.5 seconds, the time will move forward or backward more
quickly until the buttons are released.
Once the correct time has been established, pressing the (8
) button again will set the time and restore the (6 ) and
(7
) buttons to their main function.
Button to select the countdown alarm (9
): Pressing this button will activate the alarm (G). When pressed once, it causes the
digits of the clock to start flashing the time recorded in its memory, and activates the third function of the (6
) and (7 )
buttons which are used to increase or decrease the time respectively. Each press of these buttons causes the time to
increase or decrease by 1 minute. If they are held down for more than 0.5 seconds the time will increase or decrease more
quickly until the buttons are released.
Once the time has been set, after five seconds (or earlier by pressing button 9 again) the alarm countdown will activate, the
bell symbol (symbol H
) will light up, the digits will stop flashing and the (6 ) and (7 ) buttons will revert to their main
function.
At the end of the countdown, to show that it has ended, a buzzer will go off intermittently, which will stop sounding after one
minute or when button 9 is pressed.
GB