Professi o n a l Su p p l i es MAGNETRON MICROWAVE OVEN Model: *688.212 GEBRUIKSAANWIJZING (p. 2-14) INSTRUCTION MANUAL (p.
Bewaar deze gebruiksaanwijzing op een veilige plaats Lees vóór gebruik van de magnetron deze gebruiksaanwijzing zorgvuldig door. Bewaar haar voor toekomstig gebruik. Als u de instructies in de gebruiksaanwijzing in acht neemt, zult u van de magnetron vele jaren plezier hebben. VOORZORGSMAATREGELEN OM MOGELIJKE BLOOTSTELLING AAN OVERMATIGE MAGNETRONENERGIE TE VOORKOMEN NEDERLANDS 1.
688212 nl en ma 2016 3 NEDERLANDS 9. Indien u rook signaleert, zet de magnetron dan uit of haal de stekker uit de contactdoos en houd de deur gesloten ter voorkoming van vlammen. 10. Kook het voedsel niet te gaar. 11. Gebruik de magnetronruimte niet voor opslagdoeleinden. Sla geen producten zoals brood en koekjes op in de magnetron. 12. Verwijder sluitclipjes en metalen grepen van papieren en plastic bakken of zakken voordat u ze in de magnetron plaatst. 13.
Het risico op persoonlijk letsel verminderen Aardingsinstructies GEVAAR Risico van elektrische schok Het aanraken van de inwendige onderdelen kan leiden tot ernstig letsel of overlijden. Demonteer dit apparaat niet. NEDERLANDS WAARSCHUWING Risico van elektrische schok Steek de stekker van het apparaat pas in een contactdoos als het correct geïnstalleerd en geaard is. Dit apparaat moet worden geaard.
Materialen die geschikt zijn voor gebruik in de magnetron Aluminiumfolie Opmerkingen Alleen afdekken. Met kleine gladde stukken kunnen dunne stukjes vlees of gevogelte afgedekt worden om te gaar koken te voorkomen. Er kunnen vonken voorkomen als de folie te dicht bij de magnetronwanden is. De afstand tussen de folie en de magnetronwanden moet ten minste 2,5 cm bedragen. Bruineringsschaal Volg de aanwijzingen van de fabrikant.
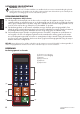
OPSTELLING VAN DE MAGNETRON Benaming van de magnetrononderdelen en de accessoires Haal de magnetron en alle materialen uit de doos en de magnetronruimte. De magnetron wordt geleverd met de volgende accessoires: Gebruiksaanwijzing A NEDERLANDS C B D A. Control panel B. Observation window C. Door assembly D. Safety interlock system Opmerking: 1. Druk niet met kracht op de keramische plaat. 2. Hanteer de keramische plaat voorzichtig tijdens het gebruik. 3.
Installatie op werkblad Verwijder al het verpakkingsmateriaal en de accessoires. Controleer de magnetron op schade, zoals deuken of een beschadigde deur. Installeer de magnetron niet als hij beschadigd is. Behuizing: Verwijder alle beschermfolie van het oppervlak van de magnetronbehuizing. Verwijder niet het lichtbruine micakapje dat is bevestigd aan de magnetronruimte om de magnetron te beschermen NEDERLANDS Installatie 1.
Uitwendige equipotentiale Aardklem (alleen export) Het apparaat heeft een secundaire aardklem. De aardklem biedt een externe massaverbinding die gebruikt wordt in aanvulling op de aardpen van de stekker. Hij bevindt zich aan de buitenkant op de achterzijde van de magnetron en is aangegeven met het onderstaande symbool. Reinigingsinstructies NEDERLANDS Houd de magnetron altijd schoon 1. Het kijkvenster, de binnenzijde van de deur en de voorzijde van de magnetron reinigen.
BEDIENINGSINSTRUCTIES Er zijn vijf vermogensniveaus beschikbaar. Niveau Hoog Middelhoog Middelmatig Ontdooien Nul Vermogen 100% 70% 50% 20% 0% 70 50 20 00 Display Bijlage A Gebruiksopties Optie Instelling 1 Pieptoon einde bereiding 2 Volume pieptoon 3 Toetspieptoon aan/uit 4 Toetsenbordvenster 5 Instantbereiding 6 Deurreset 7 Maximale tijd 8 Handmatige instelling 9 Een-/tweecijferige modus NEDERLANDS De standaardwaarden staan vetgedrukt.
1. Inschakelen "−− −−" geeft weer wanneer de magnetron de eerste keer op de stroomvoorziening aangesloten en ingeschakeld wordt. Als de toets ingedrukt wordt, gaat de magnetron in de inactieve modus. Opmerking: in de inactieve modus reageert de magnetron niet als er een toets ingedrukt wordt. NEDERLANDS 2. Inactieve modus 1. Inschakeling: De magnetron gaat in de inactieve modus als er in de actieve modus of de pauzemodus een aantal seconden verstreken is zonder dat de deur geopend en gesloten wordt.
7. Handmatige bereidingsmodus 1. Druk op de toets om de magnetron in de handmatige bereidingsmodus te zetten. 1. In deze modus wordt de resterende bereidingstijd weergegeven. De ventilator en verlichting zijn ingeschakeld. 1. Als het bereidingsprogramma voltooid is, gaat de magnetron in de modus voor einde van de bereidingscyclus. Als in deze modus de toets ingedrukt wordt, gaat de magnetron in de NEDERLANDS pauzemodus. 8. Modus voor einde van de bereidingscyclus 1.
5. De bereidingsfactor wijzigen: Als op de toets ‘X2’ wordt gedrukt, wordt ‘CF:XX’ op het display weergegeven. De standaardfactor is 80%. Op het display wordt ‘CF:80’ weergegeven. Druk simpelweg op een van de cijfertoetsen om het vermogensniveau te wijzigen. 6. Druk binnen 30 seconden na het instellen van de bereidingstijd en het vermogensniveau op de toets om het bereidingsprogramma op te slaan. Nadat het programma is opgeslagen, wordt ‘PROGRAM’ op het display weergegeven. NEDERLANDS 7.
14. Gebruiksoptiemodus 1. Open de deur en druk gedurende 5 seconden de cijfertoets ‘2’ in. De buzzer klinkt eenmaal en deze modus wordt ingeschakeld. 2. Op het display wordt "OP:−−" weergegeven. 3. Druk op een cijfertoets om de bijbehorende instelling in te voeren. Voorbeeld: het geluidsniveau van de buzzer instellen op normaal. Druk op de cijfertoets ‘2’. Op het display wordt ‘OP:22’ weergegeven. NEDERLANDS Houd de cijfertoets ‘2’ ingedrukt om dit te wijzigen.
BEREIDINGSTIPS NEDERLANDS PRODUCT TIJD VERMOGEN 1 Sandwich 40 seconden P100 2 Kippenborst 50 seconden P100 3 Pizza 3 minuten en 55 seconden P70 Probleemoplossing De magnetron mag niet gebruikt worden zonder dat er voedsel in zit. Dit is erg gevaarlijk. Normaal Storing van tv-ontvangst door magnetron. Radio- en tv-ontvangst kunnen gestoord worden bij gebruik van de magnetron.
Save these instructions carefully Read these instructions carefully before using your microwave oven, and keep it carefully. If you follow the instructions, your oven will provide you with many years of good service. PRECAUTIONS TO AVOID POSSIBLE EXPOSURE TO EXCESSIVE MICROWAVE ENERGY ADDENDUM If the apparatus is not maintained in a good state of cleanliness, its surface could be degraded and affect the lifespan of the apparatus and lead to a dangerous situation. Specifications Model: *688.
ENGLISH 12. Remove wire twist-ties and metal handles from paper or plastic containers/bags before placing them in the oven. 13. Install or locate this oven only in accordance with the installation instructions provided. 14. Eggs in their shell and whole hard-boiled eggs should not be heated in microwave ovens since they may explode, even after microwave heating has ended. 15.
To Reduce the Risk of Injury to Persons Grounding Installation WARNING Electric Shock Hazard Improper use of the grounding can result in electric shock. Do not plug into an outlet until appliance is properly installed and grounded. This appliance must be grounded. In the event of an electrical short circuit, grounding reduces the risk of electric shock by providing an escape wire for the electric current. This appliance is equipped with a cord having a grounding wire with a grounding plug.
Materials you can use in microwave oven Utensils Aluminum foil Remarks ENGLISH Shielding only. Small smooth pieces can be used to cover thin parts of meat or poultry to prevent overcooking. Arcing can occur if foil is too close to oven walls. The foil should be at least 1 inch (2,5 cm) away from oven walls. Browning dish Follow manufacturer’s instructions. The bottom of browning dish must be at least 3/16 inch (5 mm) above the turntable. Incorrect usage may cause the turntable to break.
SETTING UP YOUR OVEN Names of Oven Parts and Accessories Remove the oven and all materials from the carton and oven cavity. Your oven comes with the following accessories: Instruction Manual A ENGLISH C B D A. Control panel B. Observation window C. Door assembly D. Safety interlock system Note: 1. Don't press the ceramic board forcibly. 2. Take and put the ceramic board gently during the operation. 3. After the unit be using, don't touch the ceramic board by hand because of the high temperature.
Installation 1. Select a level surface that provide enough open space for the intake and/or outlet vents (Figure1). 12 inch(30cm) 3.0 inch(7.5cm) OPEN 3.0 inch(7.5cm) ENGLISH A 10-cm spacing should be kept between the appliance and right and back walls, and a 30-cm spacing kept on the top. Never dismantle the appliance’s feet, nor block the air intake and exhaust opening. The left side must be open. 1. Blocking the intake and/or outlet openings can damage the oven. 2.
External Equipotential Earthing Terminal (export only) Equipment has secondary earthing terminal. Terminal provides external earthing connection used in addition to earthing prong on plug. Located on outside of oven back, terminal is marked with symbol shown below. Always keep the oven clean 1. Cleaning the glass viewing window, the inner door panel and oven front face.
OPERATION INSTRUCTION Five power levels are available. Level High M. High Med. Defrost Hold Power 100% 70% 50% 20% 0% 70 50 20 00 Display Appendix. A User Options Items bolded below are the default values.
1. Power Up "−− −−" displays when the oven is electrified for the first time. If button pressed, the oven will change to idle mode. Note: Under idle mode, no button can be pressed. 2. Idle Mode 1. Entry: The oven shall enter idle mode after a set of seconds have expired in Ready Mode or Pause Mode without a keyboard press or a door open and close. The number of seconds is determined by the keyboard Timeout Window, set by User Option 4. 2. During idle mode, the display is blank.
7. Manual Cook Mode 1. Pressing the pad will cause to the oven to begin Manual Cook Mode. 2. During this mode, remaining cooking time displays. The fan and oven lamp will work. 3. When cooking program finish, the oven will enter End of Cook Cycle Mode. If you press button under this mode, the oven will enter Pause Mode. 8. End of Cook Cycle Mode 1. After the time has expired in a Manual Cook Mode, or a Preset Program Cook Mode, the oven shall go into The End of Cook Cycle Mode. 2.
8. Close the door, the oven will turn back to Ready Mode. If press button during setting process, the oven turn to Door Open Mode. The program that not saved will be lost. If there is program saved as memory procedure, press the related number button, the saved program will start. If no saved program, the buzzer will alarm when pressing number button and it will not work. Note: 1. If the electricity is cut off, the saved program will not lost. 2. If the program need to reset, just repeat the above steps.
EXPERT COOKING GUIDE ITEM TIME POWER 1 Sandwich 40 seconds P100 2 Chicken breast 50 seconds P100 3 Pizza 3 minutes 55 seconds P70 Trouble shooting It is forbidden to run the unit without any food inside. It is very dangerous. Normal ENGLISH Microwave oven interfering TV reception Radio and TV reception may be interfered when microwave oven operating. It is similar to the interference of small electrical appliances, like mixer, vacuum cleaner, and electric fan. It is nominal.