
Instructions / Assembly

STEP 2
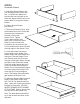
Attach Drawer Glides to Glide Support Sticks
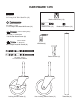
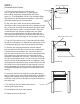
A. Take the drawer glides, extend them to their fullest. See illustration 4. The glide has 3 parts. Remove
the furthest extended part (1) (smallest) by pushing the black plastic lever down – then pull part out,
separating it. This part will attach to the drawer side later. Attach the largest parts (2&3) to the glide
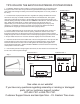
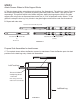
support stick using holes as illustrated. Attach with Two (2) 7/16” #6 panhead screws. About 1” of the
glide will overlap the front leg. Only 2 holes in the glide support sticks will be used.See illustration 5.
B. Repeat with other side.
Push down on the black tab and pull out
Gets attached to the Drawer Side Gets attached to the Glide Support Brace
(1) (2) (3)
(1) (2) & (3)
Illustration 4
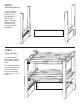
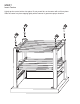
Prepare Side Assemblies for back braces
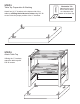
C. The top back brace utilizes the Bastion system for attachment. Place the Bastion posts into their
positions on the back legs only of both side assemblies.
This end of Glide
overlaps leg about
1 1/4 inchs.
Note: sliding part should
extend further as illustrated.
Left Back Leg
Left Front Leg
Illustration 5
Tab faces out
This side goes against glide support brace