C R A F T S M E N, I N C. Assembly Instructions Model 1538 A. These units are Ready-To-Assemble. Catskill uses positive fastening methods such as wood screws and in some places hidden Bastion Fasteners. You will need some standard household tools: hammer and screwdriver. A power screwdriver is recommended. Where possible, we have packaged some of the screws in separate labeled packages. To keep hardware separate after packets are open, we suggest you place each type of screw into separate containers.
Parts List Model 1538 Side Panel (2) P/N SP/HDL-1538 Back Panel (1) P/N BP-1538 Drop Leaf (1) P/N DL-1538 Drawer Front (1) P/N DF-1538 Top Front Brace (1) P/N B-34 1/4 / 2 1/2 /TF-1538 Bottom Front Brace (1) P/N B34 1/4 / 2 1/2 /BOT-1538 Knife Rack Face (1) P/N KR-1538 Center Shelf (1) P/N CS-1538 Glide Support (2) P/N GLDSUP-1538 Table Top (1) P/N TT-1538 Drawer Back (1) P/N DBK-1538 Bottom Shelf (1) P/N BS-1538 Knife Rack Side (2) P/N KR-SIDE-1538 Right Drawer Side (1) P/N DS-1538/R Left Dra
1 3/4” Phillips Flat Head Bolt (8) Nickel Handle (6) 1 1/4” Phillips Flat Head #8 Screw (20) 5/8” Phillips Flat Head #8 Screw (20) 3/16” Flat Washer (8) 10-24 Hex Nut (8) Bastion Post (2) Bastion Set Screw (2) 5/8” Phillips Flat Head #6 Screw (12) 5/8” Phillips Flat Head #5 Screw (4) 5/8” Phillips Flat Head #4 Screw (4) “L” Bracket (4) 5/8 Wooden Disk (8) Bastion Barrel Nut (2) Polished Nickel Towel Bar (1) 5/8” #6 Pan Head Screw (8) Drawer Hinge (2) 1” Truss Head Machine Screw (12) Cabinet 1 1/
STEP 1 A. Tap/insert ONE 1 1/2” pin into each end of all the doors. DON’T OVERDRIVE PINS! Pins should stick up about 1/2” when seated. B. Attach the magnet plate (may be stuck to magnet!) with the 1/2” #4 screw to the top of the doors. Bumps go toward the wood. C. Attach door handles with 1” truss head machine screws. ILLUSTRATION 1 STEP 2 A. Take the 2 front braces and tap/insert one 3/4” steel pin into each end of both braces until seated. About 3/8” will stick out when seated. OK if loose.
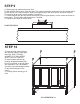
STEP 3 A. Assemble Knife Rack by inserting four brass colored 1 1/4” #8 Screws through the countersunk (reamed out) holes in the Knife Rack into the pilot holes in the long edges of the Knife Rack Sides. Tighten untill Seated. Sides will be flush with the bottom of the face leaving a space at the top. ILLUSTRATION 3 STEP 4 A. Attach the Drawer Back to the Drawer Sides with four 1 1/4” #8 screws. There are left and right sides.
STEP 5 A. Attach a Glide Support Stick to the top of each Side Panel using 1 1/4” #8 screws. The countersunk holes (reamed out) in the stick are positioned as in illustration 5 so that the glide holes are toward the lower edge. Sticks should be flush with top of panel. B. Attach the cabinet glide of the Drawer Glides to the Glide Support Stick using 5/8” #6 flat head screws. Left glide to left Side Panel, right glide to right Side Panel.
STEP 6 A. Lay Back Panel flat on a smooth surface with holes up. B. Attach Side Panels with 1 3/4” machine screws (bolts) and hex nuts. After inserting bolts(s) thru the holes in the Side Panels, thru the holes in the long edges of the Back Panel, place a hex nut on the tip of your finger, align nut with bolt and tighten. C. Look ahead to step 7 which shows side panels attached to back panel. NOTE: Make sure you position the side panels according to Drawer Glides (left or right).
STEP 8 A. Install Doors by fitting the pins in the top of the door into the holes in the Top Front Brace. B. Place washers on the pins on the bottom of the doors, then fit the Bottom Front Brace onto the pins and secure the brace using 1 3/4” machine screws and nuts as in illustration 8A. C. Tap two 1” pins into the back panel, two into the holes on the inside of the Bottom Front Brace and two into each Side Panel as in illustration 8B. These will hold the Bottom Shelf.
STEP 9 A. Stick magnet to magnet plate on a door. B. With all other doors open, close the door. The magnet should be positioned over the wooden block on the bottom of the top front brace. Hold the magnet in place with your thumb, and open the door. The magnet will be in the correct position on the block. C. Secure magnet with the two round head screws in the magnet packet. Center screws in the slot in the magnet . This will allow adjustment later, if needed. D. Repeat these steps for all the doors.
STEP 11 A. Upright unit. B. Determine if you want the Knife Rack on the left or right Side Panel. The Handle/Towel Bar will go on the other. Then attach the Knife Rack to the Side Panel with two 1 1/4” x #8 screws from inside the panel. Place a washer over the screw so that so that the head won’t pull through the side panel. C. Attach Towel Bar to the other Side Panel with 1 1/4” #8 screws from inside the Side Panel. Place a washer over each screw. ILLUSTRATION 11 STEP 12 A.
STEP 13 A. Choose at which height you want the middle shelf to be from the two sets of holes in the Back & Side Panels. Then tap 1” pins into the 6 holes in the Back & Side Panels. B. Fit the middle shelf into the cart and rest it on the pins. ILLUSTRATION 13 STEP 14 A. Assemble top by placing the top and the drop leaf upside down on a smooth flat surface. Install hinges using 5/8 #8 screws. The longer part of the hinge goes on the drop leaf with the short part on the cart top.
STEP 15 A. Slide the Drawer into the front of the cart. B. Tap in the 5/8 wooden plugs into the holes on the legs. C. Install Middle Shelf simply by sliding it in. D. Illustration 15B shows completed 1538.
121207 For continued beauty and long life of your Catskill Craftsmen cart, we recommend Catskill Craftsmen’s Butcher Block Oil. If you would like to purchase Butcher Block Oil directly from Catskill Craftsmen’s factory, we offer a reduced price. For one eight ounce (8 fl. oz.) bottle, which is sufficient for two applications, simply send $5.95 along with the completed coupon to the address below. C R A F T S M E N, I N C.
TIPS ON HOW THE BASTION FASTENING SYSTEM WORKS 1. The Bastion fastening system consists of a steel post (threaded on one end with a hole through the shaft on the other end); a Barrel Nut (cylindrical barrel-shaped with threaded open end & holes through the sides); and a Set Screw (Phillips slot on one end, pointed on the other) 2. To attach Posts: A) Dip threads of Post in vegetable oil.