Instruction Manual CADA-U3E4 4-Bay USB 3.0 RAID EXTERNAL Cavalry, the names of series and the Cavalry logo are registered trademarks of Cavalry Storage. All other trademarks or registered trademarks are the property of their respective owners. When referring to hard drive capacity, one gigabyte, or GB, equals one billion bytes, and one terabyte, or TB, equals one trillion bytes. Your computer’s operating system may use a different standard of measurement and report a lower capacity.
Table of Contents Chapter 1. Getting Started ............................................................................... 1 Features and Applications ......................................................................................... 1 Specifications ............................................................................................................. 1 System Requirements ................................................................................................ 1 Package Content .....
GETTING STARTED CHAPTER 1 APPLICATIONS FEATURES Thank you for purchasing the Cavalry four-bay eSATA/ USB 3.0 RAID enclosure. The CADA-U3E4 was designed to be the ultimate in storage security and power. The multiple RAID modes allow users to have discrete RAID arrays, using multiple disks, and still retain the ability to setup and test new drives on-the-fly.
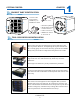
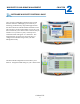
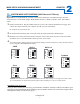
GETTING STARTED CHAPTER PRODUCT PART IDENTIFICATION 3. EASY YOUR PC 4-BAY RAID HDD Backup Solution HDD 4 4. 1. Interface LED 2. Power Button 3. HDD Trays (4) 4. HDD Status LEDs 5. 6. USB 3.0 Cable 7. 8. HDD 3 1. 2. USB eSATA ERROR REBUILD POWER HDD 2 HDD 1 Power Supply 5. Reset/Set Up Button 6. Mode Setting Switch 7. eSATA Connector 8. USB 3.0 Connector 9. HDD Power Switch 10. Power DC In 1 10. 9.
GETTING STARTED CHAPTER DESCRIPTION OF RAID-MODES 1 RAID modes and terminology can be a little confusing to the un-initiated. Rather than try to explain the exact mechanisms that underlie each mode, we will describe each one in terms of what they can do for you. Then, you can carefully choose the appropriate mode for your application. Normal JBOD Mode (Just a Bunch Of Disks) This really isn’t a RAID mode at all. JBOD simply allows you to see and use each drive separately within its bay.
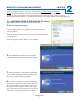
MODE SETUP AND ARRAY MANAGEMENT CHAPTER 2 There are two primary ways to setup your CADA-U3E4: the software method and the switch method. The software method is by-far the easiest. The switch method, at this point in time, is a method that can be used by MAC users and a feature for IT users who are setting up arrays on-the-fly. But for the PC-based customers, we recommend the software method which utilizes the BackupQ application. SOFTWARE MODE-SETUP METHOD (PC Users) 1.
MODE SETUP AND ARRAY MANAGEMENT SOFTWARE MODE-SETUP METHOD: BASIC Once you have installed the application and reviewed the basic functions of BackupQ, you are half-way to mastering your RAID-array! Open BackupQ and click the ‘Basic Mode’ and ‘RAID and Disk Information’ tabs. This will show you the model number of every drive you have inserted into your CADA-U3E4. It will also tell you whether or not you have any arrays currently active. Unallocated disks will appear as “Unreleased”.
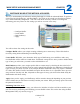
MODE SETUP AND ARRAY MANAGEMENT SOFTWARE MODE-SETUP METHOD: ADVANCED CHAPTER 2 The key to understanding and efficiently utilizing BackupQ lies within the Advanced Mode. To get there, click on the far-left tab that says ‘Advanced Mode’. Now click on the second icon from the top left that says ‘Advanced RAID Configuration’. This will reveal all the necessary controls for creating and monitoring your array.
MODE SETUP AND ARRAY MANAGEMENT CHAPTER SWITCH MODE-SETUP METHOD (MAC Users or PC Users) 2 Important: To set any RAID mode, you have to first reset the mode back to the JBOD setting. Follow the directions below to set all mode settings: JBOD, RAID 0, RAID 1+0, RAID 3, RAID 5, Clone, and Combine modes. 1. Install your hard drives. Plug the CADA-U3E4 into a power source with the included power supply. Next, connect the CADA-U3E4 into your computer via USB 3.0/2.0 or eSATA cable.
YOUR DISK MANAGEMENT UTILITY YOUR DISK MANAGEMENT UTILITY CHAPTER 3 In Windows, they call it “Disk Management”. In Mac, they call it “Disk Utility”. Despite having different names and appearances, both Windows Disk Management and Mac Disk Utility do basically the same thing: they allow you to create, modify and delete any storage volume connected to your computer. In order to get the most out of your CADA-U3E4, you will need to become intimately familiar with your disk management utility.
Initializing and Formatting Your New Array A) B) C) D) E) F) A) B) C) D) E) F) G) H) CHAPTER 4 Windows: Navigate to Disk Management: Start Menu>right-click (My) Computer>select “Manage”>select Disk Management. Once in Disk Management, look for your drives in the bottom-right window. You may have to scroll down to find it. The disk(s) will most easily be recognized by their size. Ex.: If you are initializing a 1 TB drive, look for a drive that is close to the same size; like 931.51 GB.
SUPPORT CHAPTER AFTER THE STORM: REBUILDING A DAMAGED ARRAY 5 One of the best reasons to use a multi-disk array (like RAID 5) is that it automatically rebuilds as soon as you replace the defective drive. The only thing the user will need to do is identify and replace the malfunctioning drive. This is easily done by referring to the drive-bay LEDs on the corresponding front-panel.
SUPPORT CHAPTER HDD LED STATUS CODES 5 Solid Green: A healthy, functioning HDD. Flashing Green/Red: The connected HDD is writing or formatting. Solid or Flashing Orange: The connected HDD is attempting to access the host PC. Solid or Flashing Red: The connected HDD is unhealthy or offline. No LED: No HDD is connected, or the HDD is in-operational. WARNING! Always switch USB cables as your first troubleshooting step for all of the situations below.
SUPPORT CHAPTER WARRANTY INFORMATION 5 Cavalry Storage Inc.