
Instruction manual


EN-CAHDD2B-D
4
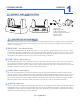
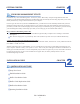
Connect the Cavalry power supply.*
Connect the USB cable to a port on your computer that you
have used recently and know to work well. Take this time to
temporarily eject and disconnect any other external storage
devices you have. This will make it easier to nd your new
Cavalry dock.
Insert the hard drives that you are going to
use into the dock.** Make sure that you handle
them very carefully. Check that they are rmly
inserted into the dock.*** Be sure that you never touch any exposed circuitry or data ports
on the drive or the dock. Hard drives are very fragile devices!
Proceed to the Installation Guides below depending on the RAID-Mode of your choice.
A)
B)
C)
D)
*Note: Take a moment to label your power supply with the Cavalry Model # of your unit. A piece of light-colored masking tape
or an address label works great, and can save you tons of time and frustration down the road. Just make sure it is attached well.
**Note: Depending on the drives used when powering on, allow up to 30 seconds for both drives to spin up to speed.
***Note: Ensure a proper connection when inserting a drive by putting it straight down and not tilting it. If a drive is not being
detected, turn off the dock then remove and re-insert the drive.
Caution: Removing the hard drives from the dock while it is on may result in data loss.
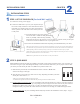
With the dock powered-off, set the RAID-Mode selector switches to JBOD mode
shown in the image on the right.
Turn the dock on. Proceed to one of the next two steps, depending on whether your disks
already have data on them.*, **
Installing Disks with existing data: If you’re installing a disk with data already on it, look for your drive directly in
(My) Computer. If it does not show up, it may simply need to be assigned a new drive letter. It may also need to be
formatted to a different le system or may even have developed a fault since it was last used. Your disk
management utility can perform all of these functions as well as error-checking. See troubleshooting for details.
Installing Blank disks: If you’re installing a blank disk(s) skip ahead to the Initialization section (Step 3 - Page 7).
A)
B)
C1)
C2)
*Allow up to 30 seconds for both drives to spin up to speed.
**Caution: Removing hard drives from the dock while they are being accessed can result in data loss.
1 2 3
1
INSTALLATION STEPS
STEP 1: SET UP YOUR DOCK (For both MAC and PC)
2
CHAPTERINSTALLATION GUIDE
2
STEP 2: JBOD MODE
JBOD installation is almost the same as installing a disk inside of your desktop computer. That is, once connected, you
will need to navigate to your disk management utility in order to locate the disk. There, you can prepare it for use with
your OS. If your disk already has data on it, JBOD is the preferred mode to use.