
Instruction manual


EN-CAHDD2B-D
5
Power the dock off. Both disks should still be in the dock from your JBOD test.
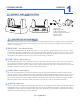
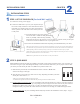
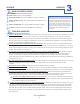
Set switches to RAID 1 mode shown in the image on the right.
Power-on the dock.
Check for 1 unallocated disk in your disk management utility. Now you are ready to
partition and format that disk. As you do so, the invisible “mirrored” disk will receive
all of the same data that the visible “master” disk does.
See the Initialization section for specic formatting and partitioning instructions for your operating system.
A)
B)
C)
D)
E)
There are two ways in which you can use RAID 1:
Create a new RAID 1 array using blank disks.
Duplicating a source disk which already has data on it.
Creating a New (Blank) RAID 1 Array
The process for creating a (blank) RAID 1 array is very simple. Just make sure that each disk is functioning in
JBOD mode rst. The two disks should be the same make and model number. If each disk appears as a separate
blank or “Unallocated” volume within your disk management utility, then they should be ready to create an
array.
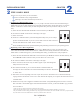
Power the dock off. Both disks should still be in the dock from your JBOD test. Remove the blank disk only. The
EN-CAHDD2B-D will set whichever disk you insert rst as the “source” disk.
Set switches to RAID 1 mode shown in the image on the right.
Power-on the dock, and wait for only one disk to appear in your disk management
utility. This is the source disk.
Now with the dock still on, you can insert the blank or unallocated disk into
the empty slot. The second disk to be inserted automatically becomes the “destination”
or “mirror” disk.
Wait an hour or more (depending on the size of your drives) for the “destination” drive to nish automatically
copying all of the data from the “source” drive. After that time has elapsed, you can power the dock down and reset
it to JBOD mode.
Windows users may need to toggle the destination disk “Online” (using Disk Management) in order to access the
data on the disk.** If both disks appear with identical information on them, you know the RAID 1 copy procedure
was successful!***
A)
B)
C)
D)
E)
F)
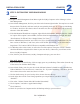
Duplicating a Source Disk Using RAID 1
Before you begin, make sure that each disk is functioning in JBOD mode rst. Then, check the data on the
source disk. The destination disk should be blank or “Unallocated” and, ideally, should be the same make and
model number.* If both disks appear in your disk management utility, you should now be ready to duplicate.
* At the very least, you must use another drive that has the same capacity.
**Some users may also need to assign a new drive letter to the destination disk, before Windows will allow you to access it.
***If you would like to continue using your RAID 1 array, simply power the dock down, and reset it to RAID 1. Now when you power the dock
on, it will continue to mirror the destination drive whenever you add new data to the source.
1 2 3
1 2 3
2
STEP 2: RAID 1 MODE
2
CHAPTERINSTALLATION GUIDE