
Instruction manual


EN-CAHDD2B-D
7
Windows:
Navigate to Disk Management: Start Menu>right-click (My) Computer>select “Manage”>select
Disk Management.
Once in Disk Management, look for your drives in the bottom-right window. You may have to scroll
down to nd it. The disk(s) will most easily be recognized by their size. Ex.: If you are initializing
a 1 TB drive, look for a drive that is close to the same size; like 931.51 GB. Once you’ve found it,
take note of the disk number.
If the Initialization Wizard does not appear, right-click the disk number, and then select the “Initial-
ize” option. If this option is not available, click the white box immediately to the right and select
“New Partition” for XP and “New Simple Volume” for Vista/ 7.
Select “MBR/Primary Partition” and “NTFS” for XP, or for drives that are smaller than 1TB. For
later versions of Windows (7 and Vista), select “GPT/GUID” and “NTFS”, or for drives that are
larger than 1 TB. Caution! GPT/GUID is not compatible with Windows XP!
Let Windows select a drive letter, as well as the rest of the options. Then press “Finish”. Double-
check that Windows assigned a drive-letter to your new drive(s). Otherwise, you will not see the
drive(s) in (My) Computer.
Now, look for your drive-letter(s) in (My) Computer and enjoy your new drive!
Mac OS X 10.4.0+:
Look for the drive in Disk Utility: Click an empty space on your Desktop. Then select (from the top
of the screen) Go>Utilities>Disk Utility.
Once in Disk Utility, look for your drive in the left-hand column. It should be easily identied as a
USB or DMI drive of a size close to it’s stated size. Ex.: If you are Initializing a 1TB drive, look for
a drive that is close to the same size; like 931.51 GB.
Click on the rst entry for your Cavalry drive; the one closest to the top.
On the right, there will be a row listing operations you can perform on your drive. Select
“Partition”.
Now select “Volume Format>Mac OS Extended (Journaled)”.
Click “Options,” and select “Apple Partition Map”.
Click “Partition”.
Check for your drive in Computer and/or the Desktop and enjoy your new drive!
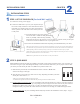
A)
B)
C)
D)
E)
F)
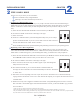
A)
B)
C)
D)
E)
F)
G)
H)
2
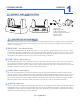
CHAPTERINSTALLATION GUIDE
3
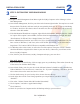
STEP 3: INITIALIZING YOUR BLANK ARRAY