
User`s guide


17
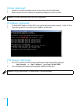
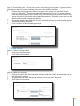
Step 3. Share Permission - Grant users access to existing group-shares. A group-share is
a location in the NAS where multiple users can view and/or edit les.
• Choose any existing group-share(s) to grant users access to, and click “Read
Only” or “Writable” . The group-share will move to the “Access Granted” column
with the chosen permissions. “Read Only” will allow the user to access les in the
group-share but will not be able to edit the contents. “Writable” gives the user full
permission to make changes to the le.
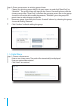
• Remove a group-share from the “Access Granted” column by selecting the group-
share and clicking “Remove”
• Click “Conrm” to nish adding the user.
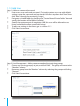
1.1.3 Add Group
Step 1. Choose a group name
• Enter a new group name.
• Click “Next” to continue.
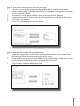
Step 2. Add users to group
• Click on a user in the “Non-member” column and click “Add” to move the user to
the “Member” column.
• To remove a user from the group, choose a user and click “Remove”
• Click “Next” to continue.