
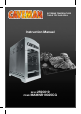
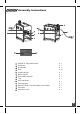
Assembly Instructions

Before testing:
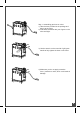
1. Make sure that all packing material is removed from the grill.
2. Do not smoke while leak testing.
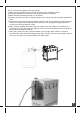
3. Never leak test with an open flame.
4. Make a soap solution with one part liquid detergent and one part water. Prepare a spray
bottle, brush, or rag to apply the solution to the connections. For the initial leak test, make sure
the cylinder is full.
5. Grill must be leak tested outdoors in well-ventilated area, away from ignition sources such as
gas-fired or electrical appliances, and flammable materials.
6. Keep grill away from open flames and/or sparks while testing.
To test:
1. Make sure the gas grill knob is in the “Off” position.
2. Make sure the regulator is connected to the gas cylinder tightly.
3. Completely open the gas cylinder valve by turning counter clockwise. If you hear a “POP”
sound, turn gas off IMMEDIATELY, it indicates a heavy leak at the connection. Call your gas
dealer or fire department.
4. Check every connection from the gas cylinder to the gas grill connection by brushing or
spraying the soapy solution.
5. If soap bubbles appear, there is a leak. Turn off the cylinder valve IMMEDIATELY and re-
tighten connections. Open the cylinder valve again, and recheck.
6. If leaks cannot be stopped, DO NOT ATTEMPT TO REPAIR. Call our service center for help.
7. Always close the cylinder valve after leak test by turning clockwise.
Only those parts recommended by the manufacturer should be used on the grill. Substitution
can void the warranty. Do not use the grill until all connections have been checked and do not
leak.
Very important: Always inspect the hose before each use of this grill.
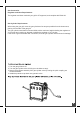
Before igniting the grill,
unscrew the black electronic button, and place a 1.5V AA battery
inside, then tighten it (Remember to replace the battery when no spark is seen).
1. Read instructions before lighting.
2. Turn the knob to “Off” position then open the gas cylinder valve.
3. Simply press the knob in, turn counterclockwise to the maximum position and the burner will
ignite. Before releasing knob, ensure a flame is established, if the burner fails to ignite, put
into “Off” position and try again.
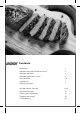
4. If in case of failure of the ignition, a match or lighting devise can be used. Care must be taken
when using this method. Simply place a long mechanical ignition lighter near the ceramic
burner and then push and turn the knob to the maximum position, and make sure the burner
lights and stays lighted.
5. If after 15 seconds the burner has not lit, stop operating the gas grill and wait at least 1
minute before attempting a further ignition of the burner.
6. In the event of the burner flames being accidentally extinguished, turn off the burner control
and do not attempt to re-ignite the burner for at least 1 minute.
7
Leakage Test
Lighting Instructions