INSTRUCTIONS MPEG-4 SUPER CD+G CD+GRAPHICS ECHO - Before operation 2 Preparations 5 Basic operations 7 Advanced operations 10 Karaoke operations 14 Audio/Video files playback 15 Changing the initial settings 17 Additional information 21 ECHO + AY PL MPX Digital Direct Progressive Scan For Customer Use: Enter below the Model No. and Serial No. which are located on the rear, bottom or side of the cabinet. Retain this information for future reference. Model No. Serial No.
Warnings, Cautions and Others Mises en garde, precautions et indications diverses CAUTION RISK OF ELECTRIC SHOCK DO NOT OPEN CAUTION: TO REDUCE THE RISK OF ELECTRIC SHOCK. DO NOT REMOVE COVER (OR BACK) NO USER SERVICEABLE PARTS INSIDE. REFER SERVICING TO QUALIFIED SERVICE PERSONNEL.
Important Product Safety Instruction Electrical energy can perform many useful functions. But improper use can result in potential electrical shock or fire hazards. This product has been engineered and manufactured to assure your personal safety. In order not to defeat the built-in safeguards, observe the following basic rules for its installation, use and servicing. ATTENTION: Follow and obey all warnings and instructions marked on your product and its operating instructions.
USE 1. Accessories Do not place this product on an unstable cart, stand, tripod, bracket, or table. It may fall, causing serious injury to a child or adult, and serious damage to the product. Use only with a cart, stand, tripod, bracket, or table recommended by the manufacturer or sold with the product. Use a mounting accessory recommended by the manufacturer and follow the manufacturer's instructions for any mounting of the product.
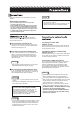
......................................... Supplied accessories Table of contents Check that you have all the following accessories supplied to you. If anything is missing, consult your dealer immediately. Before operation .................................... 2 About playable media .....................................................2 Care and handling of discs .............................................2 Names of parts and controls ...........................................
Discs with the following formats can be played back on the player. DVD, MPEG-4, DiVX, Video CD Super CD+G, CD+Graphics, Audio CD, HDCD MP3, JPEG, Kodak The player can also playback the following discs: DVD-R, DVD+R, DVD-RW, DVD+RW discs CD-R and CD-RW discs If a disc gets dirty, dusty, scratched or warped, playback sound and picture may be deteriorated. Take proper precautions when handling discs. Handling Do not touch the surface of the disc.
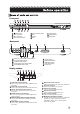
Front panel PLAY PAUSE STOP FWD OPEN/ CLOSE REV DVD MIC POWER Power button MIC 1 Input Jack MIC 2 Input Jack MIC 1 Volume Control Fast Forward Fast Backward Open/Close MIC 2 Volume Control Play Pause Stop Back panel L R SW Y Cb SL SR C ML MR Cr VIDEO COXA S-VIDEO OPTICAL VGA Analog 5.
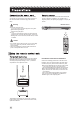
ECHO - ECHO + /EQ MPX 4 POWER REPEAT SUBTITLE Numeric buttons MULTI ANGLE LANGUAGE (AUDIO) TITLE 3D SETUP UP LEFT, ECHO MENU DOWN PLAY PAUSE FAST BACKWARD FAST FORWARD MUTE NTSC/PAL SLOW STEP RETURN PBC LOWER KEY (PITCH) RESET KEY (PITCH) A-B LOOP OPEN/CLOSE RANDOM PROGRAM ENTER RIGHT, ECHO + CLEAR/EQ ZOOM STOP NEXT PREVIOUS VOLUME UP DISPLAY VOLUME DOWN TIME MPX MIC ON (KARAOKE ON) RESUME RAISE KEY (PITCH)
Before using the player, connect the player to a TV and/or amplifier. Before making connections * Do not connect the AC power cord until all other connections have been made. * Connect VIDEO OUT of the player directly to the video input of your TV. Connecting VIDEO OUT of the player to a TV via a VCR may cause a monitor problem when playing back a copy-protected disc. You may also have a monitor problem when connecting the player to an integrated TV/Video system.
When all the audio/video connections have been made, connect the AC power plug first to the player and then to the wall outlet. Make sure that the plugs are inserted firmly. Point the top of the remote control unit toward the remote sensor as directly as possible. If you operate it from a diagonal position, the operating range(approx. 5 m) may be shorter. Remote sensor Warning * Disconnect the power cord: if you are not going to use the player for a long time. before cleaning the player.
PLAY STOP OPEN/CLOSE PLAY PAUSE STOP FWD REV OPEN/ CLOSE DVD When you turn on the player for the first time, you may want to change the settings in the player according your preferences. Use / and ENTER buttons to navigate within SETUP menu. POWER POWER POWER OPEN/CLOSE Numeric buttons SETUP ECHO - Press SETUP. The MAIN PAGE of SETUP MENU appears.
4 Select a desired Audio Output Select an Audio Output according to your audio connection. For COAXIAL or OPTICAL connection to digital amplifier or receiver: -- AUDIO SETUP -- CD Graphics Audio CD 1 2 Press OPEN/CLOSE to open the disc tray. Place a disc in the disc tray. PRO LOGIC SPDIF/RAW 3 Press OPEN/CLOSE to close the disc tray. LPCM OUTPUT SPDIF/PCM 4 Press PLAY. The player starts playback from the beginning.
To check the playback status Press DISPLAY button on the remote control to see the current selection number (the title/chapter number for DVD VIDEO or track number for Video CD/Audio CD), time information (the time elapsed, or time remaining) on the TV screen. To turn off the status bar Press DISPLAY button repeatedly until the status bar goes off. To stop playback temporarily DVD VIDEO Video CD While paused, press STEP button.
DVD VIDEO DVD VIDEO DVD VIDEO discs generally have their own menus which show the disc contents. These menus contain various items such as titles of movies, names of songs, or artist information, and display them on the TV screen. You can locate a desired scene using the DVD menu. 1 While a DVD VIDEO disc is inserted, press MENU. 2 Press / / / press ENTER. 1 Press TITLE. 2 Press / / / press ENTER. The TV screen shows available items in the menu.
CD Video CD Graphics Audio CD DVD VIDEO In stop mode, press PROG. 2 Press the numeric buttons to specify track. 3 Press ENTER. 4 Press the number buttons to program the next track followed by ENTER. Continue to complete the programming. 5 6 7 Audio CD If you press REPEAT in stop mode, press PLAY to start playback. Each time you press REPEAT, the repeat mode cycles among REP-ALL, REP-ONE and OFF. A window which indicates the current repeat mode will be displayed on the TV screen.
DVD VIDEO DVD VIDEO Some DVD VIDEO discs contain more than one subtitle language. You can choose a desired one from them. Hint At the beginning of the part where the subtitles are recorded, appears on the TV screen. 1 2 3 During playback, press SUBTITLE. The subtitle selection window appears on the TV screen. Press SUBTITLE repeatly to make a selection. Each time you press SUBTITLE, the subtitle language changes.
DVD VIDEO Video CD 1 During playback or while paused, press ZOOM. 2 Press 3 To return to normal play, press ZOOM repeatly until ZOOM OFF message appears. Pressing ZOOM causes the player to zoom in on the image. Each time you press ZOOM, the magnification is changed (1.5, 2 and 3 times). / / / to move the zoomed position. NOTE While zoomed, the picture may look coarse.
Super CD+G (SCDG) Operations DVD VIDEO 1 Super CD+G Video CD CD Graphics Audio CD Press MIC ON to set KARAOKE MODE ON. This enables the key control and voice cancel (MPX) features in the player. The SPEAKER SETUP is also automatically changed to DOWNMIX: STEREO. Be sure to set SPDIF OUTPUT as OFF in AUDIO SETUP. Super CD+G 1 Insert the SCDG disc into the player. 2 Using numeric buttons, input a song number or using / buttons, search for a song.
Notes for making files/groups The player can play MP3/JPEG/MPEG-4/DiVX files on a personally recored media as follows: CD-R/RW, DVD-R, DVD+R, DVD-RW Some DVD-R and DVD-RW discs mastered as multi border (multi-session) may not be compatible with the player. You can select and play back files using the SMART NAVI display on the TV screen. The player may be unable to play back the media due to the characteristics or recording conditions.
When you insert a disc with groups and files, the player will automatically begin playback of the MP3, JPEG, MPEG-4, or DiVX contents. Press STOP and the SMART NAVI display that shows the groups and files will appear on the TV screen. You can specify and play back the desired group/file from the SMART NAVI display using the following procedure. 1 To stop playback Press STOP to stop the playback. The SMART NAVI display will show the contents of the disc on the TV screen. Press STOP.
SUBTITLE This section refers to the settings which are already made when you purchase the player. Read this section when you want to change settings according to your preferences and viewing environment. 1 2 3 Press SETUP. Press / to select PREFERENCES. The color of the selected item changes. Press ENTER. The PREFERENCES menu appears on the TV screen.
OSD LANG You can select the on-screen display language of the player. This section refers to the settings which are already made when you purchase the player. Read this section when you want to change settings according to your preferences and viewing environment. 1 2 3 Setting options ENGLISH, SPANISH, FRENCH, GERMAN Some screen messages are shown in English regardless of the setting. You cannot change the language shown in SMART NAVI. Press SETUP. Press / to select GENERAL SETUP.
DOWNMIX You can select a downmix option when the player is connected to an amplifier (sound system) using analog audio outputs. Setting options LT/RT - Analog amplfier with Dolby Prologic decoder connected to the 2 channel downmix outputs. STEREO - Analog stereo amplifier connected to the 2 channel downmix outputs. VSS - Analog amplifier with virtual surround sound 5.1 Ch - 5.1 channel analog amplifier connected to connected to the 2 channel downmix outputs. analog 5.1 channel outputs.
DYNAMIC You can select the level of dynamic range compression in the audio output. Normally, it should be set at FULL. Setting options FULL, 7/8, 6/8, 5/8, 4/8, 3/8, 2/8, 1/8, OFF This section refers to the settings in EQUALIZER which are already made when you purchase the player. Read this section when you want to change settings according to your preferences and viewing environment. 1 This section refers to the settings which are already made when you purchase the player.
MPEG-4 files cannot be played back. The format of the file is not asf. Power Power does not come on. Power plug is not inserted securely. Plug in securely. DiVX files are played back without sound. This player can play back the MP3 sound for the audio part of the DiVX files. Select the proper audio CODEC when making DiVX files. Operation "REGION CODE ERROR!" is shown on the TV screen. Region code of the inserted disc does not match the player.
CAVS LIMITED WARRANTY CAVS DVD KARAOKE CAVS USA Inc. warrants this product and all parts thereof, except as set forth below ONLY TO THE ORIGINAL PURCHASER AT RETAIL to be FREE FROM DEFECTIVE MATERIALS AND WORKMANSHIP from the data of original retail purchase for the period as shown below. ("The Warranty Period") PARTS 1 YR LABOR 90 DAYS THIS LIMITED WARRANTY IS VALID ONLY IN THE FIFTY (50) UNITED STATES, THE DISTRICT OF COLUMBIA AND IN COMMONWEALTH OF PUERTO RICO.
Authorized Service Centers HOW TO LOCATE YOUR CAVS SERVICE CENTER CALL: 1 (562) 777-1846 http://www.cavsusa.com Dear Customer, In order to receive the most satisfaction from your purchase, please read the instruction booklet before operating the unit. In the event that repairs are necessary, please call 1 (562) 777-1846 for your nearest authorized service or visit our website www.cavs.com. Remember to retain your Bill of Sale for Warranty Service.
CAVS USA INC. 10707 Fulton Wells Ave Santa Fe Springs, CA 90670 TEL: 1 (562) 777-1846 http://www.cavsusa.