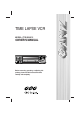
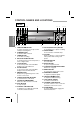
TIME LAPSE VCR MODEL: CTR-030NC-2 OWNER’S MANUAL POWER TIME/CNT/REM V-POS TIMER H-POS REC/PLAY HOURS ALARM/INDEX CURSOR MENU COUNTER TRACKING ENTER CLEAR SHARPNESS LOCK ON OFF SOFT HARD Before connecting, operating, or adjusting this product, please read this instruction booklet carefully and completely.
IMPORTANT SAFETY INSTRUCTIONS CAUTION: PLEASE READ AND OBSERVE ALL WARNINGS AND INSTRUCTIONS IN THIS OWNER’S MANUAL. AND THOSE MARKED ON THE PRODUCT. RETAIN THIS BOOKLET FOR FUTURE REFERENCE. This product has been designed and manufactured to assure personal safety. Improper use can result in electric shock or fire hazard. The safeguards incorporated in this product will protect you if you observe the following procedures for installation, use, and servicing.
INTRODUCTION WARNING : TO REDUCE THE RISK OF FIRE OR ELECTRIC SHOCK, DO NOT EXPOSE THIS PRODUCT TO RAIN OR MOISTURE. CAUTION RISK OF ELECTRIC SHOCK DO NOT OPEN CAUTION : TO REDUCE THE RISK OF ELECTRIC SHOCK, DO NOT REMOVE COVER (OR BACK); NO USER-SERVICEABLE PARTS INSIDE REFER SERVICING TO QUALIFIED SERVICE PERSONNEL.
CONTENTS • Time Lapse VCR Function INTRODUCTION Features/Contents . . . . . . . . . . . . . . . . . . . . . . . . . . . .3 PREPARATION Control Names and Locations . . . . . . . . . . . . . . . . .4-6 Installation/VCR to Monitor and CCD Camera Connection . . . . . . . . . . . . . . . . . . . . . . . . . . . . . . . . .7 Multiplexer/Matrix Switcher Connections . . . . . . . . . .8-9 Alarm Record Connection . . . . . . . . . . . . . . . . . . . . .10 Series Record Connection . . . . . . . . . . . . . . . . .
CONTROL NAMES AND LOCATIONS FRONT 1 2 3 4 5 POWER PREPARATION TIME/CNT/REM V-POS TIMER 6 78 9 10 11 12 13 H-POS REC/PLAY HOURS ALARM/INDEX CURSOR MENU COUNTER TRACKING ENTER CLEAR SHARPNESS LOCK ON 23 22 21 OFF SOFT 20 HARD 19 18 1. TIME/CNT/REM BUTTON To switch among the clock, tape counter and tape remaining time. 2. POWER BUTTON To turn the VCR on and off. 3. TIMER BUTTON To set timer recording. 4.
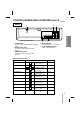
CONTROL NAMES AND LOCATIONS (cont’d) REAR 1 2 3 VIDEO IN 1 ALARM IN 2 ALARM OUT AUDIO IN 3 ALARM RESET 4 GND 5 SERIES IN 6 SERIES OUT 7 WARNING OUT 8 TRIGGER OUT 9 GND 10 LOW TAPE OUT 1 2 3 4 5 6 7 8 9 10 11 12 11 1 SHOT REC IN AUDIO OUT 12 GND PREPARATION RESET VIDEO OUT 4 1. POWER CORD Connect only to an AC 100-240V, 50/60Hz outlet. 2. AUDIO IN/OUT JACK Connect the audio input and output terminal. 3. VIDEO IN/OUT JACK Connect the video input and output terminal. 5 4.
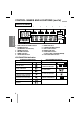
CONTROL NAMES AND LOCATIONS (cont’d) INDICATOR PANEL 1 2 PREPARATION ALARM 3 4 SERIES REC 5 1. TIME LAPSE VCR TIME Indication 2. ALARM Indication (ALARM REC ON indication) 3. SERIES Indication 4. RECORD Indication 5. TIMER Indication 6. CASSETTE Indication INDEX P.FAIL K.LOCK REPEAT 11 10 7. 8. 9. 10. 11.
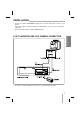
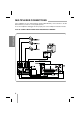
INSTALLATION • Connect your VCR’s AUDIO/VIDEO output jacks to the A/V input jacks on back of your monitor. If your monitor does not have A/V input jacks, exchange the monitor or TV for one with A/V input jacks. • Connect the CCD camera to VCR’s VIDEO input jack. PREPARATION VCR TO MONITOR AND CCD CAMERA CONNECTION • The cables for audio and video connection are not provided with your VCR.
MULTIPLEXER CONNECTIONS If the multiplexer has two output terminals (monitor OUT, PB OUT), connect monitor to the PB OUT terminal if you want to see the playback picture. To use the multiplexer and trigger function properly, refer to the multiplexer instruction manual.
MATRIX SWITCHER CONNECTIONS HOW TO CONNECT SWITCHER WITHOUT TRIGGER INPUT TERMINAL PREPARATION 9
ALARM RECORD CONNECTION Connect alarm output of external device to alarm input of VCR, and then connect alarm out GND of device to alarm input GND of VCR. 2 3 4 5 6 7 8 9 10 11 12 PREPARATION 1 SERIES RECORD CONNECTION Make all connections to the first VCR before making any connections to the other VCRs in the series. After connecting, turn on the VCRs and then select the ON: SERIES mode in REC MODE menu. (Refer to the page 22.
SETTING THE ON SCREEN DISPLAY The following pages describe the on screen selections to be set. PREPARATION • Turn on the power of both the VCR and the monitor. • If you have a TV instead of monitor, turn on the power of TV and then set the TV’s source selector to VIDEO. MENU SELECTION 1 Press MENU button and the main menu will appear. 2 Select the desired menu with the UP or DOWN button and then press the ENTER button.
SETTING THE SETUP MENU MAIN MENU PREPARATION • Turn on the power of both the VCR and the monitor. • If you have a TV instead of monitor, turn on the power of TV and then set the TV’s source selector to VIDEO. MENU VCR SET UP REC MODE SET UP TIMER REC SET UP ALARM SET UP POWER FAIL RECALL LANGUAGE ENGLISH 1 Press MENU button. The main menu will appear. Press DOWN or UP to choose VCR SET UP. (UP) (DOWN) (ENTER) (MENU) 2 Press ENTER button. The VCR SET UP menu will appear. PREPARATION SETUP MENU 1.
SETTING THE SET TIME Things to know before starting MAIN MENU MENU VCR SET UP (UP) (DOWN) (ENTER) (MENU) VCR SET UP MENU VCR SET UP PREPARATION • Turn on the power of both the VCR and the monitor. • If you have a TV instead of monitor, turn on the power of TV and then set the TV’s source selector to VIDEO. 1 Press MENU button. The main menu will appear. 2 Press DOWN or UP to select the SET UP item and then press ENTER. The SET UP menu will appear.
VIDEO CASSETTE TAPES SAFETY TAB WHEN HANDLING VIDEO CASSETTES PREPARATION • Do not expose video cassettes to extreme heat, high humidity, or strong magnetic fields. • Do not tamper with the cassette mechanism. • Do not touch the tape with your fingers. • Always store an unused cassette in its case. To prevent accidental erasure, remove the tab after recording. To record again, cover the hole with vinyl tape. LOADING Hold the cassette with the arrow side up (top).
NORMAL PLAYBACK POWER TIME/CNT/REM V-POS TIMER CURSOR ALARM/INDEX COUNTER PREPARATION • Turn on the power of both the VCR and the monitor. • If you have a TV instead of monitor, turn on the power of TV and then set the TV’s source selector to VIDEO. H-POS REC/PLAY HOURS MENU TRACKING ENTER CLEAR SHARPNESS LOCK ON OFF SOFT HARD NORMAL PLAYBACK 1 Insert a prerecorded video cassette. The indicator will light and the VCR will power-up automatically.
SPECIAL EFFECTS PLAYBACK TO WATCH A STILL PICTURE During PLAYBACK mode... 1 Press the P/STILL button. TRACKING Still picture will appear on the monitor. • If a still picture vibrates vertically, stabilize it by pressing the TRACKING (▼/▲) buttons. • If the VCR is left in the STILL mode for more than 5 minutes, the VCR will automatically enter the STOP mode to protect the tape and video heads. 2 To continue normal playback, press the PLAY button. TO WATCH A FIELD ADVANCE PICTURE During PLAYBACK mode...
SPECIAL EFFECTS PLAYBACK (cont’d) SHUTTLE RING During Still mode... 1 Rotate the Shuttle Ring to forward or reverse. STILL (Pause) FF REVERSE SLOW PLAY PLAY X 2 SEARCH RE W -SLOW -PLAY -PLAY X 3 -SEARCH FORWARD Shuttle Ring 2 Rotate Shuttle Ring toward FF to advance the tape, or toward REW to reverse the tape. How far you rotate and hold the shuttle ring determines the speed at which the tape moves. Rotate Shuttle Ring for variable speed adjust from Slow to Search in the direction chosen.
TAPE COUNTER MEMORY FEATURE REAL TIME COUNTER TIME/CNT/REM During PLAYBACK or RECORDING mode... Press the TIME/CNT/REM button. Whenever you press the TIME/CNT/REM button, time and counter are displayed alternately in the VCR indicator panel. H CLOCK H COUNTER When the COUNTER is displayed... • Counter changes to TIME when the cassette is ejected. • The real-time counter does not operate when nothing is recorded on the tape.
NORMAL RECORDING POWER TIME/CNT/REM V-POS TIMER COUNTER PREPARATION • Turn on the power of both the VCR and the monitor. • If you have a TV instead of monitor, turn on the power of TV and then set the TV’s source selector to VIDEO. H-POS REC/PLAY HOURS CURSOR ALARM/INDEX MENU TRACKING ENTER CLEAR SHARPNESS LOCK ON OFF SOFT HARD 1 Insert the VIDEO CASSETTE that has safety tab in place. REC/PLAY HOURS 2 Press REC/PLAY HOURS to choose the desired recording mode.
REPEAT RECORDING POWER TIME/CNT/REM V-POS TIMER CURSOR ALARM/INDEX COUNTER This function is used to select various options before starting a recording. H-POS REC/PLAY HOURS MENU TRACKING ENTER Things to know before starting CLEAR SHARPNESS LOCK ON OFF SOFT HARD • Make sure a tape is in the each VCR and the safety tab is in place otherwise, the tape will be automatically ejected. • Turn on the power of both the VCR and the monitor.
TIMER RECORDING POWER TIME/CNT/REM V-POS TIMER CURSOR ALARM/INDEX COUNTER This VCR can be programmed to record up to 8 programs. For programmed recording, the timer must be set for the starting and ending times.
SERIES RECORDING POWER TIME/CNT/REM V-POS TIMER CURSOR ALARM/INDEX COUNTER Series Recording mode is convenient when you record with two or more VCRs. If you have two VCRs in series recording mode, the second VCR will start to record automatically at the end of the first VCR recording. H-POS REC/PLAY HOURS MENU TRACKING ENTER CLEAR SHARPNESS LOCK ON OFF SOFT HARD Things to know before starting • Before series recording, refer to page 10 for Series Record connection.
ALARM RECORDING POWER TIME/CNT/REM V-POS TIMER CURSOR ALARM/INDEX COUNTER Alarm recording will start when the external alarm signal is input. This function is available when VCR is connected with an external device having an alarm output terminal. H-POS REC/PLAY HOURS MENU TRACKING ENTER CLEAR SHARPNESS LOCK ON OFF SOFT HARD Things to know before starting • Before alarm recording, refer to page 10 for Alarm Record connection. • Make sure a tape is in the VCR and the safety tab is in place.
ALARM RECORDING (cont’d) ALARM SET UP ALARM SET UP REC MODE DURATION BUZZER ALARM READY ALARM RECALL L6H 1 MIN ON ON 5 Press DOWN to choose the BUZZER item. Press ENTER repeatedly to switch buzzer function during alarm recording. • While the alarm is in process, the buzzer will ring. If you want to stop buzzer, press any button. 6 Press DOWN to choose the ALARM READY item. Press ENTER repeatedly to switch alarm ready function.
CHECK THE ALARM RECORD INFORMATION To check or cancel the Alarm Record Information, use the ALARM RECALL function. MAIN MENU 1 Press MENU button and the main menu will appear MENU VCR SET UP REC MODE SET UP TIMER REC SET UP ALARM SET UP POWER FAIL RECALL LANGUAGE ENGLISH (UP) (DOWN) (ENTER) (MENU) 2 Press DOWN or UP to choose the ALARM SET UP item and then press ENTER. ALARM SET UP menu will appear. 3 Press DOWN or UP to choose the ALARM RECALL item ALARM REC MODE MENU ALARM RECALL menu will appear.
CHECK THE POWER FAIL RECALL To check or cancel the POWER FAIL RECALL while you are recording, use the POWER FAIL RECALL function. MAIN MENU 1 Press MENU and the main menu will appear. MENU 2 Press DOWN or UP button to choose the POWER FAIL VCR SET UP REC MODE SET UP TIMER REC SET UP ALARM SET UP POWER FAIL RECALL LANGUAGE ENGLISH (UP) (DOWN) (ENTER) (MENU) RECALL item. 3 Press ENTER to enter the POWER FAIL RECALL menu. POWER FAIL RECALL menu will appear.
SELF-DIAGNOSIS This function informs you of error messages to help solve problems more easily. When the VCR malfunctions, an error code is displayed in the VCR indicator panel. ERROR CODE TABLE DISPLAY • • DESCRIPTION INPUT SIGNAL CIRCUIT STATUS SERVICE POINTS Loading Motor Error • Mode Switch S1,S2,S3,S4 • Load Motor +, - • Mode Switch Position not changed within 6 seconds after cassette loading attempt.
SERVICE GUIDE TABLE Unit is Hour. NO.
TROUBLESHOOTING SYMPTOM CHECK POINT & CORRECTION Cassette cannot be inserted. • Load cassette in direction indicated by arrow on cassette. • A cassette is already in the VCR. • Check if power indicator is lit on the VCR indicator panel. If not, make sure power cord is plugged in. • If the indicator flashes, press the POWER button again. The VCR will not go into the recording mode, even when REC button is pressed. • The cassette has had the erase prevention tab removed.
SPECIFICATIONS GENERAL Head System Four head helical scan azimuth system Power Source AC 100-240V, 50/60Hz Power Consumption Approx. 15 watts Back up time (clock) 30 days Dimensions (WxHxD) 14.2” x 3.7” x 10.7” (360 x 94 x 273 mm) Operating Temperature 41 °F~105 °F (5 °C~40 °C) Operating Humidity Less than 80% RH Timer 24-hour display type Weight Approx. 8.4 lb (3.8 kg) Tape Speed 11.12 mm/sec (L6H), 3.70 mm/sec (L18H), 2.
Image & Information Technology Div. 2-15-13, Tsukishima, Chuo-Ku, Tokyo 104-0052, Japan Tel : +81 (0)3 3536 4596 Fax : +81 (0)3 3536 4771 http://www.cbc.co.