Bluetooth Printer Combo Adapter BT-0260-V2 USER’S Manual (For Widcomm Driver) VERSION 1.
© All rights reserved. All trade names are registered trademarks of respective manufacturers listed. The Bluetoothname and the Bluetoothtrademarks are owned by BluetoothSIG,Inc. This manual may not be copied in any media or form without the written consent of original maker.
WELCOME ................................................................. 1 Features ............................................................... 1 System Requirements ............................................... 1 Before You Start ...................................................... 2 Connecting your Bluetooth USB Adapter with PC ................ 2 Printer Combo Adapter .............................................. 2 Getting to Know Your Printer Combo Adapter ....................
Thank you for your purchase of the Bluetooth Printer Combo Adapter. Featuring Bluetooth wireless technology, Bluetooth Printer Combo Adapter creates cable-free printing connections between your desktop PCs and your printers. Bluetooth Printer Combo Adapter is compatible with all Bluetooth v2.0+EDR-certified devices and you can connect your computing devices and printers 100 meters away without cables in your working environments, such as home or office. FEATURES Compliant with Bluetooth standard version 2.
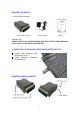
BEFORE YOU START 1. Confirm Box Contents Printer Combo Adapter Power Adapter Manual IMPORTANT PLEASE READ ALL INSTRUCTIONS AND THE SAFETY GUIDE BEFORE YOU PLUG THE UNIT INTO THE PRINTER. CONNECTING YOUR BLUETOOTH USB ADAPTER WITH PC Connect your Bluetooth USB dongle with our PC. Install Widcomm Bluetooth software driver.
GETTING TO KNOW YOUR PRINTER COMBO ADAPTER Printer combo adapter supports two interfaces which can be used to connect with your printer. 1). IEEE-1284 - It is a 36-pin male connector on the front. Connect it to your printer. If your printer hides its female connector inside its case, then you have to open it. 2). USB - It is a USB type A connector. You need to connect one end of the USB cable to printer combo adapter, then connect another end to the printer.
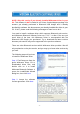
NOTE: Skip this section if you already installed Widcomm driver in your PC. This software is NOT included in our Printer Combo Adapter package. We assume you already purchased a Bluetooth USB dongle and it already bundled this software. We also assume you already installed this driver in your PC. If NOT, please read the following messages to learn how to do it. You need to install a software driver which supports Bluetooth print service, and Widcomm Bluetooth Software Driver ver. 1.3.2.7.
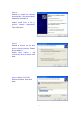
Step 3: Select destination folder, you can choose the default or change to your favorite. Step 4: Click Install to start the installation. If you have not plugged in Bluetooth Dongle onto your PC before, one reminding window will show up to ask you to plug in it before installation can be finished. Step 5: Click OK to continue the installation. Step 6: Installation is complete. My Bluetooth Places should appear on your desktop and a similar icon also appears on the lower right corner of your screen.
NOTE: Read this section only if you are using Windows XP SP1 (or later releases). Skip otherwise. This section is a reference topics to tell you how to prevent conflict when installing your USB Bluetooth Dongle in your PC. It has NOTHING to do with Printer Combo Adapter which you purchased. Here, we assume you already purchased a Bluetooth USB dongle and it is using CSR technology (i.e. chipset). Plug a USB Bluetooth Dongle into your PC. Windows XP SP1 (or after) is supporting Bluetooth.
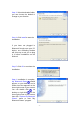
Step 4: Default is: Install the software automatically (Recommended). Please do not select it. Select Install from a list or specific location (Advanced). Then click Next. Step 5: Default is Search for the best driver in these locations. Please do not select it. Select Don’t search. I will choose the driver to install. click Next. Step 6: Select CSR USB Bluetooth Device, then click Next.
Step 7: Click Finish. Step 8: After these update driver steps, you will see only one Bluetooth device in the Device Manager. This is what Widcomm driver really supports.
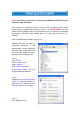
When the first time Widcomm driver is installed, and USB Bluetooth Dongle is plugged to your system, you will be asked to configure your Bluetooth services for your system. Step 1: Double-click on the Bluetooth icon on the lower-right corner of the screen, you will see configuration wizard, Click Next button. Step 2: Assign computer name and specify computer type, then click Next button. These can be customer defined. Step 3: Click Next button to configure Bluetooth services.
Step 4: The default setting is that all services are available, you can check or uncheck one or more services, then click Next button. Step 5: click skip and then click Next button. Step 6: configuration is completed.
Step 1: Method 1: Double click on your desktop. Click Folder on the toolbar. Folder window will appear on left side of your screen. Method 2: Right click on the lower right hand corner of your screen. Select Explore My Bluetooth Places. Two folders appear on the window. They are : Entire Bluetooth Neighborhood and My Device. Step 2: Click Entire Bluetooth Neighborhood to search for devices available to you.
You also may start a search for devices by clicking Bluetooth from the toolbar. Step 3: In this example, One Bluetooth printer device is found in your Bluetooth neighborhood. Step 4: Right click on your device icon Select Pair Device . Step 5: Enter Bluetooth security code 0000 and press OK.
Step 6: The pairing process is now complete. This is the service we want to know. We will look at it later. The “My Bluetooth Places” program provides an easy way to find different application services through Bluetooth connections. A variety of Bluetooth services and explanations can be found in the “Help” file of the ”My Bluetooth Places” program.
ADD LOCAL PRINTER In the following example, we assume a printer combo adapter (with series#: BT-PTR-B0A251) is connected to an EPSON Stylus C61 printer. Step 1: From MY BLUETOOTH PLACES, Right click on printer combo adapter folder (with series#: BT-PTR-B0A251), then select OK to install a printer driver for it. Step 2: Add Printer Wizard will show up, find the brand name and model number of the printer driver you want this printer adapter to use.
START PRINTING Click My Computer icon on the desktop screen, select Control Panel, select Printers and Faxes, then you can find a Bluetooth Printer is there: EPSON Stylus C61 Series. Print a file by using combo printer adapter is quite straightforward, it is just like the normal way you are printing a file. For EPSON Stylus C61 Series: When page range and number of copies screen prompts, select EPSON Stylus C61 Series printer, then click OK.
In your home or office, there may be two or three different printers coming from different brands. In previous example, we selected EPSON Stylus C61 color printer as our Bluetooth printer. If we want to change it to another printer, such as EPSON Stylus C82, then we shall know how to change printer driver to a different one. Step 1: Select Control Panel. Select Printers and Faxes. Right click on EPSON Stylus C61 Series printer icon. Click on Properties.
Step 3: In Advanced setup, try to find the driver of EPSON Stylus Photo 830U. If there is an EPSON Stylus Photo 830U driver installed before, select it and click OK to complete the change. If there is none, click New Driver and follow the instructions to install it. Once New Driver is selected, this screen will prompt to ask you to install new driver step by step. Step 4 : From Ports page, please unmark or disable bidirectional support.
ed to the printer adapter now. Previous sections talked about how to do a printing job with a printer combo adapter. This section is talking about when multiple adapters are installed in your office, how to configure each adapter before printing. Supposed there are three printer combo adapters connected to two EPSON Stylus C61 and one EPSON Stylus Photo 830U printers separately.
1. Configure the first Printer Adapter Connect the first printer combo adapter to an EPSON Stylus C61 printer. Step 1: From MY BLUETOOTH PLACES, Right click on the first printer combo adapter folder (with series#: BT-PTR-B0A251), then select OK to install a printer driver for it. Step 2: Add Printer Wizard will show up, find the brand name and model number of the printer you want this printer adapter to use. It will ask you to install the printer driver if it has not been installed in your system before.
installation. 2. Configure the second Printer Adapter Connect the second printer combo adapter to another EPSON Stylus C61 printer. Step 1: From MY BLUETOOTH PLACES, Right click on the second printer combo adapter folder (with series#: BT-PTRB0A252), then select OK to install a printer driver for it. Step 2: Add Printer Wizard will show up, select EPSON Stylus C61 as the printer, because its driver was installed before, so just click OK to continue.
3. Configure the third Printer Adapter Connect the third printer combo adapter to an EPSON Stylus Photo 830U printer. Step 1: From MY BLUETOOTH PLACES, left click on the third printer combo adapter folder (with series#: BT-PTR-B0A253), then select OK to install a printer driver for it. Step 2: Add Printer Wizard will show up, select EPSON Stylus Photo 830U as the printer, supposed its driver has been installed before, so just click OK to continue.
Step 4 : From Ports page, you can see three printer ports are used : 1. BT-PTR-B0A351. 2. BT-PTR-B0A352. 3. BT-PTR-B0A353. They are functioning the same as the original LPT1: printer port of your PC. The difference is LPT1: is for cable connection, while these three Bluetooth printer ports are used for wireless connections. From Ports page, please unmark or disable bidirectional support.
If you want to print by using these printers, please refer to next page. Start Printing: Print a file by using combo printer adapter is quite straightforward, it is just like the normal way you are printing a file. For EPSON Stylus C61 (Sales_ Dept): When page range and number of copies screen prompts, select EPSON Stylus C61 (Sales_ Dept) printer, then click OK. For EPSON Stylus C61 (RD_ Dept): When page range and number of copies screen prompts, select EPSON Stylus C61 (RD_Dept) printer, then click OK.
Change Printer: Step 1: Select Control Panel. Select Printers and Faxes. Right click on printer EPSON Stylus C61 Series (Sales_Dept) icon. Click on Properties. Step 2: You can change printer name to such as: EPSON Stylus COLOR 680 (Sales_Dept).
Step 3: Click on Advanced tab to see if the driver of EPSON Stylus COLOR 680 has been installed before. If yes, click OK to complete the change. If not, click New Driver and follow the instructions to install it. If New Driver is selected, this screen will prompt to instruct you to install new driver step by step. Step 4: When installation of new printer driver is complete, the Printers and Faxes screen will look like this. EPSON Stylus COLOR 680 (Sales_Dept). is coming out as the new printer.
There are some conditions which will stop the printing process: 1. Inks 100% run out. 2. Paper Jam. 3. Printer is BUSY. 4. Printer is not turned on. When the above conditions occurred, PC will pop out a failed to print message on the screen one minute later. User can clean the problem and continue the printing after. INKs run out Paper Jam Printer BUSY - Replace new INKs for your printer. - Remove jamed paper. - Check if there is any error in feeding paper to the printer.
1. Start 2. Printing job in process. 3. Printing job has error. Double click on printer icon to read the message. 4. Error message. 5. Right click on the file being printed, and select Cancel to stop it. If there is any Bluetooth operation hanged, you can use the following steps to clean it. Right click on green Bluetooth icon on lower-right corner of your screen. Select Stop the Bluetooth Device. Right click on red Bluetooth icon on lower-right corner of your screen. Select Start the Bluetooth Device.
APPENDIX A Specifications: Product Name Bluetooth Printer Combo Adapter Model Name BT-0260-V2 Certification FCC, CE, BQB Standard Bluetooth v2.0+EDR Frequency Band 2.4~2.4835GHz unlicensed ISM band Modulation Method GFSK, π/4-DPSK, 8DPSK Spread Spectrum FHSS (Frequency Hopping Spread Spectrum) Services supported SPP and HCRP print services Transfer rates (Max) 3 Mbps Asymmetrical RF Output Class 1 (15 dBm) Working distance Greater than 100m in free space Sensitivity <-88dBm at < 0.
APPENDIX B Safety Guide: Read and follow all instructions and warnings provided. Save these instructions for future use. When service or replacement of parts is required, ensure work is one by a qualified technician. Do not use this unit near water or in a rainy/moist environment. Use supplied cables only. Do not attempt to service this product yourself. Doing so will expose you to various hazards including dangerous voltage. This unit is suitable for a 110V to 230V AC power supply (Auto detect).
INFORMATION TO USER Federal Communication Commission Interference Statement This equipment has been tested and found to comply with the limits for a class B digital device, pursuant to part 15 of the FCC Rules. These limits are designed to provide reasonable protection against harmful interference in a residential installation.
violate FCC regulations. This equipment complies with FCC radiation exposure limits set forth for an uncontrolled environment. This equipment should be installed and operated with minimum distance 20cm between the radiator & your body. The users manual or instruction manual for an intentional or unintentional radiator shall caution the user that changes or modifications not expressly approved by the party responsible for compliance could void the user’s authority to operate the equipment.
One Year Limited Warranty This device is guaranteed against manufacturing defects for one full year from the original date of purchase. This warranty is valid at the time of purchase and is non-transferable. This warranty must be presented to the service facility before any repair can be made. Sales slip or other authentic evidence is required to validate warranty. Damage caused by accident, misuse, abuse, improper storage, and/or un certified repairs is not covered by this warranty.