Chipley Custom Machine Regulator Manual V 1.0 CCM / DPM 19641 N. Hirsch St Anderson, Ca 96007 Phone- 530-378-3420 Sales- 1-877-412-6850 Fax- 530-378-3420 www.chipleymachine.
I. Table of Contents: I. Liability Page 3 II. Safety and Handling Page 4 III. Parts List Page 5 IV.
II. Liability: Chipley Custom Machine and Datum Precision Machining (CCM / DPM) does not accept any liability for the handling of these markers, tools, air tanks, or any other item mentioned in this manual. You, the user accept this sole liability when purchasing and using any paintball marker or paintball accessories. We, CCM / DPM, disclaim any implied warranties or any responsibility for any errors that may appear in this manual.
III. Safety and Handling: A Paintball Marker is not a toy. Any of the tools in this manual are not toys. Tools and paintball markers should be used only by adults or with adult supervision. Respect other peoples’ property and when using any paintball marker, obey all local, state and federal laws. When entering a paintball field, become aware of their rules and regulations. It is very important to have the proper paintball protection before going to the paintball field for play.
IV.
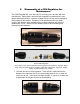
V. Disassembly of a CCM Regulator for Maintenance: The CCM Regulator will serve the end user for many years to come with little maintenance. Some players wait until their regulator has performance issues before doing maintenance – however a failed or dirty seal can cause damage to internal parts of the marker. Therefore, CCM recommends that you clean, inspect, and lubricate your regulator every so often to prevent any failure or performance issues.
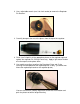
2. Use a adjustable wrench (or a 3/8th inch socket) to remove the Regulator Pin Retainer. 3. Carefully dump out the rest of the pieces from the top of the regulator. 4. Clean (use Q-tips® in all the appropriate places on the regulator top) and replace the regulator Pin O-Ring if necessary. Apply a light coat of marker oil to these parts and replace them. 5.
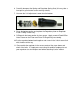
6. Carefully dump out the Spring and Regulator Spring Seat (this may take a few taps on your hand or a non-marring surface). 7. Unscrew the 3/16 adjustment screw from the bottom. 8. Clean the bottom portion and replace the Regulator piston or Regulator Piston O-Ring if necessary. 9. CCM packs the lower portion in clear grease. Apply a coat of Dow® 55 or Hater Sauce on the Piston and Piston O-Ring during reassembly. 10.