
User's Manual


Attention:
Set up should be conducted in an area free from interference by other 2.4GHz transmitters.
Push the set up button on the front
of the transmitter, then switch the
transmitter on. Transmitter will output
the electrical wave under this setting
mode. Output power will be given weakly
to avoid interference to others.
In this case, LED will flash slowly.
Push the set up button on the receiver
and then switch receiver on. Release
the set up button. The receiver
will enter set up mode and transmitter ID
is registered to the receiver.
You can set the failsafe function ON or OFF by repeatedly pushing and releasing the
set up button on the receiver.
LED is ON : Fail-safe function ON
LED is OFF : Fail-safe function OFF
To set the position of the servo in failsafe mode, first press the receiver button
so that the LED is off. Move the trigger to the desired failsafe position.
Push the receiver set up button so that the LED is on and this position will be memorized
in the receiver. If the TX trigger is not moved, the position of the trigger will be memorised
in neutral.
Attention:
After the ID and fail safe are set, switch the transmitter and receiver off and restart both.
Check that all functions are working correctly before operating the model.
Attention:
When adjusting failsafe function for nitro models, set failsafe function to apply brakes
in a setting that will allow the model to stop in a safe fashion.
Attention:
If another 2.4GHz radio is being set up nearby, your TX will not enter set up mode.
Checking Fail Safe Function ON/OFF
Switch the transmitter off and leave the receiver on, the receiver start to search and LED will
start to flash. If you activated the fail-safe function and it is ON, the servo will return to the position
saved in memory and if failsafe function is OFF, the servo will be in neutral position.
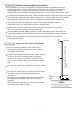
Step 1
Step 2
Step 3
Step 4
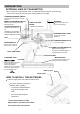
Transmitter
setting up
button
LED
5