
User's Manual
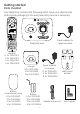


Getting started
4
Battery installation
CAUTION:
F3( 4)(+#-.$#(02#(+%!C()1(5+#()+("#+!)/&'(%/G.+7,(.!#()/'7(02#(>&00#+7(!.""'%#-(
(model 2SN-AAA40H-S-X2 or NI-MH AAA400*2) with this product.
2. If the handset will not be used for an extended period of time, unplug the battery
and remove it from the handset to prevent possible leakage.
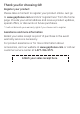
Please fully charge your handset before use!
For optimum battery performance, charge the battery for 16 hours
>#1)+#(5+!0(.!#3
NOTE: Use only the supplied rechargeable battery or replacement battery. Visit our website
at www.gephones.com to order a replacement battery if necessary.
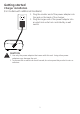
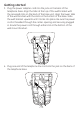
1. Plug the battery connector securely into
the socket inside the handset battery
compartment. Make sure that red and
black wires on the plug are properly
inserted into the socket as shown.
2. Place the battery
and the wire inside
the battery
compartment.
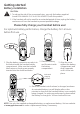
4. Place the handset onto the base (or charger) as shown.
An animated battery icon will display after a few
minutes to show that the handset battery is successfully
being charged. For optimum performance, please allow
02#(>&00#+7(0)($2&+<#(1)+(FH(2).+!(>#1)+#(5+!0(.!#3
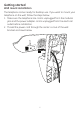
3. Align the cover
against the battery
compartment and
slide it upwards
until it clicks into
place.
Animated
charging
indicator
red
wire
black
wire