MD750 Series User Guide Digital 5.
Welcome Welcome Congratulations on your purchase of a Motorola product! Your Motorola handset at a glance: i
Welcome For a copy of a large-print version of this guide, or for product-related questions, please contact: 1-800-353-2729 U.S.A. 1-800-461-4575 Canada 1-888-390-6456 TTY (Text Telephone) Or visit us online: www.motorola.com/cordless Product registration is an important step toward enjoying your new Motorola product. Registering helps us facilitate warranty service, and permits us to contact you should your Motorola product require an update or other service.
MOTOROLA, the Stylized M Logo, and PhoneWrap are registered in the U.S. Patent and Trademark Office. All other product or service names are the property of their respective owners. Welcome purpose. Motorola may make improvements or changes in the product(s) described in this manual at any time.
iv Welcome
Table of Contents Contents Welcome . . . . . . . . . . . . . . . . . . . . . . . . . . . . . . . . . . . . . i Important Safety Instructions . . . . . . . . . . . . . . . . . . . vii FCC Information . . . . . . . . . . . . . . . . . . . . . . . . . . . . . . xi Getting Started . . . . . . . . . . . . . . . . . . . . . . . . . . . . . . . . 1 Battery Safety Instructions . . . . . . . . . . . . . . . . . . . . . . 1 Charging the Battery . . . . . . . . . . . . . . . . . . . . . . . . . .
Contents vi Using the Handset . . . . . . . . . . . . . . . . . . . . . . . . . . . . 21 Making a Call . . . . . . . . . . . . . . . . . . . . . . . . . . . . . . . 21 Adjusting the Volume During a Call . . . . . . . . . . . . . . 21 Inserting Pauses in a Number . . . . . . . . . . . . . . . . . . 22 Using Automated Dialing . . . . . . . . . . . . . . . . . . . . . . 23 Using the Speakerphone . . . . . . . . . . . . . . . . . . . . . . 24 Muting a Call . . . . . . . . . . . . . . . . . . . . . . . . . . .
Important Safety Instructions Follow these safety precautions when using your cordless phone to reduce the risk of fire, electric shock and injury to persons or property: Safety Info Reduce risk of fire and shock by 1. Keep all slits and openings of the phone unblocked. Do not set the phone on a heating register or over a radiator. Ensure that proper ventilation is provided at the installation site. 2. Do not use while wet or while standing in water. 3.
Safety Info viii Unplug this cordless phone immediately from an outlet if: • The power cord or plug is damaged or frayed. • Liquid has been spilled into the product. • The product has been exposed to rain or water. Do not retrieve the handset or base until after you have unplugged the power and phone from the wall. Then retrieve the unit by unplugged cords. • The product has been dropped or the cabinet has been damaged. • The product exhibits a distinct change in performance. Installation Guidelines 1.
8. Use only the power supply that came with this unit. Using other power supplies may damage the unit. 9. Because cordless phones operate on electricity, you should have at least one phone in your home that isn’t cordless, in case the power in your home goes out. 10. To avoid interference to nearby appliances, do not place the base of the cordless phone on or near a TV, microwave oven, or VCR.
x Safety Info
FCC Information This equipment complies with Parts 15 and 68 of the FCC rules and the requirements adopted by the Administrative Council for Terminal Attachments (ACTA). A plug and jack used to connect this equipment to the premises wiring and telephone network must comply with applicable FCC Part 68 rules and requirements adopted by the ACTA. A compliant telephone cord and modular plug is provided with this product. It is designed to be connected to a compatible modular jack that is also compliant.
Connection to party line service is subject to state tariffs. Contact the state public utility commission, public service commission or corporation commission for information. FCC Info If your home has specially wired alarm equipment connected to the telephone line, ensure the installation of this cordless phone does not disable your alarm equipment. If you have questions about what will disable alarm equipment, consult your telephone company or a qualified installer.
• Inform you of your right to bring a complaint to the Commission pursuant to procedures set forth in Subpart E of Part 68, FCC Rules and Regulations. The telephone company may make changes in its facilities, equipment, operations, or procedures that could affect the operation of the equipment. If this happens, the telephone company will provide advance notice in order for you to make necessary modifications to maintain uninterrupted service.
If this equipment does cause harmful interference to radio or television reception, which can be determined by turning the equipment on and off, the user is encouraged to try to correct the interference with one or more of the following measures: FCC Info • Reorient or relocate the receiving antenna (that is, the antenna for the radio or television that is "receiving" the interference). • Reorient or relocate and increase the separation between the telecommunications equipment and the receiving antenna.
xvi FCC Info
Getting Started Before you can use your telephone to make or answer calls, you must charge the battery. This section provides the step-by-step instructions you will need. Battery Safety Instructions • Do not burn, disassemble, mutilate, or puncture the battery. The battery contains toxic materials that could be released, resulting in injury. • Caution: There is a risk of explosion if you replace the battery with an incorrect battery type.
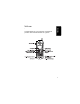
Getting Started Charging the Battery 2 1 Remove the battery door. 2 Insert the battery into the battery compartment. 3 Plug the battery connector into the receptacle in the battery compartment and replace the battery door. 4 Plug the power cord into the back of the base and into an outlet.
5 Rest the handset in the base so the charge/page LED lights. 6 For the initial charge, charge the battery for at least 16 hours. Do not connect the base station to the phone line until the handset is fully charged. Note: Every time a battery is plugged in, the phone must be charged in the base for at least 10 seconds for the phone to properly restart.
Installing Backup Batteries Getting Started Four AAA alkaline batteries (not included) can be installed into the base as backup incase of a power outage. 4 1 With the front of the base facing you, carefully remove the right side panel, exposing the battery compartment cover. 2 Press the cover latch to remove the battery compartment cover. 3 Insert four AAA alkaline batteries as directed on the compartment.
Using the Handset The handset display, soft keys, and navigation keys are used to select the various features and functions of the handset. This section describes how to use these components so you can set up your preferences. For step-by-step instructions on setting personal preferences, see Setting Up Your Phone. Using the Handset Display The main display: When the handset is not in use, the standby screen is displayed.
The menu display: In a menu display, points to the currently selected item, and b indicates there are more items above and below the currently selected item. Using the Soft Keys Getting Started Two soft keys are used to select the functions shown above them on the display. The functions change as you move from one screen to the next. In this guide, soft key functions are shown as the function name. For example, if a step instructs you to “select MENU,” do so by pressing the soft key below MENU.
Using the Navigation Key The navigation key is used to scroll up and down through menu items, lists of settings, caller ID and redial lists, and the phonebook.
8 Getting Started
Once your MA750 is fully charged and ready for use, you can install it on a desktop or mounted to a wall. This section provides the step-by-step instructions you will need to install the phone. Installation Installation Installing the Phone on a Desk Once the battery is fully charged, plug the phone cord into the back of the phone and then into the phone jack on the wall.
Installation Installing the Phone on the Wall 10 The wall mount of your MA750 is located in the base of the phone. It works best with a wall mount bracket, which is available at most electronic stores. 1 Carefully slide and lift the wall mount from the base. 2 Turn the wall mount over so the key slot is facing upward. Align the holes of the wall mount with the feet of the base and push gently until the wall mount fits snugly into place.
3 5 Installation 4 Plug the power cord into the back of the base and into an electrical outlet. Plug one end of the telephone line cord into the jack on the back of the base. Line up the tabs on the wall mount bracket with the holes on the back of the wall mount. Snap the wall mount firmly into place.
12 Installation
Setting Up Once your expansion handset has been fully charged, you can set your own preferences. Personalizing Your Handset You can personalize each handset by setting unique ring tones, adjusting the ringer volume for day and night, and naming each handset so you can distinguish one from another. Setting the Ring Volume 2 Scroll to Ringer and select SELECT. Day Volume is displayed, which sets the ringer volume from 6 AM to 9 PM.
Setting the Ring Tone If you subscribe to a caller ID service, you can set a specific ring tone for numbers stored in your handset’s phonebook and another for all other incoming calls. 1 Select MENU. 2 Scroll to Ringer and select SELECT. 3 Scroll down to Ring Tone, which sets the ring tone for incoming calls. 4 Select CHANGE to scroll through the ring tones. Each tone plays as you select CHANGE. Stop at the ring tone you want to set. Setting Up 5 Select DONE.
Naming a Handset When you register a handset, it is assigned a default name of Handset(x), where x can be 1, 2, 3, 4, 5, 6, 7, or 8. You can change the name to something more useful, for example a location (Kitchen) or someone’s name (Evan). Naming a handset makes it easy to select the handset from a list (for example, to intercom another handset). If you name a handset, the handset number remains part of the name, for example, Kitchen(2). 1 Select MENU. 2 Scroll to Name handset and select SELECT.
Setting Up The following table shows how many times to press each button on the handset to enter letters and special characters. Button 1 2 3 4 5 6 7 8 9 1 space A D G J M P T W Number of Presses 2 3 4 – * ! B C ( E F ) H I # K L / N O ‘ Q R S U V ? X Y Z 5 1 2 3 4 5 6 7 8 9 The first letter of the entry is an uppercase letter. To change the entry from uppercase to lowercase, press *. A flashing square indicates that you are in the uppercase text entry mode.
Storing Area Codes for Caller ID You can store up to 5 area codes to make it easy to dial numbers from your list of caller ID calls. For example, if you store 954 in 10-digit format, when you receive a call from that area code, the phone number is stored in your call list with all 10 digits. The number will then be in the correct format for you to dial directly from the call list without any reformatting.
4 Select FORMAT to scroll through the formats. Stop at the format you want to set for the area code, then scroll down to move to the next area code. 5 Repeat steps 3 and 4 to store up to 4 more area codes. When you are finished, select DONE. 6 Select EXIT to return to the standby screen, or scroll to a different menu option. Setting the Date and Time 1 Select MENU. Setting Up 2 Scroll to Date/Time and select SELECT.
Setting the Language 1 Select MENU. 2 Scroll to Language and select SELECT. 3 Scroll until points to the language you want. 4 Select DONE. 5 Select EXIT to return to the standby screen, or scroll to a different menu option. Setting Touch Tone or Pulse Dialing 2 Scroll to Tone/Pulse. 3 Scroll or press CHANGE to switch between Tone and Pulse. Setting Up Your handset uses touch tone dialing by default. Do not change this setting unless touch tone service is not available in your area. 1 Select MENU.
20 Setting Up
Y Using the Handset Making a Call INA R Press ON. When you hear the dial tone, dial the number. OR Enter the phone number, then press ON. This lets you see the phone number on the display before the number is dialed. During a call, a timer on the display shows the length of the call. EL IM When you are finished talking, press OFF to hang up. Press ON or HANDSFREE to answer using the speakerphone. If you have call waiting service, press ON to answer the second call.
Inserting Pauses in a Number INA R Y When you call a number featuring a pause, the phone waits 3 seconds before transmitting the next digits in the dialing sequence. This is useful, for example, when you have to dial 9 to get a dial tone or for accessing a voicemail system. 22 EL IM PR Using the Handset To insert a pause within a number, press the pound key (#) twice. A “P” is displayed on the handset display.
Using Automated Dialing 2 Press DIAL. INA R Y You can retrieve numeric information (like a PIN or credit card number) from the phonebook during a phone call. This feature is useful when using automated response system. For example, if you frequently access your bank account information over the phone, you can store your account number and PIN in the phonebook, and then access them during the call instead of entering them manually each time.
Using the Speakerphone Y To make a call using the speakerphone, press HANDSFREE and dial the number. INA R For optimal speakerphone sound quality, make sure the belt clip is on. This raises the handset up so it is not lying flat (the speakerphone is on the back of the handset). When the speakerphone is on, V appears on the handset display. If you have call waiting, press ON to answer the second call while using the speakerphone.
When a call is on hold, you can use the intercom features (see page 29). Y Redialing a Number INA R To redial the last number dialed, press ON and then press REDIAL. To redial one of the last 5 numbers you dialed: 1 Press REDIAL 2 Scroll until points to the number you want to redial. 3 Press DIAL or ON or HANDSFREE. EL IM If a number in the redial list matches a number in your phonebook, the phonebook name and number display in the redial list.
Storing a New Number 1 Select PHONEBK. Y 2 Scroll to NEW ENTRY and select SELECT. INA R 3 Enter the name (up to 12 characters). The flashing underline shows the input cursor position. Select DELETE to erase characters to the left of the input cursor.
7 To set the tones of incoming calls for this number, select CHANGE. A tone plays each time you select CHANGE. Stop at the ring tone you want to set. INA R Y 8 Select DONE. Storing a Recently Called Number 1 Press REDIAL. The display shows the last five numbers you dialed, with the most recent number at the top. 2 Scroll until points to the number you want to store. 3 Press STORE. 5 Scroll down until the phone number displays in the Number: field.
Storing a Caller ID Number 1 From the caller ID list, select OPTIONS. Y 2 Scroll to STORE and select SELECT. The caller’s name is displayed in the Name field. INA R If changes need to be made, select DELETE to erase characters to the left of the input cursor. See Storing a New Number for information on entering text. 3 Scroll down until the Number field is displayed. If changes need to be made, select DELETE to erase characters to the left of the input cursor. EL IM 4 Scroll down.
Y press *. A flashing square indicates that you are in the uppercase text entry mode. A flashing cursor indicates that you are in the lowercase text entry mode. 6 Scroll down. INA R 5 Scroll down to the phone number field and modify as necessary. 7 To set the tones of incoming calls for this number, select CHANGE. A tone plays each time you select CHANGE. Stop at the ring tone you want to set. 8 Select DONE. Deleting a Phonebook Entry EL IM 1 Select PHONEBK.
Calling a Number from the Phonebook 1 Select PHONEBK. Y 2 Scroll down until points to the phonebook entry you want to call. INA R To search numerically, press the numbers of the phonebook entry that you want to dial. 3 Press ON or HANDSFREE. 30 EL IM PR Using the Handset To speed dial, select PHONEBK, enter the location number, and then press ON.
Using Caller ID INA R Y If you subscribe to caller ID service, the caller’s name and/or number are displayed when you receive an incoming call. If information on the caller is not available, or if you do not subscribe to caller ID service, INCOMING CALL is displayed. Reviewing the List of Caller ID Calls The handset can store up to 40 caller ID records. 1 Scroll down to view the recent calls list. The most recent call is listed first. 2 Scroll to review more calls.
Using the Intercom Using the Intercom 1 Press INTERCOM. INA R Y The handsets and base station can be used as an intercom system, allowing you to talk to people in other parts of your home. The following sections explain how to user the intercom, enable the auto-answer feature, and transfer calls from one handset to another. If you only have one additional handset registered to the base, pressing INTERCOM automatically pages the handset.
1 Select MENU. 2 Scroll to and select INTERCOM SETUP. Y 3 Scroll to and select one of the following options: INA R AFTER 1 RING: The handset automatically answers a page after one ring. AFTER 3 RINGS: The handset automatically answers a page after three rings. 4 Select EXIT to return to the stanby screen, or scroll to a different menu option. Transferring Calls to Other Handsets 1 Select HOLD. EL IM 2 Press INTERCOM.
Multihandset Functions Y The following multihandset functions require at least 2 (up to 8) handsets registered to the base station. EL IM To order expansion handsets, call: 1-800-353-2729 U.S.A. 1-800-461-4575 Canada 1-888-390-6456 TTY (Text Telephone) Or visit us online: www.motorola.com/cordless PR Using the Handset INA R You can expand your phone system by adding Motorola MD Series expansion handsets (up to 8). Expansion handsets do not require connection to a phone line.
Y To join a conference call, press ON from the base station. To disconnect from a conference call, press OFF on the handset. Using the Intercom INA R The handsets and base station can be used as an intercom system, allowing you to talk to people in other parts of your home. The following sections explain how to user the intercom, enable the auto-answer feature, and transfer calls from one handset to another. To use the intercom: 1 Press INTERCOM.
Enabling Auto-Answer INA R 1 Select MENU. Y You can program a handset or base station to automatically answer a page by turning on the speakerphone. The handsets are not programmed to do this by default. 2 Scroll to and select INTERCOM SETUP. 3 Scroll to and select one of the following options: AFTER 1 RING: The handset automatically answers a page after one ring. AFTER 3 RINGS: The handset automatically answers a page after three rings.
6 Select UNHOLD. The call is transferred to the other handset and all three individuals are on the call. Y 7 Press OFF to disconnect. Monitoring a Room INA R Room monitoring allows you to place a handset in a room and listen to the sounds in that room from another handset. 1 Place a handset in the room to be monitored. 2 On that handset, select MENU. 3 Scroll to MONITOR ROOM and select SELECT. READY TO MONITOR ROOM is displayed. EL IM 4 On the handset you want to listen from, press INTERCOM.
38 PR EL IM Using the Handset INA R Y
Warranty Motorola Limited Warranty for Consumer Products, Accessories, and Software Purchased in the United States or Canada What Does this Warranty Cover? Subject to the exclusions contained below, Motorola, Inc.
• Products and Accessories that are Repaired or Replaced. Length of coverage: The balance of the original warranty or for ninety (90) days from the date returned to the consumer, whichever is longer. • Software. Applies only to physical defects in the media that embodies the copy of the software (e.g. CD-ROM, or floppy disk). Length of coverage: ninety (90) days from the date of purchase. Warranty Exclusions 40 Normal Wear and Tear.
Communication Services. Defects, damages, or the failure of Products, Accessories or Software due to any communication service or signal you may subscribe to or use with the Products, Accessories or Software is excluded from coverage. Software Embodied in Physical Media.
comparable proof of purchase; (b) a written description of the problem; (c) the name of your service provider, if applicable; (d) the name and location of the installation facility (if applicable) and, most importantly; (e) your address and telephone number.
with, the Products associated with such Motorola software. No other use, including without limitation disassembly of such Motorola software or exercise of the exclusive rights reserved for Motorola, is permitted.
44 Warranty
Visit our website at: www.motorola.