Digital Video Recorder User’s Manual Ver 9.x ABOUT THE CCTV SERVICES INC DVR SYSTEM Welcome to the CCTV SERVICES INC. Digital Video Surveillance System. Our DVR 9.x series features recording for Cash register Interface / POS devices. • Recording for up to eight Cash register / POS devices, system health status and configuration, multievent recording; continuous motion detection, alarm; and scheduled recording. • DVR 9.
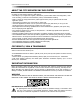
Digital Video Recorder User’s Manual Ver 9.x The exclamation point within an equilateral triangle is intended to alert the user to the presence of important operating and maintenance (servicing) instruction in the literature accompanying the product. PRECAUTION SAFETY: Should any liquid or solid object fall into the cabinet, unplug the unit and have it checked by the qualified personnel before operating it any further.
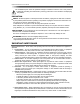
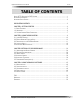
Digital Video Recorder User’s Manual Ver 9.x TABLE OF CONTENTS ABOUT CCTV SERVICES INC DVR SYSTEM. .................................................................................. 1 IMPORTANT INFORMATION. ............................................................................................................ 1 IMPORTANT SAFETYGUARD. .......................................................................................................... 2 DVR SYSTEM CONTENTS. .......................................
Digital Video Recorder User’s Manual Ver 9.x GETTING STARTED Copyright © CCTV Services Inc. All rights reserved.
Digital Video Recorder User’s Manual Ver 9.x 1.1 BASIC FEATURES The Digital Video Recorder (DVR) is the core of the Digital Video Surveillance with Recording System for Security and manufactured by CCTV SERVICES INC. The DVR collects, saves, and plays back the digital video images in a fashion that significantly improves on the defects of existing analog CCTV.
Digital Video Recorder User’s Manual 1.2 Ver 9.x UNPACKING DVR Set Configuration DVR system (1SET) System Power cable DVR User’s Manual Installation CD -Manual -Driver -Setup S/W Key Board / Mouse LCD Monitor(Size depend on order entry) Monitor connect cable /LCD monitor Power Adaptor Components can be changed according to option selection. Please unpack a system in flat and not wet place. Please check all components are in the package. Copyright © CCTV Services Inc. All rights reserved.
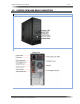
Digital Video Recorder User’s Manual 1.3 Ver 9.x SYSTEM VIEW AND REAR CONNECTION DVR SYSTEM View SYSTRM FRONT VIEW SYSTEM REAR PORT Copyright © CCTV Services Inc. All rights reserved.
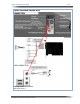
Digital Video Recorder User’s Manual Ver 9.x DVR SYSTEM REAR CONNECTION AUDIO CONNECTION Red input: Audio 1 White input: Audio 2 Copyright © CCTV Services Inc. All rights reserved.
Digital Video Recorder User’s Manual Ver 9.x USING THE DVR SYSTEM Copyright © CCTV Services Inc. All rights reserved.
Digital Video Recorder User’s Manual Ver 9.x 2.1 LOGIN DVR SYSTEM To access the features of the CCTV Services Inc. DVR, each user must log in with a valid user name and password. User names and passwords are case sensitive. There are two user access levels that can be configured on the DVR. Access levels range from the Administrator, with the most rights and privileges, to the restricted user, with the least rights and privileges.
Digital Video Recorder User’s Manual Ver 9.x [NOTICE] When clicking on the Exit button to exit the DVR program, Shutdown message will be appearing on the Screen if not enabling Windows function keys. Normally, DVR SYSTEM will shutdown automatically when detecting physical disk problems (BAD sectors) or the DVR File System corrupted. (ImageDB) 2.3.
Digital Video Recorder User’s Manual Ver 9.x Live image View field Function button KEYLOCK, Setup, search, PTZ, Camera information and CAMERA Button Screen Layout (1~16ch:3120), (21,25: 2120), (36: 2432), Move Page, Full ,Auto TDS, Live Audio, Image Control and Manual Backup, DVR properties, log view, CD BURN button area Exit Company LOGO Live Audio, Client Connection Status FUNCTION BUTTON SEARCH button: This button is pressed to view images that were recorded onto the hard disk drive.
Digital Video Recorder User’s Manual Ver 9.x SCREEN SPLIT BUTTON Select split screen view by clicking screen division buttons. This will change the display to single, 4, 6, 9, 10, 16, 21, 25, 36 split screen views. Description On the single camera mode, you can select individual camera by clicking on the camera number. 1 CAMERA SCREEN: This Button will change the cameras in the main viewing area so there is only a single view of one camera.
Digital Video Recorder User’s Manual Ver 9.x FULL SCREEN BUTTON: FULL SCREEN: This button will make the main viewing area the entire screen. In other words the entire computer monitor will display the cameras only. The toolbar buttons will not be displayed again until the left mouse button is clicked anywhere on the screen. Providing more screen area to display image. Double click anywhere on the screen to show previous screen with interface.
Digital Video Recorder User’s Manual Ver 9.x ADJUST COLOR ADJUST COLOR: This menu will allow you alter the individual characteristics of each camera. The lighting in the cameras view will change throughout the day, with the change of seasons, with changes in weather, and many other variances. These simple to use control bars ensure that your cameras are properly adjusted for your recording environment. When click on the ‘COLOR’ button, COLOR ADJUST button will be appearing in the screen. (Shown below).
Digital Video Recorder User’s Manual Ver 9.x ON SCREEN DISPLAY(OSD) INFORMATION The OSD consists of camera Number, Description, Recording status, PTZ and Audio Instruction that is superimposed on each pane.
Digital Video Recorder User’s Manual Ver 9.x [Control Buttons] • POWER : Camera Power On/Off. • LAMP : Camera Light On/Off. • AUX : Auxiliary Power On/Off. • PTZ Direction Control Panel. • Auto-Pan : Auto PAN On/Off • PTZ Camera Selection. • Iris +/- Button. • Focus in/out Button. • Zoom in/out Button PTZ Panel • Speed up/down Button • PRESET Button.
Digital Video Recorder User’s Manual Ver 9.x 7. Have to save programmed Preset, just click on the SAVE button. 8. Click Exit button to exit programming mode in the Preset dialog. START PRESET 1. Choose the activated Preset position in the Preset list field. PRESET RUN button to testing Preset position, will be Move the Click on the camera according to activated preset position. PRESET TOUR Description A preset tour allows a camera to move through a programmed sequence of PTZ presets.
Digital Video Recorder User’s Manual Ver 9.x START TOURING Choose the listed Tour on the Tour list field in PTZ panel. tour run button to starts touring, , will be moving the camera Click on the according to programmed tour. When users use PTZ and Dome camera with Preset Receiver, however, when using several PTZ cameras at the same time, users can not use Touring.
Digital Video Recorder User’s Manual Ver 9.x SYSTEM PROPERTIES SYSTEM PROPERTIES BUTTON PROPERTIES button: DVR system information display. System information will be appearing after click on the PRORPERTIES button in the DVR Main Screen. (Shown next page) WRITE TO SAVE button for copy this file for ‘System information’ checking ‘systeminfo ‘file is saved in C:\program files\dvr (shown ‘ex’ below) [NOTICE] Please check this syseminfo file if DVR system failed to function or halt.
Digital Video Recorder User’s Manual Ver 9.x LOG VIEWER USING Log View LOG VIEW button is pressed to view DVR system log files. DVR system creates the Log files on the program files folder / DVR folder / Log folder Description during DVR program running. LOGVIEWER dialog will be appearing after click on the LOG VIEW button on the OTHER button field. (Shown below) How to viewing log files, do the following: 1. Choose the log view start date and time, END date and time. 2.
Digital Video Recorder User’s Manual Ver 9.x CD BURN USING CD BURNER CD BURN button for CD burning directly on the DVR main screen. (To burn CD, have to save files onto HDD) CD BURN Dialog will be appearing in the screen, when click on the CD BURN button in the OTHER button field. (Shown below). Add Folder: Adding folder on the CD. Add File: Select the data for burning. RESET: Clear added files or folder. WRITE: Start Burning.
Digital Video Recorder User’s Manual Ver 9.x RETRIEVAL RECORDED DATA Copyright © CCTV Services Inc. All rights reserved.
Digital Video Recorder User’s Manual 3-1 Ver 9.x UNDERSTANDING SEARCH SCREEN Enters the search mode and opens the Search SCREEN, providing access to search features. When click on the SEARCH button in the Viewing Main Screen, Search screen will appear. (Shown below) The name and function of each button are described below. 4 7 10 6 9 5 8 1 3 2 11 INTRODUCE SEARCH MAIN SCREEN The calendar is how the date you wish to view is selected. The days that are YELLOW, are days that have video footage.
Digital Video Recorder User’s Manual Ver 9.x [Color for each Recorded Mode] White: No Data 3. CAMERA SCROLL and Camera Label 4. Information Window 5. Playback Control Panel 6. SPLITS, PANORAMA, ZOOM, FULL button 7. FUNCTIOIN Buttons 8. Book Mark, GoTo Buttons 9. SELECT SOURCE Button 10. Image display Window 11.
Digital Video Recorder User’s Manual 3-2 Ver 9.x RETRIEVAL RECORDED DATA Description Recorded video can be played back one channel at a time on the screen. Like live video, recorded video is viewed from the camera view window on the screen. When click on the SEARCH button in the DVR main screen, The Search Main screen will appear on to screen. (Shown below) To Retrieval Recorded data, do the following: a. Choose the Existing Recorded data information indicated on the Calendar. b.
Digital Video Recorder User’s Manual f. Ver 9.x Click on the Play button to playback in the Play button panel, play back the video on the window. (Shown below) The above Picture show the data when click on the Yellow date. Hour/Minute Table In Hour zone, Red Line is shown by 3 hours for easy checking, and In Min zone, Red Line is shown by 5 minutes as well.
Digital Video Recorder User’s Manual Ver 9.x 1. Cameral Move (Up/Down button) 2. Select camera name or NO 3. Search Pointer Cameras are Grouped 4, users move to next Group just click on 1. Camera Move the Up/Down Button. 2. Select camera name or NO It point out the current SEARCH Hour / Min. 3. Search Pointer It point out the current SEARCH Hour / Min. PLAYBACK PANEL PLAY button: The play button will begin the playing of the video from where you have selected on the camera timeline.
Digital Video Recorder User’s Manual 3-3 Ver 9.x SMART SEARCH THUMBNAIL SEARCH Description Step1 Thumbnail search is a function that helps users to find the videos, they are look for more easily by showing every hour’s stop To access the Motion Detection you will need to open the search feature. Once in the search feature the user will need to click on the SMART SEARCH button.
Digital Video Recorder User’s Manual Ver 9.x MOTION SEARCH Description The advanced Smart Search feature is a new addition to the CCTV SERVICES INC DVR that allows a user to find a certain event of any camera at anytime by utilizing the built in smart search feature. There are two parts to this new function. The first part allows the user to define specific areas of a cameras recording and the software will analyze the footage for the time specified.
Digital Video Recorder User’s Manual Ver 9.x By holding down the left mouse button on the camera view, you draw a box over the area that would like to choose from. Once the area is chosen, a green box will appear from where you did the drawing over the picture. The following picture will show what you will be seeing. Step2 Now that the area is selected, The picture above will show what you have just done. Next Click on the SEARCH button to start search after chosen Search area and adjusted sensitivity.
Digital Video Recorder User’s Manual Ver 9.x 1. Choose the one of date in the list field. 2. Click on the Add button to bookmark on to Motion Selection field. 3. Choose the listed one of bookmark in the Motion Selection field. 4. Just click on the chosen list, and then click on the Play button to playback. If you need to Print or save JPG file, Click on Print button or JPG save button on the Play area in Smart search dialog.
Digital Video Recorder User’s Manual Ver 9.x Adjust Playback Speed Not exist data message will appear if recorded data does not exist.(Shown left) If you need playback in others time zone, do the following: a. Double clicking on chosen year, date and hour. (Shown below) b. Minute drop down menu will be appearing. c. Choose the minute time range to playback on drop down menu d. The recorded image data will playback on the screen e. Click on EXIT button to close Quick search after the stop playback.
Digital Video Recorder User’s Manual Ver 9.x PANORAMA PLAYBACK Description Step1 Step2 PANORAMA a playback feature that shows the motion of a single camera in 4’ 9, or 16 individual frames, one frame at a time. To use this feature, Step 1~5 is the same as one channel SEARCH. (To do the same thing to Hour/Min Zone Search) Click on the PANORAMA button. Click on the PLAY button to Panorama Play back.
Digital Video Recorder User’s Manual Ver 9.x Will be appears Select time dialog(Shown below) Fill in the Channel(camera no), Date and time and Click “OK” go to image location directly and image will be display on to screen. Step2 FULL SCREEN PLAYBACK Description FULL SCREEN button FULL SCREEN playback feature that display full screen image when playback the one splits mode. FULL: The full button will make the recorded video play in full screen.
Digital Video Recorder User’s Manual Ver 9.x AUDIO PLAYBACK AUDIO PLAY AT THE RETRIEVAL IMAGE a. Click on the Audio button when playback recorded image data. b. Play the recorded image with AUDIO. SEARCH IP CAMERA RECORDED DATA EASY FIND OUT IP CAMERA DATA Description To easy search for IP products data (recorded data in file system). Default location is ANALOG when click Search button, Click on the IP Camera button in the Search window screen.
Digital Video Recorder User’s Manual Ver 9.x Step 1 Will be appearing the zoom window.(see left) Select Enlarged area in the image and Draw the Square like left Picture at zoom window.. Selected square image will be enlarged. Step 2 Copyright © CCTV Services Inc. All rights reserved.
Digital Video Recorder User’s Manual Ver 9.x Another zooming by COLOR Adjust panel, COLOR Adjust panel appears on the screen after click Adjustment Button on the on the Search main window. (Shown below) ZOOM IN/OUT On single display, left button double-click on mouse may be used to magnify the image. An image may be magnified no more than three times. (x1, x1.5, x2) Description If recorded data are high resolution (704x480 or 720x480), zoom up function not working.
Digital Video Recorder User’s Manual Ver 9.x Click on the Exit button to close book mark. ON SCREEN BOOK MARK Just click RIGHT button mouse on the chosen image. Bookmark drop down menu will be appearing on to screen. On screen (Shown left) Enter simple description to Identify Bookmark, and click on the OK button. When click on the (Shown below) List button, bookmark list will be appearing. Bookmark list Auto is book marked at the Smart Search. Manual is book marked by book mark button.
Digital Video Recorder User’s Manual Ver 9.x Click on the PRINT button on the print dialog after confirming the image and description Step3 Information of Printed Image 1. Signature: Guaranteed DVR Image. 2. Name and ID of the camera. 3. Site installed, owner, site information. 4. Recorded time: Time recorded by the system. 5. Printed time: Time the image is printed.. 6. Computer User Name. 7. OS and Serial NO. 8. Video Image. 9. Comments.
Digital Video Recorder User’s Manual Ver 9.x USING SELECT SOURCE BUTTON Description Updating all recorded image and reload, To easy go to recorded data location Default data from file DB in Local System at a running Search. If you need to update all recorded image and reload or searching recorded data from other location of file DB, click on the SELECT SOURCE button on the Search screen. Select source drop down menu will be appearing on the screen.
Digital Video Recorder User’s Manual Ver 9.x (File name is made automatically, but can be changed as user wants.) A tick inside the round indicates JPEG, and then will save the image on to chosen Folder of Drive after click on the OK button. Step4 JPEG file copied message will appear after the copy is done. AVI VIDEO FORMAT Description Save is a way that you can save video the footage to hard drive so it will not be overwritten.
Digital Video Recorder User’s Manual Ver 9.x Click on the Start Recording button, AVI format creating will starting. Progress rate bar will appear after clicking on the START RECORDING button, AVI file (full motion video clip) will save to the chosen folder. [NOTICE] Audio Synchronization Function. Audio synchronization with Video is done automatically. But this is done when at least 1 fps is saved,. So users have to save at least 1 fps. So in Motion recording, Audio Synchronization cannot be perfect.
Digital Video Recorder User’s Manual Ver 9.x [NOTICE] Backup Media 1.Default: Backup in the root, C:\_backup in Local HDD(Can be used again) CD/DVD: CD R/RW,DVD R/RW 2. External: Backup in USB external HDD or other external storage. When users named the folder, all backup files are saved in the
Digital Video Recorder User’s Manual Ver 9.x USING THE BACKUP S/W Copyright © CCTV Services Inc. All rights reserved.
Digital Video Recorder User’s Manual Ver 9.x There are 4 kinds of Backup for Manual, Schedule, Concurrent and Direct backup. Moreover users can backup all data file directly just identifying the Backup Date. 4-1 MANUAL BACKUP Users can use this to backup the data recorded in specific camera, time, and minute period with Audio.
Digital Video Recorder User’s Manual Ver 9.x To Manual Backup, do the following: a. Chose the Camera Channel. b. Choose the Time: Set Start Time and End Time. c. Choose the Media to Backup: Default is ‘_Backup Folder’ in Drive C. Backup Folder in Drive C/ CD,DVR Drive / Other External Media(USB HDD etc) d. Fill in the folder name on to folder name area. Message dialog appear (Shown below) if not fill in folder name. e. Backup will be progress after click on the START BACKUP button.
Digital Video Recorder User’s Manual Ver 9.x SCHEDULE BACKUP dialog will be appearing when chosen BACKUP SCHEDULE SETUP in the drop down menu. (Shown below). [Automatic Backup Type] 1. Schedule Backup (Selected Period Backup) 2.Concurrent Backup SELECT BACKUP TIME(Including Full Backup ) Step1 A tick inside the box indicates Schedule Backup enabled. 1) Click on the Select button and select Backup Drive. 2) A tick inside the box indicates Use Auto Deletion if need it.
Digital Video Recorder User’s Manual Ver 9.x 4-3 CONCURRENT BACKUP Description To use Concurrent backup, Schedule Backup(including Full Backup ), users are recommended to use Big Size HDD after calculation of selected data Size. This is done by once in a day. Concurrent Backup is the system to backup the data at the same time when data is saved in HDD.
Digital Video Recorder User’s Manual Ver 9.x Click on the Backup button on the Recorded data Tie Dialog. (Shown left) after chosen date. YMD/Record Start Time ~ YMD/Record End Time for all channels. So users can backup all the data based on this information. Step1 Shift(Select All), Ctrl(Select several data) Step2 Backup will be starting, chosen data backup on to default data save folder. Backup done message will be appear after Backup completely.
Digital Video Recorder User’s Manual Ver 9.x Instruction 1. Open Window Explorer 2. Search DVR folder in ImageDB made directory. 3. Choose the Files to copy in IMAGEDB folder. 4. With Shift, Ctrl key (like Window), or Drag & Drop, users can select the files easily to copy. Have to select Image file and index together as a couple (Ex, WS000017 / WS000017.idx ) 4. Copy them to …. (Please copy this not ) Users can see backup data with Backup Viewer.
Digital Video Recorder User’s Manual Ver 9.x Users have to search and designate the Backup folder exactly. When finding, click on the OK button. Left Picture shows the image when click on the search button in Backup View S/W. Step1 Step2 For Manual Backup, users can see backup data directly on Backup Viewer without Step 3. For Schedule Backup, Concurrent Backup, and Direct Backup, and Manaul Files Copy, users have to Recovery Process (Step3) to see the data by Backup Viewer.
Digital Video Recorder User’s Manual Ver 9.x Step5 1. Click on the Yellow date (which has the recorded data) in the calendar. 2. Search the recorded data by camera, time, and minute on the time table. 3. next step same as Search process. When users want to search other Backup data, users can search this by just clicking ‘Select Source’ button and do the same procedure (Step1~4) and monitor. Details refer to 3.3.5 Select Source.
Digital Video Recorder User’s Manual Ver 9.x FAQ Power Display Video PTZ Recording Remote Search Backup Print Network When DVR power On, Does not boot up system. 1. Check the connection of Power Cable. 2. Check the Voltage (115V/230V).(Switcher) 3. When using Multi-Tab, check the power and connection. When display is not coming. 1. Check the Monitors Power and DVR System Power. 2. Check the connection between DVR and Monitor. 3. Check the Brightness of Monitor.
Digital Video Recorder User’s Manual Ver 9.x WARRANTY CCTV SERVICES will repair or replace, without charge, any merchandise proved defective in material or workmanship for a period of one year after the date of installation or delivered. CCTV SERVICES INC. Warranty Statement 1) CCTV Services extending this warranty only to the original purchaser. 2) This warranty only covers failures due to defects in materials and workmanship by the manufacturer.
Digital Video Recorder User’s Manual Ver 9.
Digital Video Recorder User’s Manual Copyright © CCTV Services Inc. All rights reserved. Ver 9.