
USB
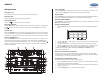

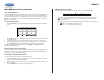


AWM975
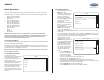
16
1
2 3
4
5 6
7
8 9
+10
10/0
MENU
TUNE+
TUNE-
ENTER
VOL
VOL
T/F
PROG
LANG RPT TITLE
SOURCE
ZOOM
ANGLE
GOTO
AUD
....
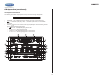
14
15
16
17
18
19
20
22
21
23
24
25
26
27
1
3
5
7
8
9
10
11
12
13
6
4
2
LOUD
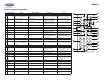
Remote Control Operation
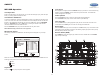
REF DESCRIPTION TUNER WEATHERBAND CD/MP3/USB DVD
1 Power Turn radio on/standy mode. Turn radio on/standy mode. Turn radio on/standby mode. Turn radio on/standby mode.
2 VOL +/- Adjust volume up/down.
Press for Audio Control Setup
menu.
Adjust volume up/down.
Press for Audio Control Setup
menu.
Adjust volume up/down.
Press for Audio Control Setup menu.
Adjust volume up/down.
Press for Audio Control Setup menu.
3 TUNE + Search higher station. Search higher station. Stopping State: UP - Search in
current folder.
Playing State: UP - Next Track.
Stopping State: UP: Next Item.
Playing State: UP: Next Track.
4 TUNE - Search lower station. Search lower station. Stopping State: DN - Search in
current folder.
Playing State: DN - Prev Track.
Stopping State: DN: Previous Item.
Playing State: DN: Previous Track.
5 ENTER Confirm menu selection.
6 MENU Access main DVD menu.
7 T/F Press to toggle clock time/playing
time. Press and hold to set clock.
Press to toggle clock time/playing
time. Press and hold to set clock.
Press to toggle clock time/playing
time. Press and hold to set clock.
Press to toggle clock time/playing
time. Press and hold to set clock.
8 PROG Display Setup Program. Display Setup Program.
9 LANG Display MONO/L, MONO/R, or
STEREO.
Select alternate audio language, if
available.
10 Numeric Keypad Use 1-6 to access preset stations. Use 1-7 to access each of the seven
channels.
Enter track number to access track
directly. For track number > 10, use
10+ followed by second digit.
Enter track number to access track
directly. For track number > 10, use
10+ followed by second digit.
11 Setup View SETUP menu. View SETUP menu.
12 Subtitle Choose subtitle language, if
available.
13 Mute/LOUD Silence Audio output. Press and
hold to turn LOUDNESS feature on/
off.
Silence Audio output. Press and
hold to turn LOUDNESS feature on/
off.
Silence Audio output. Press and
hold to turn LOUDNESS feature on/
off.
Silence Audio output. Press and
hold to turn LOUDNESS feature on/
off.
14 Eject Eject Disc. Eject Disc. Eject Disc. Eject Disc.
15 Previous/Next Select next/previous track. Select next/previous chapter.
16 Directional
Buttons
Move to desired menu item and then
press ENTER to confirm.
Use with DVD menu to move to
desired menu item and then press
ENTER to confirm.
17 Fast Reverse/
Forward
Fast Forward 2X, 4X, 8X, 20X.
Fast Reverse 2X, 4X, 8X, 20X.
Fast Forward 2X, 4X, 8X, 20X.
Fast Reverse 2X, 4X, 8X, 20X.
18 Play/Pause Pause/resume playback. Pause/resume playback.
19 Stop Stop playback. Stop playback.
20 TITLE Press to view title menu, then use
directional arrows and play button
play selected title. May not be
supported by all discs.
21 RPT Repeat track. Repeat chapter.
22 SOURCE Select source for playback. Select source for playback. Select source for playback. Select source for playback.
23 ZOOM Zoom picture or press repeatedly to
change magnification level.
24 ANGLE Select alternate viewing angle, if
available.
25 AUD Access Audio Menu options.
26 GOTO Select exact time, track or chapter
for playback.
Select exact time, track or chapter
for playback.
27 Display Display current playback information
on the screen.
Display current playback information
on the screen.