washing machine contents WARNINGS 4 SPECIFICATIONS 5 INSTALLATION AND ASSEMBLY 6 USING THE APPLIANCE.
warnings To avoid the risk of fire, electric shocks, injury or damage when using your washing machine, please take the following precautions: This washing machine comes with a manual that includes operating, maintenance and installation instructions. Please read all the instructions before using the washing machine.
washing machine specifications Power cord Work top Control panel Detergent dispenser Drain hose Stainless steel drum Hatch Accessible filter (behind kickplate) Kickplate Adjustable feet ACCESSORIES Water inlet hose.
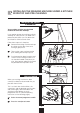
washing machine installation and assembly AND 1 UNPACKING UNBLOCKING THE a WASHING MACHINE UNPACKING a Remove the base, corner protectors and top cover. UNBLOCKING a Remove the screws holding the plastic covers to the back of the washing machine. b Loosen and remove the 3 blocking screws. Important c Cover the holes with the plastic covers you have just removed. a/c Do not throw the blocking screws away. You may need to move the washing machine at a later date.
TO THE MAINS WATER SUPPLY AND 2 CONNECTION DRAINAGE installation and assembly CONNECTION TO THE MAINS WATER SUPPLY The water supply hose is inside the drum: a Connect the bent end of the hose to the threaded inlet of the electrovalve located at the rear of the washing machine. Important b Connect the other end of the hose to the water intake. Then securely tighten the connection nut.
THE WASHING MACHINE AND CONNECTING 3 LEVELLING IT TO THE MAINS ELECTRICITY SUPPLY installation and assembly Important LEVELLING Use the adjustable feet to level the washing machine. This will reduce the noise level and prevent it from moving during use. Do not bring the feet too far out, you will achieve better stability. You need to use a spanner for the models that have a nut.
THE WASHING MACHINE UNDER A KITCHEN 4 INSTALLING WORKTOP AND PRE-CLEANING INSTALLATION UNDER A WORKTOP a Your washing machine may be fitted underneath a kitchen worktop. If you need to remove the washing machine’s worktop, for safety reasons you need to fit a protection plate which you can obtain from your Dealer or CDA Customer Care. Follow these steps to fit the plate: a Remove the washing machine work top by taking out the side screws and moving it gently back.
washing machine using the appliance and practical tips 1 PREPARING GARMENTS FOR WASHING Important PREPARATION Before placing the clothes in the drum, make sure all the pockets are empty. Any small objects may block the drain pump. SORTING THE CLOTHES a Sort the clothes according to fabric and how they are made: We recommend using the delicate programmes for sensitive fabrics. There is a special wool programme for woollens. Important Make sure beforehand that your woollens can be machinewashed.
2 USING DETERGENT AND ADDITIVES using the appliance and practical tips DETERGENT AND ADDITIVES a a Your washing machine’s detergent dispenser has three compartments. Prewash Wash Fabric softener b Put the detergent or additive into the detergent dispenser before starting the wash programme. Important c Liquid detergents may also be used in this washing machine. The level of liquid must never be higher than the MAX mark printed on the dispenser wall.
3 SELECTING THE WASH PROGRAMME using the appliance and practical tips start/ pause key delay start selector command models without a screen O WASH SPIN-DRYING Anticrease detergent dispenser programme selector command spin-drying selector command RINSE END DELAY START INTENSIVE EASY WASH IRONING intensive wash key EXTRA RINSE easy ironing key additional function 12 START PAUSE extra rinsing key
using the appliance and practical tips To select a wash programme, proceed as follows: a O Quick 30’ a Select the wash programme by turning the programme selector (see programme table). b In the command carrier the End of Programme pilot light flashes on and off. WOOL Spin c Press the start/pause button.
Wool prog.
Ant -crease Total consumption kWh/litres 5 Kg 6 Kg Approx. duration (minutes) 1.
4 SELECTING THE ADDITIONAL FUNCTIONS using the appliance and practical tips SPIN-DRYING a The selected programme is associated with spin-drying revolutions. b SPIN-DRYING SPIN-DRYING a It can be changed by turning the spindrying selector command. b Elimination of spin-drying By turning the spin-drying selector command we come to the spin-drying elimination command. A programme without final spin-drying; it is used for avoiding the formation of creases in special fabrics.
using the appliance and practical tips EASY IRONING This option avoids the formation of creases in the garments by the operation of a special programme with special turns to soften the clothes after the spin so as to make ironing easier. INTENSIVE WASH EASY IRONING EXTRA RINSE INTENSIVE WASH EASY IRONING EXTRA RINSE EXTRA RINSE Increases the level of the final rinse obtained in the clothes; suitable for large loads and garments belonging to people with sensitive skin.
5 WASH PROGRAMME PHASES AND POWER CUTS using the appliance and practical tips PROGRAMME PHASES When the programme is running, the phase the programme is at will appear on the display together. WASH RINSE END The active phases will appear successively as the programme progresses: the wash, rinse and end. Pressing the start/pause button during the wash activates the PAUSE function.
washing machine maintenance and cleaning MAINTENANCE After each wash, leave the door open for a while to allow the air to circulate freely inside the machine. Important From time to time, depending on the hardness of your water, it is recommendable to run a full wash cycle using a decalcifying product. This will extend the life of your washing machine. The washing machine should be disconnected from the mains electricity supply before any cleaning or maintenance is carried out.
THE ACCESSIBLE FILTER 2 CLEANING AND THE OUTSIDE maintenance and cleaning CLEANING THE FILTER a Clean the accessible filter if the drain pump is blocked by any foreign objects. a Remove the kickplate by pulling gently on its edges and turning it downwards, to release the clips. If you do not have access from the side, insert a small screwdriver into the three slots at the top of the kickplate, in order to get leverage and release the clips.
washing machine Important safety and troubleshooting If you detect any problems with your washing machine, you will probably be able to rectify them yourself by consulting the following instructions. Never open up the appliance. There is no fuse or similar component inside that can be replaced by the user. If this is not the case, unplug the appliance and contact CDA CUSTOMER CARE. Indicator Indicator mod. with a screen mod.
safety and troubleshooting Why doesn’t the washing machine take in water? Indicator F01, no water coming in, this may be due to a cut in the water supply, a tap turned off or a blocked water inlet filter. The possible solutions are as follows: wait for the water supply to be reconnected, turn on the tap, or remove the water inlet hose and clean the filter. If this failure is detected, F01 will appear on the display or the wash and rinse pilot lights will flash.
safety and troubleshooting Why is there still some water in the dispenser? This may be because the dispenser needs cleaning. This simple operation is described in Maintaining and cleaning the appliance. 1- Cleaning the detergent dispenser. Why can’t I open the hatch immediately after the wash has finished? Washing machines today are provided with safety systems for users. One of them is that the washing machine cannot be opened until it is certain that the drum is quite still.
washing machine environmental warnings eco-note INFORMATION FOR THE CORRECT DISPOSAL OF WASTE ELECTRICAL AND ELECTRONIC APPLIANCES When your appliance is of no further use, it should not be disposed of together with general domestic waste. It can be taken, free of charge, to a specific waste collection centre, run by your local authority, or dealers who provide this service.
04/07 LJ6A030S0