CI931 CI93 1 Int Integrated egrrat a ed e W Washing a ashing Mac Machine hine e Manual ffor or o Inst Installation, allattion, Use and Maint Maintenance enancce *\Z[VTLY *HYL +LWHY[TLU[ ;OL .YV\W 3[K /HYI` 9VHK 3HUNHY 5V[[PUNOHTZOPYL 5. *\Z[VTLY *HY L +LWHY[TLU[ ;OL .YV\W 3[K /HYI` 9VHK K 3HUNHY 5V[[PUNOHTZOPYL 5. /@ ; : 01949 service@cda.eu www.cda.eu 0194 49 862 012 F : 01949 862 003 E : service@ @cda.eu W : www .cda.
Contents Page 1 Important information Page 2 Warnings Page 3 Washing machine specifications Page 4 Unpacking the washing machine and removing the transit bolts Page 5 Connecting to the mains water supply Page 6-7 Levelling and electrical information Page 8 Before first use Page 9 Preparing garments for washing Page 10 Detergents and additives Page 11-12 Selecting the wash programme Page 13-14 Programmes Page 15 Spin speed and anti-crease Page 16 Time delay Page 17 Starting up Page
Important This appliance must only be used for the purpose for which it is intended, i.e. domestic use. Any other use could be dangerous and may lead to premature failure of the appliance. The CDA Group Ltd cannot be held responsible for injuries or losses caused by incorrect use or installation of this product. Please note that CDA reserve the right to invalidate the guarantee supplied with this product following incorrect installation or misuse of the appliance.
Warnings To avoid the risk of fire, electric shocks, injury or damage when using your washing machine, please take the following precautions: s Please read all the instructions before using the washing machine. s Do not wash items that have previously been cleaned, washed, soaked or treated with petrol, solvents for dry cleaning, other inflammable substances or explosives, as they produce fumes that could catch fire or explode.
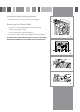
Unpacking the Washing Machine s Remove the base, corner protectors and top cover (Figure 1). Removing the Transit Bolts s Remove the screws holding the plastic covers to the back of the washing machine (Figure 2 and 3). s Loosen and remove the 3 transit bolts (Figure 3). s Cover the holes with the plastic covers you have just removed (Figure 2). fig. 1 Do not throw the transit bolts away. If you need to move the washing machine after installation you should first replace the transit bolts. fig. 2 fig.
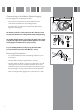
Connecting to the Mains Water Supply The water supply hose is located inside the drum. s Connect the bent end of the hose to the threaded inlet of the electrovalve located at the rear of the washing machine. s Connect the other end of the hose to the water inlet. Then securely tighten the connecting nut. fig. 4 The drain hose must be securely fastened to the outlet to prevent any risk of the drain hose becoming detached and causing flooding.
Levelling s To reduce the noise level from the washing machine and to prevent unnecessary movement during use, you should ensure the washing machine is level using the adjustable feet. Please note: Raising the washing machine too high can affect the stability of the appliance. fig. 7 Electrical Connection s Check the rating plate located on the porthole door of the washing machine before connecting the appliance to the power supply. Ensure that the voltage reaching the plug is the same as that on the plate.
Electrical information Warning! This appliance must be earthed. The mains lead of this appliance has been fitted with a BS 1363A 13 amp fused plug. To change a fuse in this type of plug, follow the steps below: 1. Remove the fuse cover and fuse. 2. Fit replacement 13A fuse, ASTA approved to BS 1362 type, into the fuse cover. 3. Replace fuse cover. Important: Do not use the appliance without the fuse cover in position.
Before First Use s When your washing machine has been correctly installed, we recommend that you pre-clean the machine. This is to check that the installation, the connections and the drainage are all correct, and to thoroughly clean the inside of the washing machine before any wash programmes are run (see the operating instructions on the following pages). fig. 10 s Prior to pre-cleaning you should ensure the transit bolts have been removed. s Select the normal programme at 60ºC (Figure 10).
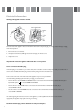
Preparing Garments for Washing Preparation s Before placing the clothes in the drum, make sure all the pockets are empty (Figure 11). Any small objects may block the drain pump. Sorting the Clothes fig. 11 Sort the clothes according to fabric and how they are made: 0TWVY[HU[ s We recommend using the delicate programmes for sensitive fabrics. There is a special wool programme for woollens (Figure 12). s Sort clothes according to how soiled they are (Figure 13).
Detergents and Additives Your washing machine’s detergent dispenser has three compartments. 79,>(:/ >(:/ -()90* :6-;,5,9 s Add the detergent or additive to the detergent dispenser before starting the wash programme (Figure 15). s Liquid detergents may also be used in this washing machine. The level of liquid must never be higher than the MAX mark printed on the dispenser wall. fig. 15 Remember that the amount of detergent to be used will always depend on: s The amount of clothes to be washed.
Selecting the Wash Programme Start/stop Start/stopbutton button Screen drying time Drying time start pause spin CI931IN delay timer option 6Kg Detergent dispenser Programme selector dial Spin and Delay time anti-crease button button Additional function button fig. 18 To select a wash programme: s Press the programme selector dial to release it (Figure 19) . s Select the wash programme by turning the programme selector dial (Figure 19 - See programme table).
Washing Machine Programmes There are five types of programme: Normal programmes Delicate programmes Wool programme Auxiliary programmes Drying programmes PROGRAMMES Normal Auxiliary Wool Delicate Delicate 1 Normal 8 Delicate cold 12 Wool 35oC 12 Rinses 14 Normal Dry 2 Quick 30oC 9 Delicate 30oC 13 Spin Drying 15 Delicate Dry 3 Normal 30oC 4 Normal 40oC 10 Delicate 40oC 5 Normal 60oC 6 Normal 90oC 7 Prewash 60oC Eco Note We recommend you choose a wash programme without prewash whenever possib
Washing Machine Programmes Drying prog. Auxiliary prog. Wool P.
Washing Machine Programmes Max load of clothes (Kg) Wash product compartment Programme description Total consumption kWh/litres Approx.
Spin Speed Selection and Anti-Crease You should first select the wash programme and then select the wash options (Changing the programme cancels the preset selected options). Each selected programme has its own preset spin speed. drying time spin delay timer option fig. 22 Spin speed s You can reduce the spin speed or remove it completely by pressing the spin button (Figure 22). drying time s The spin speed will gradually reduce each time the spin button is pressed at 100 r.p.m.
Delay Timer Delay timer selection button drying time s A delay of up to 24 hours can be selected. The delay must be selected after choosing the wash programme. s To set the required delay, press the delay timer button (Figure 26). Each time the button is pressed the delayed start of washing is increased by one hour. spin delay timer option fig. 26 Cancelling the delay s To cancel the delay, press the delay timer button repeatedly to cycle through the full 24-hours, and then press again.
Starting Up Start/Pause button s To start up the washing machine you have to press the Start/Pause button (Figure 29). s The time remaining (in minutes) until the end of the programme will appear on the display at all times. drying time delay imer option fig. 29 Lock Function Lock function selection s The lock function ensures that the programme will not be affected if any buttons are pressed. It is used when children could press the buttons, etc.
Programme Phases and Power Cuts Programme Phases s When the programme is running, the programme phase and the time remaining will appear on the display (Figure 32). s The active phases will appear successively at the top of the display as the programme progresses (Figure 32). The time remaining until the end of the programme will also appear on the display. It updates at regular intervals, but not minute by minute. fig.
Maintenance After each wash, leave the door open for a while to allow the air to circulate freely inside the machine. From time to time, depending on the hardness of your water, it is recommendable to run a full wash cycle using a decalcifying product. This will extend the life of your washing machine. Cleaning the Detergent Dispenser Clean the detergent dispenser whenever there is any washing product residue left inside. s Pull outwards on the detergent dispenser to remove it completely (Figure 34). fig.
Cleaning the Filter s Clean the accessible filter if the drain pump is blocked by any foreign objects. s Open the kickplate cover with the aid of a coin and by gently pulling open (Figure 36). s Place a container under the drain pump filter to collect any water that fig. 36 comes out of it (Figure 37). s Remove the drainpipe, place it on the container and open the cover. Water will start to come out. s Half- or quarter-turn the filter to the left and water will start to come out (Figure 37).
Safety and Troubleshooting s If you detect any problems with your washing machine, you will probably be able to rectify them yourself by consulting the following instructions. s If this is not the case, unplug the appliance and contact CDA Customer Care. Do not open up the washing machine. It does not contain any fuses or similar components than can be replaced.
Problems Why doesn’t the washing machine drain or spin-dry? s If this failure is detected, F02 will appear on the display. The reasons for the F02 indicator may be the following: s s The washing machine drain pump is blocked, building drainage pipes are blocked, or incorrect pump electrical connection. s Solution: if the pump is blocked, gain access to it as described on page 19, cleaning the filter.
To contact our Customer Care Department, or for Service, please contact us on the details below. 01/10 LJ6A036A3 / B0J6A4600 *\Z[VTLY *HYL +LWHY[TLU[ ;OL .YV\W 3[K /HYI` 9VHK 3HUNHY 5V[[PUNOHTZOPYL 5. /@ ; : 01949 862 012 F : 01949 862 003 E : service@cda.eu W : www.cda.