
Troubleshooting guide


11
g. 7
g. 8
g. 9
g. 10
Reversing the Door
It is possible to reverse the door on this appliance, if required.
To do so, follow the steps below:
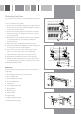
1. Remove the rear ventilation trim (2) by removing screws (1)
and then remove the front ventilation trim (4) by removing
screws (3) as shown in gure 7.
2. Remove the lower hinge (5) by removing the four screws
6) as shown in gure 8. Support the door as you do this
to prevent damage.
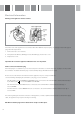
3. Gently lower the door away from the top hinge and place
on a padded surface to avoid the risk of damage as
shown in gure 9.
4. Remove the upper hinge (10) as shown in gure 10.
5. Unscrew and transfer pins (7/8) from the lower hinge plate
to the opposite side as shown in gure 8.
6. Pop out the cover caps on the opposite side and use
them to cover the screw holes on the original side.
7. Fit the alternative upper hinge on the opposite side.
8. Rotate the door 180º and relocate it on the top hinge.
9. Ret the modied lower hinge into the door and secure it
to the appliance body using the screws removed in step 1.
10. Ret both ventilation trims.
Please note:
Keep the spare hinge plate(s) to be able to reverse the door
back again.
1 - Rear ventilation trim screw access and screw
2 - Rear ventilation trim
3 - Front ventilation trim screw
4 - Front ventilation trim
5 - Lower hinge
6 - Lower hinge xing screw
7 - Short hinge pin
8 - Main hinge pin
9 - Hinge bracket
10 - Upper hinge
11 - Upper hinge xing screw
12 - Replacement top hinge