HCN610 Induction Hob Manual for Installation, Use and Maintenance Passionate about style Customer Care Department • The Group Ltd. • Harby Road • Langar • Nottinghamshire • NG13 9HY T : 01949 862 012 F : 01949 862 003 E : service@cda.eu W : www.cda.
Important The CDA Group Ltd cannot be held responsible for injuries or losses caused by incorrect use or installation of this product. Please note that CDA reserve the right to invalidate the guarantee supplied with this product following incorrect installation or misuse of the appliance or use in a commercial environment.
• Always use appropriate cookware. • Do not cook unopened tins of food directly on the hob. • Never put cooking foil or plastic materials on the ceramic surface when the hob is hot. These materials could melt and cause damage to the hob. • This hob (Class 3) has been designed for use only as a cooking appliance. Any other use (e.g. heating rooms) should be considered incorrect and therefore dangerous.
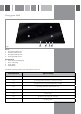
Using your Hob 3 2 1 4 5 Fig.1 6 7 8 Zones: 1. Front left 2.3 kW 210 mm 2. Back left 2.3 kW 180 mm 3. Back right 2.3 kW 210 mm 4. Front right 2 kW 160 mm Control panel: 5. Zone control keys and display 6. Timer control keys 7. Timer display 8. Childlock key The table below offers guidance as to what each power level is for.
Using your Hob Please note: • A dot will show on either the zone control display or the timer display to demonstrate which is the active control. To select a different control, touch either the required zone control key or the timer key. To switch the zone on • Touch the zone control key for the required zone. The zone control display will flash with 0 and for the relevant zone and the hob will beep to confirm the zone is on.
The childlock The hob is equipped with a childlock to lock the controls. This can be used when the hob is off or during cooking. To set the childlock • Touch the childlock key for approximately three seconds until the LED above the childlock key illuminates and the hob beeps to confirm the childlock is switched on.
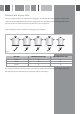
Efficient Use of your Hob The hob is equipped with zones of different sizes, designed to accommodate most shapes and sizes of pan. For best results, only use pans with flat bottoms and choose an appropriate zone depending on the size of the pan. The most efficient use of the hob is shown below, where the pan and zone are correctly chosen. Use pan lids where possible to minimize the energy usage of your appliance. Fig.
Care and Maintenance Always disconnect the appliance from the power supply before undertaking any cleaning or maintenance. Important: • Steam cleaners must not be used when cleaning this appliance. • You should use a non-abrasive cleaner to clean the hob top. Any abrasive cleaner (including Cif) will scratch the surface and could erase the control panel markings. • Sugar and starch can cause permanent damage to the surface of the hob. Wipe away any spillages immediatly.
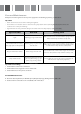
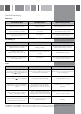
Troubleshooting On first use You observe that Possible Causes What should you do? The display shows a series of digits and symbols on first connection Working normally Nothing, the hob will be ready to use within approximately 30 seconds Installation blows a fuse or only one side of the hob works The electrical connection of the hob is incorrect Check that it is set up properly (see the Electrical Connection section) The hob produces an odour during the first cooking sessions New appliance Heat
Fitting the Hob Unpacking the hob: Take care not to lose or mishandle any parts. Fitting position of the hob: This appliance must be installed a minimum of 50mm from any back wall and a minimum of 180mm away from any adjacent vertical surfaces, e.g. a tall cupboard end panel. This may be reduced to 100mm if the adjacent surface is resistant to fire (tiles or steel, for example). These dimensions are shown in Fig.6.
How to install the hob: Overall dimensions of the hob: Width: 580mm Depth: 510mm Worktop cut-out dimensions: Width: 560mm Depth: 490mm 1. Make the required hole in the worktop. Before doing this, you must check the instructions supplied with any cooker hood to ensure that you will have the required clearance. The cut-out (Fig.6) shows a 60mm gap from the wall to the cut-out edge. The distance from the hob, when fitted, to the back wall is 50mm.
Mains Electricity Connection Warning! this appliance must be earthed We recommend that the appliance is connected by a qualified electrician, who is a member of the N.I.C.E.I.C. and who will comply with the I.E.E. and local regulations. This appliance is intended to be connected to fixed wiring and is not suitable for connection to a 13a plug or 13a supply. This appliance is intended to be connected to fixed wiring by a double pole switch, having a contact separation of at least 3mm in all poles.
To contact our Customer Care Department, or for Service, please contact us on the details below. Passionate about style Customer Care Department • The Group Ltd. • Harby Road • Langar • Nottinghamshire • NG13 9HY T : 01949 862 012 F : 01949 862 003 E : service@cda.eu W : www.cda.