HVC 32 .. - Touch Control Vitroceramic Cooking Hob Manual for Installation, Use and Maintenance Customer Care Department • The Group Ltd. • Harby Road • Langar • Nottinghamshire • NG13 9HY T : 01949 862 012 F : 01949 862 003 E : service@cda.eu W : www.cda.
Important This appliance is designed and manufactured solely for the cooking of domestic (household) food and is not suitable for any non domestic application and therefore should not be used in a commercial environment. The appliance guarantee will be void if the appliance is used within a non domestic environment i.e. a semi commercial, commercial or communal environment. The CDA Group Ltd cannot be held responsible for injuries or losses caused by incorrect use or installation of this product.
Before Using for the First Time – Read the instructions carefully before installing and using the appliance. – After unpacking the appliance, make sure it is not damaged. In case of doubt, do not use the appliance and contact your supplier or a qualified engineer. – Remove all packaging and do not leave the packing material (plastic bags, polystyrene, bands etc) in easy reach of children as they may cause serious injury. The packaging materials are recyclable.
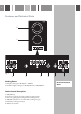
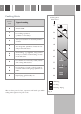
Features and Technical Data 2 1 Fig. 1 4 3 7 Cooking Zones 1. Hi-light cooking zone Ø 140 mm - 1200 W 2. Double hi-light cooking zone Ø 180/120 mm - 1700/700 W Touch-Control Description 3. ON/OFF key 4. Front zone (1) keys (increasing and decreasing power) 5. Rear zone (2) keys (increasing and decreasing power) 6. ON/OFF outside zone of rear double cooking zone (2) 7. Automatic cooking timer keys 8.
Cooking Zones Features The ceramic surface of the hob allows a fast transmission of heat in the vertical direction, from the heating elements underneath the ceramic glass to the pans set on it. The heat does not spread in a horizontal direction, so that the glass stays “cool” at only a few centimeters from the cooking plate. The 2 cooking zones are shown by painted disks on the ceramic surface. Before switching on the cooktop make sure that it is clean.
Cooking Hints Power Level Cooking Zone Power Level Type of cooking 1 0 Switched OFF 1 For melting operations (of butter or chocolate). 2 3 4 5 2 3 To keep foods warm or heat small quantities of water. 4 To heat greater quantities of water and to whip creams and sauces. 5 5 6 6 Slow boiling, e.g. spaghetti, soups, boiled meats, to continue steam heating of roast meats and stews. 6 For all kinds of fried foods, steaks, cutlets and cooking without a lid.
Residual Heat Indicators When the temperature of a cooking plate is above 65°C, the relevant H in the touch control display is also lit-up (with the cooking plate switched off) to warn of heat on the surface of the hob. This H symbol also stays on after the touch control panel has been switched off to shown that the hob surface is still hot. This residual heat lasts for a rather long time after the cooking plate has been switched off.
Safety Hints – Before you switch the hob on, make sure you know which control keys control the required cooking zone. We advise you to set the pan over the cooking zone before switching it on. – Do not use pots and pans with rough bases (pay attention to cookware made of cast-iron). Rough bases can damage the glass surface of the hob (scratches). – Always ensure that the base of your saucepan is clean and dry before placing on the hob.
How to Use the Touch-Control Notes: – Each selection (by pressing one of the keys) is indicated by an acoustic signal (beep). – If the environmental light conditions are excessive (e.g. halogen hood light/s on), the user interface operation could be stopped (the displays show " F " and " L " alternating - error message " F L ") until the correct light conditions will be recovered. In this case the direct environmental light/s must be switched off before operating the cooktop.
How To Turn the Touch Control ON and OFF Switching ON and keep it pressed until the touch control is Press the key lighted. The displays of the cooking zones read " 0 ". Notes: – If the safety key-lock protection is active, the touch control can be turned ON only after having deactivated this protection. – Auto switch-off: If a cooking zone is not turned ON within 10 seconds, the touch control will automatically switch off.
Power Ignition and Adjustment of a Cooking Zone To turn ON a cooking zone the touch control must be switched ON (see section “How To Turn the Touch Control ON and OFF”). and keep it pressed until the desired power Press the key level, ranging between 1 and 9 is set. As an alternative, press the key . The choice starts from level 9 (maximum level) down to 1 (minimum level).
Fast Automatic Heating of the Cooking Zones This function permits fast heating up at the maximum power level, followed by heating at the preset power level. The duration of the automatic fast heating up period is preset and depends on the selected power level. To activate the heat-up function select the power level " 9 " and then touch again the key ; the luminous point at the bottom right side of the display will blink for 10 seconds.
Safety Key-Lock to Protect Children This function locks the touch-control keys against unwanted activation. To activate the key-lock press the key ; the indicator light above the key symbol will light up. – Cooking zone/s operating (power level already set) - with the key-lock protection active it is only possible to switch off the cooktop. – Cooktop off - with the key-lock protection active it is not possible to use the cooktop. To use the cooktop deactivate this protection.
Program for Automatic Switching OFF of One Cooking Zone This function permits to set a timer from 1 to 99 minutes for automatic turning OFF of one cooking zone only. Note: It is not possible to set this program for both the cooking zones. With the touch control switched ON press the timer keys or . By pressing the key By pressing the key the initial value is 0 . the initial value is 99. The displays of the cooking zones show " " (timer).
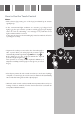
Operation Time Limit of Cooking Zones Each cooking zone is automatically switched OFF after a maximum preset time if no operation is performed. The maximum preset time limit depends on the set power level, as illustrated in this schedule. Each operation on the cooking hob by using the keys , will reset the maximum operation time at its initial value.
Error Code on the Display/s If an error message appears on the display/s (the display/s show/s " F " and another character alternating - e.g. " F " and " A ", " F " and " 0 ", .....) : 1. Disconnect the cooktop from the mains. 2. Reconnect the cooktop and turn it on. 3. Wait for about two minutes and if the problem does not appear the cooktop can be used. 4. If the problem does not disappear repeat step from 1 to 3. 5.
Cleaning and Maintenance Cleaning the Ceramic Hob – Remove spillages and other types of incrustations. – Dust or food particles can be removed with a damp cloth. – If you use a detergent, please make sure that it is not abrasive or scouring. Abrasive or scouring powders can damage the glass surface of the hob. – All traces of the cleaner must be removed with a damp cloth. – Dust, fat and liquids from food that has boiled over must be removed as soon as possible.
TIPS FOR INSTALLATION Installation CAUTION: This appliance shall only be serviced by authorised personnel. – This appliance is to be installed only by an authorised person according to the current local regulations and in observation of the manufacturer’s instructions. – Incorrect installation, for which the manufacturer accepts no responsibility, may cause personal injury of damage. – Always disconnect the cooktop from mains power supply before carrying out any maintenance operations or repairs.
This cooktop can be built into a working surface 20 to 40 mm thick and 600 mm deep. In order to install the ceramic hob into the kitchen fixture, a hole with the dimensions shown in figure 8 has to be made, keeping in consideration the following: – Within the unit, between the bottom of the hob and the upper surface of a shelf there must be a clearance of at least 30mm (fig. 9). – It is absolutely essential that you place a separator between the base of the hob and the built-in unit.
Fastening the Cooktop Each cooktop is supplied with a set of tabs and screws to fasten it on units with a working surface from 2 to 4 cm deep. The kit includes 4 tabs A and 4 self-threading screws B (fig. 11). – Cut the unit. – Turn the hob upside down and rest the glass side on a cloth. – Spread the seal C around the edge of the hob (fig. 12). – Put tabs A into the mountings; only tighten screws B a few turns. Make sure that the tabs are mounted correctly as shown in the figure 11.
Mains Electricity Connection Incorrect installation may be dangerous and the manufacturer can not be held responsible. Warning! This appliance must be earthed The manufacturer declines all responsibility for any problem caused by failure to observe this rule. THIS APPLIANCE MUST BE CONNECTED TO THE MAINS SUPPLY BY A COMPETENT PERSON, USING FIXED WIRING VIA A DOUBLE POLE SWITCH AND PROTECTED BY A SUITABLE FUSE. THIS APPLIANCE IS NOT SUITABLE FOR CONNECTION TO A 13A PLUG OR SUPPLY.
Connection of the Power Supply Cable Unhook the terminal board cover by inserting a screwdriver into the two hooks A (fig. 13). Open the cable gland by unscrewing screw F (fig. 14), unscrew the terminal screws and remove the cable. The new supply cable, of suitable type and section, is connected to the terminal board following the diagram of fig. 15. A F Fig. 13 Feeder Cable Section Type H05RR-F 230 V~ Fig. 14 230 V E N L 3 x 1.5 mm2 L N E Fig.
Appliance Servicing CDA provide a quality and effective after-sales service to cover all your servicing needs. Please attach your receipt to this page for safekeeping. Please help us to help you by having the following information available when booking a service-call: 1. Model type, make and model – see the product data plate. 2. Evidence of installation / purchase date 3. Retailer where appliance was purchased 4. Clear and concise details of the fault 5.
Cod. 1103579 - ß4 To contact our Customer Care Department, or for Service, please contact us on the details below. Customer Care Department • The Group Ltd. • Harby Road • Langar • Nottinghamshire • NG13 9HY T : 01949 862 012 F : 01949 862 003 E : service@cda.eu W : www.cda.