
Operating instructions


4-24 Operating Instructions
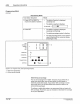
Programming Stitch
(continued)
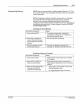
Reactivating Stitch
Push Button Sequence
Result
1. Press LEFT or
RIGHT
to
•
The
stitch off symbol is displayed
move to the stitch on symbol.
constantly and
•
The
stitch on symbol is flashing:
(rUSHING)
I
·•
I
2. Press
SET.
•
The
stitch on symbol
is
displayed
constantly (not flashing).
•
The
stitch percentage symbol is flashing .
•
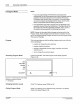
The
right-most digit of the current stitch %
value is flashing
in
the numerical display
area (Figure 4.16).
L
OCK
--
CONFIGURE
I
II
1
PR
OGRAI-4
+
RUH
uu
TEST
t.1Et.10RY
A
CHANNEL
1
TRIGGER
1
-II
TRANSITION
STITCH
•
X
2
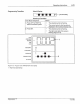
Figure 4.
16-
Program mode, stitch percentage display
1
-Right-most
di
git
flashing
2
-Percent
symbol flashing
p~
10
838
9A
57
·2
8 1/93
Determining % Coverage
You
can set coverage from
0-1
00%.
Of
course,
if
you select 0% or
some other small value, you will have either no stitch beads
or
extremely small stitch beads.
If
you select 100% coverage
or
some
other large value, you
will have either one continuous bead or an·
almost continuous bead.
To
achieve a useful stitch pattern,
we
recommend that you begin with
50% coverage. From there, you can increase or decrease the coverage
to suit your application.
Nor
dso
n Corpo
ra
tion 1993
All
Roght.s
R
esel\le
d