
Technical data
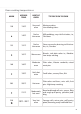


24
Changing the Oven Light
1. Disconnect the electrical power supply (for example, by switching o the main power switch).
2. Unscrew the light cover
3. Fit a new bulb.
4. Ret the cover.
Note:
Use only bulbs designed to resist up to 300°C with the following characteristics: 230 V, type E14 and same
power (check watt power as stamped in the bulb itself) of the replaced bulb.
Burners and Grids
• These parts can be removed and cleaned with appropriate products.
• After cleaning, the burners and their ame spreaders must be well dried and correctly replaced.
• It is very important to check that the burner ame spreader and the cap have been correctly positioned.
Failure to do so can cause serious problems.
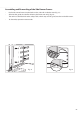
• Check that the electrode “S” (gs. 24 - 26) next to each burner is always clean to ensure trouble-free
sparking.
• Check that the sensor “T” (gs. 24 - 26) next to each burner is always clean to ensure correct operation of
the safety valves.
• Both the sensor and ignition plug must be very carefully cleaned.
• Note: To avoid damage to the electric ignition do not use it when the burners are not in place.
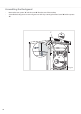
Correct Positioning of the Auxiliary, Semi-Rapid and Rapid Burners
It is very important to check that the burner ame spreader “F” and the cap “C” have been correctly positioned
(see gs. 24 and 25).
Failure to do so can cause serious problems.
Correct Position of the Triple Ring Burner
The triple ring burner must be correctly positioned (see g. 26); the burner ribs must be tted in their housing
as shown by the arrow.
The burner correctly positioned must not rotate (g. 27).
Then position the cap “A“ and the ring “B“ (gs. 27 - 28)