EN GUIDE TO INSTALLATION Oven
Dear Customer, You have just acquired a CDA oven and we would like to thank you. We have invested all our dedication and know-how in this appliance so that it would best meet your needs. With innovation and performance, we designed it to be always easy to use. In the CDA product range, you will also find a wide choice microwaves, cooking hobs, ventilation hoods, cookers, that you can coordinate with your new CDA oven.
EN TABLE OF CONTENTS 1 / NOTICES TO THE USER • Safety Recommendations ___________________________________ • Environment ______________________________________________ •Child safety ________________________________________________ 4 5 5 2 / INSTALLING YOUR APPLIANCE • Choice of location __________________________________________ • Building in ________________________________________________ • Electrical connection _______________________________________ • Changing the power cable ________________________
EN 1 / NOTICES TO THE USER — When in use, the appliance becomes hot. Do not touch the heating elements located inside the oven. You are at risk of incurring serious burns. Warning Keep this user guide with your appliance. If the appliance is ever sold or transferred to another person, ensure that the new owner receives the user guide. Please become familiar with these recommendations before installing and using your oven. They were written for your safety and the safety of others.
EN 1 / NOTICES TO THE USER • CARE FOR THE ENVIRONMENT — This appliance’s packing materials are recyclable. Recycle them and play a role in protecting the environment by depositing them in municipal containers provided for this purpose. — Your appliance also contains many recyclable materials. It is therefore marked with this logo to indicate that used appliances must not be mixed with other waste.
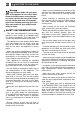
EN 2 / INSTALLING YOUR APPLIANCE 560 550 585 592 70 550 Fig. 01 provided for this purpose on either side of the front side panels (fig.1). • CHOICE OF LOCATION The diagrams above indicate the dimensions of a cabinet that would be acceptable for your oven. The oven can be installed under a work top or in a column of cabinetry (open* or closed) having the appropriate dimensions for built-in installation (see adjacent diagram).
EN 2 / INSTALLING YOUR APPLIANCE Monophase 20A Meter 220-240V~ 50Hz Monophase line 220-240 V ~ A fuse or differential circuit breaker Electrical outlet 2 prong receptacle + ground lead CEI Standard 60083 Power cable length 1.50 m approximately • ELECTRICAL CONNECTION work via a CEI 60083 standardised receptacle (1 ph +1 N + ground lead) or an all-pole cut-off device, in compliance with installation regulations. Electrical safety must be provided by a correct build-in.
EN 2 / INSTALLING YOUR APPLIANCE Warning We cannot be held responsible for any accident resulting from an inexistent, defective or incorrect ground lead. If the electrical installation at your residence requires any changes in order to hook up your Appliance, call upon a professional electrician. If the oven malfunctions in any way, unplug the appliance or remove the fuse corresponding to the sector there the oven is hooked up.
EN 3 / DESCRIPTION OF YOUR APPLIANCE • INTRODUCTION TO YOUR OVEN A B 9 93 2 6487 C D E A Programmer D Lamp B Temperature selector E Shelf support indicator C Function selector Tip This Guide to Installation and Use is valid for several models. Minor differences in details and fittings may emerge between your appliance and the descriptions provided.
EN 3 / DESCRIPTION OF YOUR APPLIANCE • ACCESSORIES • Anti-tipping safety grid (fig.1) REAR The grid can be used to hold all dishes and moulds containing foodstuffs to be cooked or browned. It can be used for barbecues (to be placed directly on the grid). FRONT fig.1 • Multi-purpose 45 mm dish (fig.2) When inserted in the supports under the grid, it collects juice and fat from grilling, and can be used half-filled with water as a double-boiler.
EN 3 / DESCRIPTION OF YOUR APPLIANCE • INTRODUCTION TO THE PROGRAMMER A B C D I E F H G A Time and duration display F Cooking time indicator B Locked door indicator G Touch controls for setting time C ECO cooking indicator H Selection touch control (duration and time) D Timer indicator I Digital temperature display E End of cooking indicator 11
EN 4 / USING YOUR APPLIANCE •How to set the time - When supplied with electricity The display flashes 12:00. (fig.1) fig.1 Set the time by pressing the + and - touch controls (pressing and holding the touch control makes the numbers advance more quickly) (fig.2). Example: 12:30 fig.2 Press the “ ” touch control to enter. The display stops flashing. - To reset the clock time 9 93 The function selector must be in the 0 position (fig.1). 2 6487 fig.
EN 4 / USING YOUR APPLIANCE •Immediate cooking — The programmer should display only the time. It should not be flashing (fig.1). fig.1 Turn the function selector to the position of your choice. Example: position (fig.2). 9 93 Your oven suggests the optimal temperature for this type of cooking. It is, however, possible to adjust the temperature by turning the temperature selection knob toward + or - (fig.3) Example: temperature setting: 210°C (fig. 4). 2 6487 fig.2 fig.
EN 4 / USING YOUR APPLIANCE • PROGRAMMED COOKING - Cooking with immediate start and programmed duration - Select the desired cooking mode and adjust the temperature (fig.1). - Press the “ fig.1 ” touch control until the cook- ing time indicator begins flashing . fig.2 The display flashes 0:00 to indicate that you can now adjust the setting (fig.2). - Press the + or - touch controls to set the desired time. Example: 30 minutes of cooking (fig.3).
EN 4 / USING YOUR APPLIANCE • PROGRAMMED COOKING - Cooking with delayed start and designated cooking end time Proceed as with standard programmed cook ing. - After setting the cooking time, press the “ ” touch control until the “ ” end of cooking indicator flashes fig.1 The display flashes 0:00 to indicate that you can now adjust the setting (fig.1). - Press the + or - touch control to set the desired cooking end time. Example: end of cooking at 13:00 (fig.2). fig.
EN 4 / USING YOUR APPLIANCE • USING THE TIMER FUNCTION - Your oven’s programmer can be used as an independent timer that allows you to count down a time without operating the oven. In this case, the timer display has priority over the clock display. - Press the “ ” TOUCH CONTROL (fig.1) until the timer symbol flashes -> 0.00 and a small hourglass flashes. fig.1 - Adjust the selected time by pressing the++ or touch controls. (fig.2). - Press on the “ ” touch control to confirm or wait a few seconds. fig.
EN 5 / OVEN COOKING MODES CIRCULATING HEAT (recommended temperature 180°C - Min. 35°C - Max. 235°C) •Cooking is controlled by the heating element located at the back of the oven and by the fan. •Preheating unnecessary except for cooking programmes requiring very short times (biscuits on several levels). •Recommended for preserving tenderness in meats, vegetables and fish and for multiple cooking on up to three levels.
EN 5 / OVEN COOKING MODES LOW TEMPERATURE STABILISATION/BREAD DOUGH (recommended temperature 80°C - Min 35°C Max - 100°C) •Heat regulated by the upper and lower elements with use of fan. •Recommended for rising dough for bread, brioche, kouglof, etc. while not exceeding 40° (plate heating, defrosting). GRILL MEDIUM + SPIT (recommended temperature 210°C min 180°C max 230°C) •Cooking is done by the upper element. •The double grill covers the entire grid surface.
EN 6 / CARING FOR AND CLEANING YOUR APPLIANCE • CLEANING THE OUTER SURFACES To clean the window of the electronic timer, as well as the oven door, use a soft cloth moistened with a glass cleaner. Do not use abrasive cleaning products or hard, metallic scrubbers to clean the oven’s glass door, which could scratch the surface and cause the glass to shatter. To preserve your appliance, we recommend that you use Clearit cleaning products.
EN 6 / CARING FOR AND CLEANING YOUR APPLIANCE - If necessary, remove the door’s inner glass assembly. This assembly is composed of one or two sheets of glass (depending on model), each of which has a black rubber corner pad (fig.4). - After cleaning, reposition the four rubber pads, taking care to follow the indications on the glass: * top left: L * top right: R Place your inner glass assembly in the door so that L and R are located on the hinge side.
6 / CARING FOR AND CLEANING YOUR APPLIANCE EN • SAFETY RECOMMENDATIONS Warning - Before beginning pyrolysis, remove all the accessories inside the oven, including all cookware. Before beginning pyrolysis, clean any major spill residue that may have occurred to avoid the risk of a fire or the production of excessive smoke. - During pyrolysis, the surfaces become hotter than during normal use; children must be kept away.
EN 6 / CARING FOR AND CLEANING YOUR APPLIANCE • STARTING CLEANING To take advantage of the volume of heat already built up in the oven and thus save energy: Start a pyrolysis cycle after a cooking programme. Remove the accessories from the oven and clean any major spill residue. Ensure that the programmer displays the time of day and that it is not flashing (fig.1). fig.1 Simply position your cooking selector on the “Pyrolysis” position or on the “ECO Pyrolysis” (fig.1).
EN 7 / TROUBLESHOOTING If you have a doubt about the functioning of your oven, this does not necessarily mean that there is a malfunction. In any event, check the following items: YOU OBSERVE THAT… The oven is not heating POSSIBLE CAUSES WHAT SHOULD YOU DO? - The oven is not connected. ➡ Plug in your oven. - Your fuse is out of order. ➡ Replace the fuse and check its value - The selected temperature is (16A). too low. ➡ Increase the selected temperature.
EN 7 / TROUBLESHOOTING Warning - Disconnect your oven before performing any task on the bulb to avoid the risk of electric shock and, if necessary, let the appliance cool down. Tip To unscrew the view port and the light, use a rubber glove, which will make disassembly easier. • CHANGING THE BULB The bulb is located on the ceiling of your oven’s cavity. a) Disconnect the oven. Bulb b) Unscrew the view port (fig.1). c) Unscrew the bulb in the same direction.
DE 6 / KUNDENDIENST Eingriffe an Ihrem Gerät dürfen nur: - von Ihrem Händler oder - von einem sonstigen Fachmann und Vertragshändler der Marke durchgeführt werden. Geben Sie bei der Meldung einer Störung die vollständige Typenbezeichnung Ihres Gerätes an (Modell, Typ, Seriennummer). Diese Angaben finden Sie auf einem an Ihrem Gerät angebrachten Schild.
99645541 03 /08