vw120, vw140 & vw280 Warming Drawers Manual for Installation, Use and Maintenance Customer Care Department • The Group Ltd. • Harby Road • Langar • Nottinghamshire • NG13 9HY T : 01949 862 012 F : 01949 862 003 E : customer.care@cda.eu W : www.cda.
Important The manufacturer cannot be held responsible for injuries or losses caused by incorrect use or installation of this product. Please note that we reserve the right to invalidate the guarantee supplied with this product following incorrect installation or misuse of the appliance.
Appliance Model Serial Number CE Declarations of Conformity: This appliance has been designed, constructed and marketed in compliance with safety requirements of Directive 73/23/CEE modified by Directive 93/68/CEE for attribution of CE approval (Low voltage) and requirements of EMC Directive 89/336/CEE modified by Directive 93/68/CEE for attribution of CE approval.
Important • Do not rest or sit on the drawer when open, as this will damage the telescopic runners. • The maximum capacity of the drawer is 25 kg. • Do not cover the bottom of the warming drawer with aluminium foil or other objects. Use only the supplied mat. • Never pour water directly into the warming drawer. • Do not use this appliance for heating liquids. • To avoid scratching, do not drag dishes on the bottom of the warming drawer. • Use suitable containers or crockery.
Before first use Before using the drawer for the first time we recommend that you clean it with a damp cloth, then dry thoroughly. Preheat the empty drawer for at least two hours at maximum temperature. A slightly unpleasant smell may be produced, caused by grease remaining on the heating element from the production process.
Using Your Warming Drawer 1. Temperature knob Max Max 2. Luminous ON-OFF switch 1 on off on off 2 Fig. 1 When the drawer is closed, the power light is visible on the front of the drawer to indicate the drawer is switched on. Use • Place the dishes in the drawer. • Set the required temperature. • Press the power switch, which will light up to confirm the warming drawer is switched on: • Close the drawer gently. • Switch the appliance off before removing the warmed dishes.
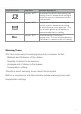
Temperature Setting Max Temperature Information Regarding Use approx. 40°C To prevent hot drinks from cooling too quickly, use this temperature setting to warm the cups to a temperature that is safe to touch. approx. 60°C To prevent hot food from cooling too quickly, use this temperature setting to warm plates or serving dishes. The use of oven gloves or pot holders is recommended for this setting. approx. 80°C The thermostat is set to max temperature.
Load capacity: • The load capacity depends on the height of the appliance and the size of the dishes. • The following load examples are only guides.
Installation Check the measurements in fig. 4 to confirm the requirements for your installation. Please note, the oven dimensions show a standard CDA oven and will vary depending on the appliance being installed above the warming drawer. 1. Connect the mains lead to the product before installation. Run the lead to the power outlet to be used and connect to the mains electrical supply. Do not switch on until installation is complete. 2.
5. The warming drawer is supplied with three metal filler strips with self-adhesive backing. These strips should be attached to the warming drawer to seal any gaps between the appliance and the housing. Remove the protective foil from each strip and position it as shown in fig. 2 so it is flush with the rear and side walls of the housing, then attach to the warming drawer. If there is no rear wall to the housing, the rear trim is not required. The casing of this appliance will get hot.
Care and Maintenence IMPORTANT • Before any maintenance is started involving electrical parts, the appliance must be disconnected from the power supply. • If the warming drawer has been in use, let it cool down before attempting any maintenance. • Steam cleaners must not be used when cleaning this appliance. • Once care and maintenance is complete, ensure that all parts are correctly replaced before using the appliance.
Mains Electricity Connection THIS APPLIANCE MUST BE CONNECTED TO THE MAINS SUPPLY BY A COMPETENT PERSON, USING FIXED WIRING VIA A DOUBLE POLE SWITCHED FUSE SPUR OUTLET AND PROTECTED BY A 3A FUSE. We recommend that the appliance is connected by a qualified electrician, who is a member of the N.I.C.E.I.C. and who will comply with the I.E.T. and local regulations. The wires in the mains lead of this appliance are coloured in accordance with the following code: DOUBLE POLE SWITCHED FUSE SPUR OUTLET Fig.
Notes: 13
Notes: 14
Notes: E & O E. All instructions, dimensions and illustrations are provided for guidance only. CDA reserve the right to change specifications without prior notice.
Please contact our Customer Care Department for Service on the details below Customer Care Department • The Group Ltd. • Harby Road • Langar • Nottinghamshire • NG13 9HY T : 01949 862 012 F : 01949 862 003 E : customer.care@cda.eu W : www.cda.