
User Manual

Note:Inthefollowinginstructions,namesofthecontrol
buttonsareshowninCAPS.Functioninformationthatappears
onthedisplayisshowninBOLD CAPS.
Battery Installation
Batteriesareinstalled.Removeplastictabtoallow
power.ReplacebatterywhenLCDbecomesdimand
weakoralertleveldeclines.
Note:Donotmixnewbatterieswitholdbatteries.
A. Base Station
1.SlidethePOWERswitchontherightsidetothe
OFFposition.
2.Removebatterycoveronthebackbyslidingtab
inthedirectionofthearrow.
3.Installtwo1.5VAAAbatteriesobserving
polarityshownincompartment.Abriefalarm
soundsandthedisplayashesallsegments.
4.Replacethebatterycoveruntilitclicksshut.
B. Remote
1.SlidethePOWERswitchonthebacktothe
OFFposition.
2.Liftthepocketcliponthebacktoaccessthe
batterycover.
3.Removebatterycoveronthebackbyslidingit
inthedirectionofthearrow.
4.Installtwo1.5VAAAbatteriesobserving
polarityshownincompartment.
5.Replacethebatterycoveruntilitclicksshut.
Mounting
A. Base Station
1.Stand
a.Onthebackofthebasestation,placethe
roundendofthestand/clip/loopinthe
cavityatthebottomwiththeatsideof
thelengthofthestand/clip/loopfacingthe
bottom.
2.BeltClip
a.Onthebackofthebasestation,insertthe
roundendofthestand/clip/loopinthe
largerportionoftheclipdepressionandpull
uptosecure.Thelengthofthestand/clip/
loopispositioneddownward.
3.Loop
a.Onthebackofthebasestation,insertthe
roundendofthestand/clip/loopinthe
largerportionoftheclipdepressionandpull
uptosecure.Thelengthofthestand/clip/
loopispositionedupward.
B. Remote
1.PocketClip
a.Presstopofthecliptoexpandpocketclip.
2.Magnet
a.Attractmagnetoncliptoanymetalsurface
3.Stand
a.Presstopofthecliptoexpandbottomgap
enoughtoallowhingedwiretofallintostops
oninsideofclip.
4.Loop
a.Hangremoteonanyprotrusionthroughloop
Operating Instructions
A. On/Off
1.BaseStation
SlidethePOWERswitchontherightsideofthe
basestationtoturnitonoroff.
2.Remote
SlidethePOWERswitchonthebackofthe
remotetoturnitonoroff.
B. Temperature Scale
Pressthe°C/°Fbuttoninsidethebattery
compartmentofthebasestationtoselect
temperaturereadinginFahrenheitorCelsius.
Abeepsoundsand°For°Cappearsinboththe
ALERT TEMPandPROBE TEMPportionsof
thedisplayonthebasestation.
C. Timer Mode
1.SlidetheTEMP/TIMERswitchontheright
sideofthebasestationtoTIMER.Thetimer
appearsinthelowerportionofthedisplay.
Note:Thetimerisonlyavailableonthebasestation.
2.CountDown
a.PresstheMINand/orSECbuttonstoenter
thedesiredtime.Pressandholdbuttonfor
fastadvance.TheCOUNT DOWNicon(t)
appearsinthetopoftheHOURGLASSicon.
b.PresstheSTART/STOPbuttontostart
countingdown.
c. PresstheSTART/STOPbuttontointerrupt
thecount.PresstheSTART/STOPbutton
againtoresumethecount.
d.Whenthecountreaches00:00,thealarm
sounds3beepspersecondfor60seconds
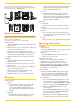
RESYNC
BEEP
VIB
ALERT
POWER
ON
OFF
Component Design Northwest, Inc.
Portland, OR
Model WT2
Made in China
32 to 482°F/0 to 250°C
Counts 100 hours by minutes
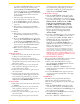
ALERT
STOP
POWER
ON
OFF
TEMP
TIMER
RF
DIRECT
Component Design Northwest, Inc.
Portland, OR
Model WT2
Made in China
32 to 482°F/0 to 250°C
Counts 100 hours by minutes
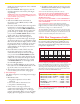
START / STOP
MIN
MEMORY
CLEAR
MEAT
TASTE
SEC