Item #1000 017 082 Model #30651
Table of Contents Table of Contents ..................................2 Safety Information .................................2 Warranty .................................................3 Pre-Installation ......................................4 Installation .............................................7 Safety Information Before you begin, make sure you carefully read and understand the instructions in this manual. This bracket system incorporates a slip-on mount design.
Warranty The manufacturer warrants that it will replace or repair this item, free of charge, at the manufacturer’s sole discretion, should it prove defective in materials or workmanship. If a claim is made under this warranty, the mount should be returned, freight prepaid, with the original purchase receipt to your dealer.
Pre-Installation PLANNING INSTALLATION Compare all parts in the package with the Hardware Included and Package Contents lists in this manual. If any part is missing or damaged, do not install this wall mount system and call customer service at 1-800-394-7519 or visit HOMEDEPOT.COM/CETECH. PLANNING WALL PLACEMENT CAUTION: Ensure the wall you select is a weight-bearing wall. Failure to observe this precaution can result in serious physical injury and/or property damage.
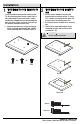
Pre-Installation (continued) HARDWARE INCLUDED NOTE: Hardware not shown to actual size. NOTE: The hardware included is suitable for mounting to walls made of brick or solid concrete. If your mounting situation is different, please consult a qualified installer or contact customer service at 1800-394-7519 or visit HOMEDEPOT.
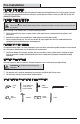
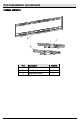
Pre-Installation (continued) PACKAGE CONTENTS A C B Part Description Quantity A Wall plate B Left display bracket 1 1 C Right display bracket 1 6
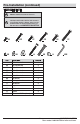
Installation 1 Identifying the bolt diameter to use 2 Identifying the bolt length to use □ Insert a straw or toothpick into one of the mounting holes on the back of your TV. If your TV is curved or recessed, place the spacer (LL) on top of one of the mounting holes first. □ Use a pencil to mark the depth of the mounting hole. □ Determine the proper bolt length to use by comparing the mark with the various bolts provided (AA – FF).
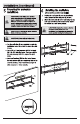
Installation (continued) 3 4 Testing the bolt length Attaching the brackets to the TV □ Center the brackets (B and C) vertically to the back of the TV. Ensure that the left and right mounting brackets (B and C) are no more than 26.38 in. (670 mm) apart. □ For curved or recessed backs, place the spacer (LL) over the mounting holes on the back of the TV. □ Attach the left and right brackets (B and C) to the back of the TV using the properly sized bolts and washers you chose in steps 1 and 2.
HOMEDEPOT.COM/CETECH Please contact 1-800-394-7519 for further assistance.
Installation (continued) Mounting the TV to the wall 7 plate □ Loosen the safety screws (1) pre-assembled to the left (B) and right (C) mounting brackets. □ Plug any cables into the TV, as they could be difficult to reach after the TV is mounted to the wall. □ Using two people, carefully lift the TV and align the brackets (B and C) with the wall plate (A). □ Gently lower the TV onto the wall plate (A), ensuring that the brackets (B and C) catch at the top edges of the wall plate (A).
Installation (continued) 9 Adjusting the angle CAUTION: Use two or more people to complete this step. 2 □ While holding the TV, adjust the angle of the TV to the desired position and secure by tightening the screw (2) on the outside of each bracket (B and C). The maximum tilt angle is 15°.
Questions, problems, missing parts? Before returning to the store, call CE Tech Customer Service 8 a.m.- 6 p.m., EST, Monday-Friday 1-800-394-7519 HOMEDEPOT.COM/CETECH Retain this manual for future use.