Item #703-627 Model #31553N USE AND CARE GUIDE ULTRA SLIM FULL MOTION FLAT PANEL TV WALL MOUNT (FITS VESA 100/200/300/400/600) Questions, problems, missing parts? Before returning to the store, call CE Tech Customer Service 8 a.m. - 6 p.m., EST, Monday - Friday 1-877-527-0313 HOMEDEPOT.COM THANK YOU We appreciate the trust and confidence you have placed in CE Tech through the purchase of this wall mounting system. We strive to continually create quality products designed to enhance your home.
Table of Contents Table of Contents ..................................2 Safety Information .................................2 Warranty .................................................2 Pre-Installation ......................................3 Installation .............................................6 Safety Information Before you begin, carefully read and understand the instructions in this manual. Please follow the instructions in the order presented in this manual and observe all warnings and cautions.
Pre-Installation PLANNING INSTALLATION Compare all parts in the package with the Hardware Included and Package Contents lists in this manual. If any part is missing or damaged, do not install this wall mount system and call customer service at 1-877-527-0313 or visit www.HomeDepot.com.
Pre-Installation (continued) TOOLS REQUIRED (NOT INCLUDED IN THE PACKAGING) Power drill 5/32 in. (4 mm) wood drill bit or ¼ in. (6 mm) + 3/8 in. (10 mm) masonry drill bits Stud finder Phillips screwdriver Tape measure Level Hammer Safety glasses Pencil HARDWARE INCLUDED NOTE: Hardware not shown to actual size. NOTE: The hardware included is suitable for mounting to walls made of brick, solid concrete, or wood studs covered with drywall.
Pre-Installation (continued) PACKAGE CONTENTS A B C D Part Description Quantity A Wall plate 1 B Mounting plate 1 C Vertical mounting rod 2 D Horizontal mounting rod 2 5 HOMEDEPOT.COM Please contact 1-877-527-0313 for further assistance.
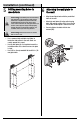
Installation 1 Identifying the screw diameter to use 2 Identifying the screw length to use □ Insert a straw or toothpick into one of the mounting holes on the back of your TV. If your TV is curved or recessed, place the proper sized spacer (GG) on top of one of the mounting holes first. □ Use a pencil to mark the depth of the mounting hole. □ Determine the proper screw length to use by comparing the mark with the various screws (EE) provided.
Installation (continued) 3 Marking the mounting locations mounting holes in 4 Drilling concrete/brick wall If you are installing the mounting system into wood studs, proceed to step 5. □ Use the holes in the wall plate (A) as a template to mark the mounting locations for attaching the wall plate (A) to the wall. Use a level to ensure that the markings are even. CAUTION: Avoid drilling near electrical wiring and water pipes. The mounting system must be attached to a weight bearing wall.
Installation (continued) 5 Drilling mounting holes in wood studs 6 Attaching the wall plate to the wall □ Align the wall plate holes with the pre-drilled holes in the wall. □ Attach the wall plate (A) to the wall using lag bolts (CC) and lag washers (BB). Use a level to ensure that the wall plate is even on the wall. □ Securely tighten the bolts with the hex wrench (DD). CAUTION: Avoid drilling near electrical wiring and water pipes.
Installation (continued) 7 Attaching the mounting plate (VESA 100x100, 200x100, 200x200) the mounting plate 8 Attaching (VESA 300x200 and 400x200) This procedure describes how to attach the mounting plate to VESA 300x200 and 400x200. For VESA 300, 400, and 600 proceed to step 9. □ Attach the horizontal mounting rods (D) to the top and bottom of the mounting plate (B) using mounting screws (KK), mounting washers (JJ), and mounting nuts (II).
Installation (continued) 9 Attaching the mounting plate (VESA 300, 400, 600) This procedure describes how to attach the mounting plate to VESA 300, 400, and 600. □ Attach the horizontal mounting rods (D) to the top and bottom of the mounting plate (B) using mounting screws (KK), mounting washers (JJ), and mounting nuts (II). □ Attach the vertical mounting rods (C) to the plate assembly using mounting screws (KK). □ Align spacers (GG) over the mounting holes on the back of your TV.
Installation (continued) the TV to the wall 10 Attaching plate A CAUTION: Use two or more people to complete this step. B □ While holding the TV, carefully position the mounting plate (B) assembly over the wall plate (A) and connect the top brackets on the mounting plate (B) to the top of the wall plate (A). □ Slide the bottom of the TV down into the mounting plate and attach using side plate screws (HH).
Questions, problems, missing parts? Before returning to the store, call CE Tech Customer Service 8 a.m.- 6 p.m., EST, Monday-Friday 1-877-527-0313 HOMEDEPOT.COM Retain this manual for future use.