
Corp. Fryer User Manual


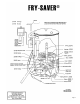

3) Place the nozzle in the cooking oil approximately 2 inches. DO NOT REST THE NOZZLE ON THE BOTTOM
OF THE FRYER. This will prevent the nozzle from becoming clogged with solid particles.
4) Turn the control switch to "FILL", keeping the nozzle tip submerged as oil is pumped into the filter.
5) When most of the oil is transferred from the fryer to the filter, turn the control switch to "OFF" and clean the fryer as
you normally would. DO NOT TRANSFER WATER AND SOLID PARTICLES FOUND ON THE BOTTOM
OF THE FRYER. You do not want to mix water and oil together.
6) Place the nozzle in the filter tank through the hole in the cover. DO NOT rest the nozzle on the cartridge. Turn the
control switch to "filter" and allow the oil to pass through the cartridge while you clean the fryer.
7) After you have removed most of the oil, only sediment and water is left. Place a container under the drain valve in
front of the fryer and open the valve to empty the unit. When the fryer is empty, follow the manufacturer's instructions
for cleaning.
8) Once the fryer is cleaned, the oil in the FRY-SAVER® tank can be transferred back to the fryer.
9) Turn the control switch on the FRY-SAVER® to "OFF" and position the nozzle in the fryer. Switch the control lever
to "FILTER" and run until all the cooking oil is transferred back into the fryer. When finished, turn the control switch
"OFF" and replace the nozzle in the cover for storage.
Even though you have emptied the FRY-SAVER® of oil, there will still be some residual oil in the valve and hose. This oil
must be drained so it does not cause any clogging.
Place a pan or other suitable container under the valve located below the flexible hose connection at the bottom of the filter
tank. Turn the valve cock open until dripping stops. Then close the drain valve. THE DRAIN VALVE MUST BE
CLOSED BEFORE FILTERING.
Page 3
The filter cartridge has an average life of approximately 1,000 pounds of oil before needing to be replaced. If you are
uncertain how many pounds you have filtered, the easiest rule of thumb is to replace the cartridge when the pleats are
completely filled with sediment.
NOTE: DO NOT CONTINUOUSLY REMOVE AND RE-INSERT THE FILTER CARTRIDGE, AS THIS WILL
CAUSE THE SEAL AROUND THE EDGE OF THE PAN TO BECOME STRIPPED.
Two Ways To Extend The Life Of The Cartridge
1. Use the stainless steel pre-filter assembly and pre-filter paper that is available as an accessory
2. Re-use the old cartridge as well as a new one
The pre-filter assembly and paper are available from your local dealer and highly
recommended to further eliminate larger particles during the filtering process.
To re-use the old cartridge, first remove it from the unit and install a new cartridge.
Take the used cartridge and empty out all the particles that have collected in the
pleats. Remove the cloth wick around the outside edge of the old cartridge and
place it on top of the new cartridge. This will extend the life of the new cartridge.
On the next change of cartridges, remove both the old and the newer discarding the
top cartridge. Install the new cartridge on the bottom and place the cartridge that
was on the bottom, on the top. This process can be continued indefinitely.
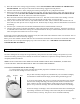
FRY-SAVER® FILTER CARTRIDGES:
Paper Filter
Cartridge
Pre-Filter