INSTALLATION Water Inlet Connection: This equipment is to be installed to comply with the applicable Federal, State, or local plumbing codes having jurisdiction. In addition: 1. A quick disconnect water connection or enough extra coiled tubing (at least 2 times the depth of the unit) so that the machine can be moved for cleaning underneath. 2. An approved back flow prevention device, such as a double check valve to be installed between the machine and the water supply.
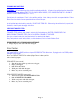
READY LIGHT PROGRAMMING FOR AUTOMATIC DISPENSE (See Door diagram) Turn Power Switch ON (toggle switch inside door). PRESS and HOLD [red] STOP Button with one hand. PRESS and HOLD [green] DISPENSE Button with other hand. RELEASE [red] STOP Button ONLY. Continue to HOLD [green] DISPENSE Button for 5 SECONDS, then RELEASE. 6. PRESS and RELEASE [green] DISPENSE Button. Product begins dispensing. When it reaches the “DESIRED VOLUME”, 7. PRESS and RELEASE [green] DISPENSE Button to SET “DESIRED VOLUME”.
CLEANING AND SANITIZING: SANITIZING: All food dispensing units should be sanitized periodically. All parts to be sanitized must be cleaned first. To prepare a sanitizing solution: ADD 2 TSP. OF LIQUID CLOROX BLEACH (5.25% CONCENTRATION) TO 1 GALLON OF WATER AT ROOM TEMPERATURE (70°F - 90°F). Soak all parts for a minimum of 3 min. in the sanitizing solution. Note: Always start with an unopened bottle of Clorox Bleach since the solution from an opened bottle has a short life span.
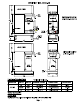
L1 N TEACH-ME TIMER 2 1 4 3 POWER TEACH-ME TIMER STOP SWITCH 2 1 4 3 DECAFF COFFEE D.C. AUGER MOTOR D.C. AUGER MOTOR SPEED CONTROL SPEED CONTROL MAIN UNIT RINSE SWITCH READY DISPENSE VALVE RED WATER INLET VALVE LIQUID LEVEL CONTROL BLK WHT BLU WATER LEVEL PROBES YEL GRN WATER VACUUM FAN CONTACTOR N HI-LIMIT RED WIRE 3 PIN CONNECTOR WARMER 100 W THERMOSTAT "C" "D" TERMINAL BLOCK DOOR UNIT HEATING L2 "B" N HEATER SW "A" L1 1 PHASE: 1.
L1 N 2 1 4 3 POWER TEACH-ME TIMER STOP SWITCH 2 1 4 3 DECAFF COFFEE D.C. AUGER MOTOR D.C.
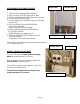
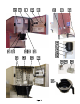
CARRIER CONVERSION KIT # SK79Q FOR MODELS ORIGINALLY EQUIPPED WITH AIRPOT DISPENSER TO CONVERT TO CAR-1 CARRIER DISPENSER: 1. Disconnect Electrical Power to the Machine. 2. Remove Tower Cover SH62Q and Base Cover SH59A (Used with Airpot Dispenser). 3. Make electrical connection to Warmer Deck SH73Q (2 pin plug and socket). 4. Drain Water Tank, Remove drain plug M391A from hot water hose, then connect hose to hot water faucet. Install hose clamp P217A. 5.
FOR MODELS ORIGINALLY EQUIPPED WITH CAR-1 CARRIER DISPENSER TO CONVERT TO AIRPOT DISPENSER: 1. Disconnect Electrical Power to the Machine. 2. Remove Tower Cover SJ73Q and Warmer Deck SH73Q (Used with Carrier Dispenser). 3. Disconnect electrical connection to Warmer Deck (3 pin plug and socket), Insulate with cap plug B155A and tape connector back into the main harness. 4. Drain Water Tank, Disconnect hot water hose from hot water faucet and plug the end of the hose with drain plug M391A. 5.
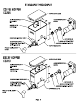
RETROFIT CARRIER KIT # SK66Q FOR JAVA 2-QB SHIPPED PRIOR TO APRIL 2002