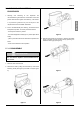
ESPAÑOL ENGLISH ENGLISH NHV UL OPERATOR’S MANUAL MANUAL DE INSTRUCCIONES NS08A
NHV UL 1 TECHNICAL CHARACTERISTICS ........................................................................................................................ 4 2 INTRODUCTION .................................................................................................................................................... 4 3 INSTALLATION ......................................................................................................................................................
NHV UL 1 TECHNICAL CHARACTERISTICS NHV 2 UL and keep them for possible future use. Transparent removable bowls n 2 Gal 2.5 width Inches 14.25 depth Inches 18.25 height Capacity of each bowl, approx. Dimensions: Inches 27.75 Net weight, approx. Lbs 137 Gross weight, approx.
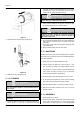
NHV UL 5 OPERATING PROCEDURES in switch panels protected by switch covers (see figure 1). ATTENTION 1 - Clean and sanitize the unit according to the instructions in this manual. See chapter 5.3 CLEANING AND SANITIZING PROCEDURES. 2 - Fill the bowls with product to the maximum level mark. Do not overfill. The exact quantity of product (expressed as liters and gallons) is shown by marks on the bowl.
NHV UL 5. 2 OPERATION HELPFUL HINTS at the start of each day. 1 - Granita viscosity adjustment: proper Granita viscosity is 7 - For good product conservation the dispenser must run factory preset. To change the viscosity, if needed, use a overnight, at least in Soft Drink mode.
NHV UL 5. 3 CLEANING AND SANITIZING PROCEDURES 1 - Cleaning and sanitizing of the dispenser are recommended to guarantee the conservation of the best ENGLISH product taste and the highest unit efficiency. This section is a procedural guideline only and is subject to the requirements of the local Health Authorities. 2 - Prior to the disassembly and cleaning, the machine must be emptied of product.
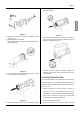
NHV UL 4 - Remove the bowl gasket from its seat (see figure 9). dishwashing detergent. Do not use abrasive detergent. Important: if present, follow label directions, as too strong a solution can cause parts damage, while too mild a solution will not provide adequate cleaning. IMPORTANT In order to prevent any damages to the dispenser use only a detergent suitable with plastic parts. 2 - Using a brush, suitable for the purpose, thoroughly clean all disassembled parts in the cleaning solution.
NHV UL front notch engages with the exposed end of the auger shaft (see figure 14). ENGLISH approved lubricant. figure 11 3 - Assemble the faucet by reversing the disassembly steps (see figure 10) 4 - Fit bowl gasket around its seat. Note: the largest brim of gasket must face against the rear wall (see figure 12). figure 14 7 - Push the bowl towards the rear wall of the unit until it fits snugly around the gasket and its front fastening hooks are properly engaged (see figure 15).
NHV UL on all surfaces protruding above the solution-level and on the underside of the top cover(s). 4 - Install the top cover(s) and operate the unit. Allow the solution to agitate for about two minutes. Drain the solution 3 - Replacement of lighted top cover bulb: remove the fixing screw placed in the upper part of the top cover, remove the lower part and replace the bulb (using a 24-28V 21W max bulb). Reassemble the top cover and replace the fixing screw.(see figure 17) out of the bowl(s).
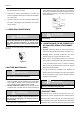
NHV UL ENGLISH automatically freezes down again to Granita setting viscosity. figure 18 To operate the defrost timer proceed as follows (see figure 18). 1 - Set the time of the day by rotating the dial clockwise (arrow A). Never rotate the timer counterclockwise as this would damage the internal mechanism. Align the current time of day with the arrow B on the timer face. This is a 24 hour timer showing both A.M. and P.M.
NHV UL 1 CARACTERISTICAS TECNICAS NHV 2 UL si hubiera cualquier eventualidad. Contenedores transparentes desmontables n Capacidad aproximada de cada c o n t e n e d o r , Gal 2 2.5 Dimensiones: ancho Inches 14.25 largo Inches 18.25 alto Inches 27.
NHV UL ATENCION Si el cable de alimentación está dañado, debe ser substituito por el fabricante o desde su servicio de asistencia técnica o, en cualquier caso, por una persona cualificada con el fin de evitar cualquier tipo de riesgo. 1 - Lavar e higienizar el distribuidor antes de utilizarlo siguiendo cuanto se ha dicho en las presentes instrucciones en el capítulo 5.3 LIMPIEZA. 2 - Llenar los contenedores con el producto deseado hasta que alcance el nivel máximo indicado (no superar dicho nivel).
NHV UL refrigeración en la posición I; ésto evita la formación de bloques o crostas de hielo que podrían dañar los dispositivos mezcladores. En el caso en que se formasen dichos bloques de hielo, estos deberían ser quitados antes de volver a poner en función el distribuidor. El funcionamiento nocturno en la posición Bebida elimina además la posible formación de hielo (debido a la condensación de la humedad atmosférica) en el exterior de los contenedores. 1 - Colocar el interruptor general en la posición I.
NHV UL 5. 3. 1 DESMONTAJE ATENCION Antes de proceder con el desmontaje de cualquier componente, desenchufar de la toma de corriente eléctrica el enchufe del aparato o bien apagar el interruptor externo de pared. 1 - Quitar la tapa del contenedor.
NHV UL figura 10). 4 - Lavar los cilindros evaporadores empleando un cepillo con cerdas suaves. 5 - Enjuagar todas las partes con agua corriente. 5. 3. 3 HIGIENIZACION DEL DISTRIBUIDOR DESMONTADO La higienización debe efectuarse inmediatamente antes de poner en función el distribuidor; evitar que este permanezca inactivo por mucho tiempo despúes de haber sido higienizado. 1 - Antes de iniciar los procedimientos descritos a continuación lavarse las manos con un jabón antibactérico.
NHV UL enla pared posterior (ver figura 12). figura 15). figura 12 5 - Enfilar el rascador interior en el evaporador, Poner atenciòn a montar debitamente la junta posterior (ver figura 13). figura 15 8 - Enjuagar con bebida fresca para eliminar todo residuo posible de solución para higienizar del fondo de los contenedores. Secar la parte interior de los contenedores con una servilleta de papel desechable.
NHV UL 5. 5 MANTENIMIENTO JUNTA POSTERIOR 6. 1 MANUTENCION (SOLAMENTE POR EL SERVICIO POSTVENTA) 1 - Cada año: es aconsejable quitar todos los paneles y IMPORTANT Lubricar la junta posterior, en la dreas sombreadas, con abundante cantidad de grasa para uso alimenticio. Para prevenir danos a la màquina, sustituir la junta posterior cada 2000 horas. Para remover la junta posterior es necesario apretarla hasta que no pierda l’efecto ventosa (ver figura 16).
NHV UL figura 18 Para utilizar el contador de descongelación seguir los ESPAÑOL ENGLISH siguientes pasos (ver figura 18): 1 - fijar la hora del día girando el contador en sentido horario. Nunca girar el contador en sentido antihorario ya que el mecanismo interno podria verse dañado. Alinear la hora del día mediante la aguja B situada en la cara del contador. Este es un contador que muestra las 24 horas AM y PM.
SPARE PARTS LIST NHV UL 2409_49 V 0.
1 00563 Lighted top cover (upper) Tapa con luz (superior) 26 00130 Power switch box Caja grisa interruptores con int.
GEAR MOTOR SPARE PARTS LIST 1 00097 Bracket with bush Soporte con buje 10 00247 Ball bearing ý 28 mm Cojinete de bolas ý 28 20 00721 Gear box cover Tapa de la caja reductor 2 00156 Stator Estator 11 00257 1.5 mm spacer Distancial 1,5 mm.
NHV UL NOTES: 23
CECILWARE CORPORATION 43-05 20th Avenue Long Island City, N.Y. 11105 Tel. (800) 935 2211 Fax (718) 932 7860 Email : customer.service@cecilware.com www.cecilware.com 2409_49 R0.