Included in the Kit: 8x8 10x10 MABEL KALAMALKA Cedar Posts 4 4 Rafters 5 6 Headers 4 4 Post Caps 4 4 Blocks 20 30 Corner Brackets 8 8 Rafter Tails 10 12 *Hardware with Step by Step Instructions 10x12 OKANAGAN 4 7 4 4 36 8 14 12x12 SHUSWAP 4 7 4 4 42 8 14
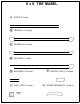
8 x 8 THE MABEL @ POSTS X 4 each @ HEADER A X 2 each @) HEADER B X 2 each @ RAFTERS X 5 each @ BLOCKING X 20 each ® RAFTER TAILS X 10 each @) POST CAPS X 4 each @ CORNER BRACKETS X 8 each
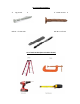
List of Included Hardware: 3” Lag Screws Drill Bit ⅛” Pilot Hole X 3” Brown Screws Drill Bit x 1 of Each List of Tools Needed (Not Included in the Kit) X
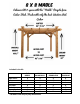
Before setting up your new Pergola, determine the proper placement for your Posts. The measurement for the 8’ x 8’ Kalamalka is 116” x 116”. To be sure your posts are square: diagonally (post to post) the measurements will be 154 ½”. We recommend that the posts are fixed to the ground, using saddle brackets (on concrete) or steel post bases. Speak with your local hardware store to purchase these, as they are not included in this kit. STEP 1: a. Lay post (marked A) on flat surface.
STEP 2: Lift the completed assembly of the Header and Post (as shown in Photo 3), be sure to have the Header facing outward, repeat steps for the adjacent end of the pergola (as shown in Photo 4) (Photo 3) (Photo 4)
STEP 3: If mount hardware is installed, position at the bottom of the posts. (Photo 5) Note: this hardware is not included, may be purchased at your local hardware store.
STEP 5: Ladders. On a flat surface, position a roof rafter notch facing up. At each end, measure 5 ½” from the notch to mark where Joist blocks will be placed (Photo 8). Once both rafters have been marked and securely screwed in using two 3” screws (Photo 9), Space evenly 19 ⅜” between each of the four blocks remaining (Photo 10). Repeat this step 3 more times, creating 2 ladders.
STEP 6: Place the completed ladders notch down (Photo 11). Start with the first ladder snug against the edge of the post. Screw corners (using two 3” screws) of the outside ladders to the post. Screw the second ladder, spaced 19 ⅜” from the first ladder and secure at each end to the Header (using four 3” screws). (Photo 11) STEP 7: BLOCKS Using a clamp to secure, screw in blocks to ladders (as shown in Photo 12), repeat until blocks is all evenly added next to each ladder block.
STEP 8: RAFTER TAILS From the inside of the ladder, screw in each Rafter Tail adjacent to the ladder blocks, with notch down.
STEP 9: CORNER BRACKETS Secure Corner Bracket with two 3” screws (for both top and bottom).
Talk with the Experts today! 1‐800‐830‐8033 A Thank You for your purchase RECEIVE A SET OF LED LIGHTS FOR YOUR PERGOLA FREE!!! HOW? ... Simple! All we need from you is a few minutes of your time to complete this questionnaire and emailing it as well as a photo of your Finished Pergola. The purpose of this is to get your help. We at Cedarshed want to be Sure that ALL of our valued customers are satisfied to the best of our abilities.