
Installation Guide


glue-up ceiling tile
INSTALLATION INSTRUCTIONS
1-800-557-0654
www.ceilume.com
Installation Instructions Revised: 03/09/2011
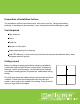
If there are no obstructing elements then simply place a chalk line in the center of the ceiling
from one wall to its opposite, parallel wall. Then nd the wall perpendicular to the rst wall
and place a chalk line in the center of that wall to its opposite, parallel wall.
Place your rst ceiling tile in the corner created by your two chalk
lines. Then continue installing your tiles from the center to the
outer edges of your ceiling.
Please keep in mind that ceilings are often not perfectly square
and chalk lines may need to be adjusted before you begin
installing your tiles.
Ceiling Tile Application
Take care that your hands and work surfaces are clean and free of dust or oils that can affect
adherence.
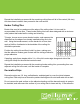
Apply a at lm of adhesive to the backside of the ceiling tile around the perimeter. Avoid
placing daubs of adhesive anywhere else on the ceiling tile, as this may be visible through the
tile. Any excess adhesive can be removed immediately with warm water.
Position the ceiling tile and rmly hold it in place, making sure that the adhesive makes good
contact with the ceiling surface for proper adhesion.
If stapling, apply three staples along each side of the ceiling tile within ¼ in. of the tile’s outer
edge, which ensures that the staples will be covered by the decorative strips in the nal phase
of installation.
Once the rst ceiling tile is installed, begin placing the adjacent tiles. The second ceiling tile
should be placed directly against the rst. The seams between tiles may vary slightly so
do not butt the tiles with pressure, simply slide them into place. All joints will be covered by
decorative strips in the nal phase, so do not worry about small gaps.