
User Manual


3939
www.cel-robox.com
4.0 Using Robox
4.4 The HeadLock™ System
This section explains how to change the head on Robox® allowing you to change
its functionality. The base model comes supplied with the Dual Nozzle, Single
Material head for FFF 3D printing. All future head designs will make use of the
same interface, and the HeadLock™ system has been designed to make head
replacement quick and easy. A microchip in each head also allows AutoMaker™
to automatically identify what head is installed, and set itself up appropriately.
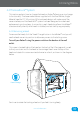
4.4.1 Removing a Head
To remove the head, click the ‘Head Change’ button in AutoMaker™ and you will
see the head move into position to allow easy access to the locking screw.
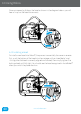
Turn o your Robox® using the power switch on the back or at the wall
outlet.
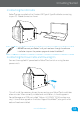
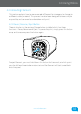
This screw is located behind the head on the back of the X Carriage and is used
to firmly constrain and fix the head to the carriage. Reach over the top of the
head and rotate this screw counterclockwise to unlock, as shown in the diagram
below:
Head Change
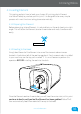
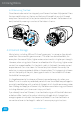
Continue to rotate the locking wheel until you feel it turning freely.