® Instruction Manual #11007 / #11008 / #11009
>> www.celestron.
TABLE OF CONTENTS INTRODUCTION . . . . . . . . . . . . . . . . . . . . . . . . . . . . . . . . . . . . . . 2 ASSEMBLY . . . . . . . . . . . . . . . . . . . . . . . . . . . . . . . . . . . . . . . . . . 4-7 THE HAND CONTROL . . . . . . . . . . . . . . . . . . . . . . . . . . . . . . 8-17 TELESCOPE BASICS . . . . . . . . . . . . . . . . . . . . . . . . . . . . . . .
INTRODUCTION Congratulations on your purchase of the Celestron CPC DeluxeHD telescope! The CPC DeluxeHD combines Celestron’s newly designed CPC Computerized mount with its new EdgeHD optical system. The CPC series uses GPS (Global Positioning System) technology to take the guesswork and effort out of aligning and finding celestial objects in the sky. Simple and easy to use, the CPC with its SkyAlign sky modeling system, is up and running after locating just three celestial objects.
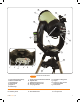
9 8 6 7 10 5 15 2 4 11 12 3 1 11 13 F A B C D E 14 FIGURE 3 CPC Deluxe 1100 HD Shown 1. Control Panel (see below) 7. Finderscope Quick Release Bracket 12. Azimuth Locking Knob 2. Mirror Clutch Knobs 8. Optical Tube 13. Tripod 3. Star Diagonal 9. Schmidt Corrector Lens 14. Accessory Tray / Center 4. Hand Control 10. Altitude Locking Knobs Support Bracket 5. Eyepiece 11. Carrying Handle 15. Focus Knob 6. Finderscope A. Hand Control Port B. Auxiliary Ports >> www.celestron.com C.
ASSEMBLY The CPC DeluxeHD telescope comes completely pre-assembled and can be operational in a matter of minutes. The CPC and its accessories are conveniently packaged in one reusable shipping carton while the tripod comes in its own box. Included with your telescope are the following: #11007 CPC Deluxe 800 HD Diameter 203 mm (8”) Edge HD Optics Focal Length 2032 mm f/10 Eyepiece 40 mm - 1.25” (51x) Finderscope 9x50 Diagonal 90° - 1.
Adjusting theTripod Height The tripod that comes with your CPC telescope is adjustable. To adjust the height at which the tripod stands: Note: When transporting your telescope, make sure that both clutches are somewhat loose; this will diminish the load placed on the worm gear assemblies and protect them from damage. 1. Loosen the extension clamp on one of the tripod legs (see figure 3-1). 2. Extend the leg to the desired height. 3. Tighten the extension clamp to hold the leg in place.
The Eyepiece The eyepiece is the optical element that magnifies the image focused by the telescope. The eyepiece fits into either the visual back directly or the star diagonal. To install the eyepiece: 1. Loosen the thumbscrew on the star diagonal so it does not obstruct the inner diameter of the eyepiece end of the diagonal. 2. Slide the chrome portion of the eyepiece into the star diagonal. FIGURE 3-6 3. Tighten the thumbscrew to hold the eyepiece in place.
Aligning the Finderscope The finderscope is adjusted using two adjustment screws, located on the top and on the right (when looking though the finder) of the finder bracket and a spring loaded pivot screw (located on the left side of the bracket). This allows you to turn the top adjustment screw to move the finderscope up and down, and turn the right adjustment screw to move the finderscope right to left.
HAND CONTROL The CPC is controlled by Celestron’s NexStar hand controller designed to give you instant access to all the functions the CPC has to offer. With automatic slewing to over 40,000 objects, and common sense menu descriptions, even a beginner can master its variety of features in just a few observing sessions. Below is a brief description of the individual components of the CPC’s NexStar hand controller: 1.
the telescope can create a model of the sky, which it uses to locate any object with known coordinates. There are many ways to align the CPC with the sky depending on what information the user is able to provide: SkyAlign uses the internal GPS receiver to acquire all the necessary time/ site information needed for the CPC to create an accurate model of the sky. Then the user can simply point the telescope to any three bright celestial objects to accurately align the telescope with the sky.
• Don’t worry about confusing planets for stars when selecting alignment objects. SkyAlign works with the four brightest planets (Venus, Jupiter, Saturn and Mars) as well as the Moon. In addition to the planets, the hand control has over 80 bright alignment stars to choose from (down to 2.5 magnitude). • Rarely SkyAlign will not be able to determine what three alignment objects were centered. This sometimes happens when a bright planet or the Moon passes near one of the brighter stars.
Note: Once a One-Star Alignment has been done, you can use the Re-alignment feature (later in this section ) to improve your telescope’s pointing accuracy. Solar System Align Solar System Align is available in alt-az mode (scope mounted directly on the tripod) and equatorial mode (scope mounted on a wedge). Solar System Align is designed to provide excellent tracking and GoTo performance by using solar system objects (Sun, Moon and planets) to align the telescope with the sky.
EQ One-Star Align >> Selecting an Object EQ One-Star Align operates much the same way as EQ Two-Star Align, however it only relies on the alignment of one star to align the telescope. To use EQ One-Star Align follow the same steps as you would for EQ Two-Star Align, but only using one star. Now that the telescope is properly aligned, you can choose an object from any of the catalogs in the CPC’s extensive database. The hand control has a key (4) designated for each of the catalogs in its database.
>> Finding Planets The CPC can locate all 8 of our solar systems planets plus the Sun and Moon. However, the hand control will only display the solar system objects that are above the horizon (or within its filter limits). To locate the planets, press the PLANET key on the hand control. The hand control will display all solar system objects that are above the horizon: • Use the Up and Down keys to select the planet that you wish to observe. • Press INFO to access information on the displayed planet.
Tracking Rate – In addition to being able to move the telescope with the hand control buttons, the CPC will continually track a celestial object as it moves across the night sky. The tracking rate can be changed depending on what type of object is being observed: Sidereal This rate compensates for the rotation of the Earth by moving the telescope at the same rate as the rotation of the Earth, but in the opposite direction.
>> Scope Setup Features Setup Time-Site – Allows the user to customize the CPC display by changing time and location parameters (such as time zone and daylight savings). Anti-backlash – All mechanical gears have a certain amount of backlash or play between the gears. This play is evident by how long it takes for a star to move in the eyepiece when the hand control arrow buttons are pressed (especially when changing directions).
guiding on a star using an off-axis guider versus a straight through guide scope. To compensate for this, the direction of the drive control keys can be changed. To reverse the button logic of the hand control, press the MENU button and select Direction Buttons from the Utilities menu. Use the UP/DOWN arrow keys (10) to select either the azimuth (left and right) or altitude (up and down) button direction and press ENTER.
to rebalance. When you are ready to slew the telescope to your next object, just remember to manually return the tube to the same bright star and carefully center it in the eyepiece. Using this tool will invalidate the PEC index and improving the tracking accuracy of the drive. This feature is for advanced astrophotography and is used when your telescope is polar aligned with the optional equatorial wedge. For more information on using PEC, see the section on “Celestial Photography”.
TELESCOPE BASICS A telescope is an instrument that collects and focuses light. The nature of the optical design determines how the light is focused. Some telescopes, known as refractors, use lenses. Other telescopes, known as reflectors, use mirrors. The EdgeHD optical system (Aplanatic Schmidt) uses a combination of mirrors and lenses and is referred to as a compound or catadioptric telescope.
>> Mirror Support Clutches The EdgeHD Optical tube is equipped with mirror tension clutches to help support and minimize lateral movement of the primary mirror during astrophotography. To use the mirror clutches: 1. Use the focus knob to adjust the primary mirror to the desired focus. 2. Once in focus, turn the two mirror lock knobs clockwise until both are very tight and can be turned no further.
ASTRONOMY BASICS Up to this point, this manual covered the assembly and basic operation of your CPC telescope. However, to understand your telescope more thoroughly, you need to know a little about the night sky. This section deals with observational astronomy in general and includes information on the night sky and polar alignment. >> The Celestial Coordinate System are marked off in units of time.
>> Polar Alignment (with optional Wedge) Even though the CPC can precisely track a celestial object while in the Alt-Az position, it is still necessary to align the polar axis of the telescope (the fork arm) to the Earth’s axis of rotation in order to do long exposure astrophotography. To do an accurate polar alignment, the CPC requires an optional equatorial wedge between the telescope and the tripod.
>> Finding the North Celestial Pole In each hemisphere, there is a point in the sky around which all the other stars appear to rotate. These points are called the celestial poles and are named for the hemisphere in which they reside. For example, in the northern hemisphere all stars move around the north celestial pole. When the telescope’s polar axis is pointed at the celestial pole, it is parallel to the Earth’s rotational axis.
CELESTIAL OBSERVING With your telescope set up, you are ready to use it for observing. This section covers visual observing hints for both solar system and deep sky objects as well as general observing conditions which will affect your ability to observe. >> Observing the Moon Often, it is tempting to look at the Moon when it is full. At this time, the face we see is fully illuminated and its light can be overpowering. In addition, little or no contrast can be seen during this phase.
>> Observing Deep Sky Objects Deep-sky objects are simply those objects outside the boundaries of our solar system. They include star clusters, planetary nebulae, diffuse nebulae, double stars and other galaxies outside our own Milky Way. Most deep-sky objects have a large angular size. Therefore, low-tomoderate power is all you need to see them. Visually, they are too faint to reveal any of the color seen in long exposure photographs. Instead, they appear black and white.
CELESTIAL PHOTOGRAPHY After looking at the night sky for a while, you may want to try photographing it. Several forms of celestial photography are possible with your telescope, including short exposure prime focus, eyepiece projection, long exposure deep sky, terrestrial and even CCD imaging. Each of these is discussed in moderate detail with enough information to get you started. Topics include the accessories required and some simple techniques.
>> Eyepiece Projection This form of celestial photography is designed for objects with small angular sizes, primarily the Moon and planets. Planets, although physically quite large, appear small in angular size because of their great distances. Moderate to high magnification is, therefore, required to make the image large enough to see any detail. Unfortunately, the camera/telescope combination alone does not provide enough magnification to produce a usable image size on film.
5. Mount your camera body onto the T-Ring the same as you would any other lens. 6. Set the shutter speed to the “B” setting. 7. Focus the telescope on a star. 8. Center your subject in the field of your camera. 9. Find a suitable guide star in the telescope field. This can be the most time consuming process. 10.Open the shutter using a cable release. 11. Monitor your guide star for the duration of the exposure using the buttons on the hand controller to make the needed corrections. 12.
metering which lets you know if your picture is under or overexposed. Adjustments for proper exposures are made by changing the shutter speed. Consult your camera’s manual for specific information on metering and changing shutter speeds Reducing Vibration Releasing the shutter manually can cause vibrations, producing blurred photos. To reduce vibration when tripping the shutter, use a cable release.
The key factors for good CCD imaging are; exposure time, field-ofview, image size and pixel resolution. As the f-number goes down (or gets faster), the exposure times needed decreases, the field-of-viewincreases, but the image scale of the object gets smaller. What is the difference between f/2 and f/10? F/2 has 1/5 the focal length of f/10.
TELESCOPE MAINTENANCE While your CPC telescope requires little maintenance, there are a few things to remember that will ensure your telescope performs at its best. >> Care and Cleaning of the Optics Occasionally, dust and/or moisture may build up on the corrector plate of your telescope. Special care should be taken when cleaning any instrument so as not to damage the optics. If dust has built up on the corrector plate, remove it with a brush (made of camel’s hair) or a can of pressurized air.
To accomplish this, you need to tighten the secondary collimation screw(s) that move the star across the field toward the direction of the skewed light. These screws are located on the secondary mirror holder (see figure 9-1). To access the collimation screws you will need to remove the collimation screw cover to expose the three collimation screws underneath. To remove the cover, place the tip of a flat screwdriver underneath the cover and twist until the cover lifts off.
Filters, Eyepiece (94119-10) – Eyepiece filters are an invaluable aid in lunar and planetary observing. They reduce glare and light scattering, increase contrast through selective filtration, increase definition and resolution, reduce irradiation and lessen eye fatigue. Celestron’s filters are made of high quality, solid plane parallel glass with excellent homogeneity. They’re anti-reflection coated to prevent glaring and ghosting.
APPENDIX A – TECHNICAL SPECIFICATIONS Optical Specification CPC Deluxe 800 HD – #11007 CPC Deluxe 925 HD – #11008 Design 203 mm (8”) EdgeHD Optics 235 mm (9.25”) EdgeHD Optics Focal Length 2032 mm 2350 mm F/ratio of the Optical System 10 10 Primary Mirror: Fine Annealed Pyrex Starbright XLT Coating Fine Annealed Pyrex Starbright XLT Coating Central Obstruction 2.75” 3.
Software Specifications Ports Period Error Correction Tracking Rates Tracking Modes Alignment Procedures Database Complete Revised NGC Catalog Complete Messier Catalog Complete IC Catalog Complete Caldwell Abell Galaxies Solar System objects Famous Asterisms Selected CCD Imaging Objects Selected SAO Stars RS-232 communication port on hand control, Autoguider Port, 2 Auxiliary Port, PC Port Permanently programmable Sidereal, Solar, Lunar Alt-Az, EQ North and EQ South Sky Align, Auto Two-Star Align,
Celestial pole The imaginary projection of Earth’s rotational axis north or south pole onto the celestial sphere. Celestial Sphere An imaginary sphere surrounding the Earth, concentric with the Earth’s center. Collimation The act of putting a telescope’s optics into perfect alignment. Meridian A reference line in the sky that starts at the North celestial pole and ends at the South celestial pole and passes through the zenith.
R– V– Reflector A telescope in which the light is collected by means of a mirror. Resolution The minimum detectable angle an optical system can detect. Because of diffraction, there is a limit to the minimum angle, resolution. The larger the aperture, the better the resolution. Right Ascension: (RA) The angular distance of a celestial object measured in hours, minutes and seconds along the Celestial Equator eastward from the Vernal Equinox.
APPENDIX C - RS-232 CONNECTION (FOR COMPUTERIZED HAND CONTROL) You can control your NexStar telescope with a computer via the RS-232 port on the computerized hand control and using an optional RS-232 cable (#93920). Once connected, the NexStar can be controlled using popular astronomy software programs. Description PC Command ASCII Echo Kx Communication Protocol CPC communicates at 9600 bits/sec. No parity and a stop bit.
APPENDIX D – MAPS OF TIME ZONES 38 >> www.celestron.
>> www.celestron.
APPENDIX E – SKY MAPS 40 >> www.celestron.
>> www.celestron.
42 >> www.celestron.
>> www.celestron.
44 >> www.celestron.
>> www.celestron.
OBSERVATIONAL DATA SHEET >>Yearly Meteor Showers Shower Date Peak Hourly Rate Quadrantids Jan 01-Jan 05 4-Jan 60-200 Lyrids Apr 16-Apr 25 21-Apr 15 pi-Puppids Apr 15-Apr 28 23-Apr Var. eta-Aquarids Apr 19-May 28 5-May 60 June Bootids Jun 26-Jul 02 27-Jun Var. July Phoenicids Jul 10-Jul 16 13-Jul Var.
CELESTRON TWO YEAR WARRANTY A. Celestron warrants this telescope to be free from defects in materials and workmanship for two years. Celestron will repair or replace such product or part thereof which, upon inspection by Celestron, is found to be defective in materials or workmanship. As a condition to the obligation of Celestron to repair or replace such product, the product must be returned to Celestron together with proof-of-purchase satisfactory to Celestron. B.
www.celestron.com 2835 Columbia Street • Torrance, CA 90503 U.S.A. Telephone: 310.328.9560 • Fax: 310.212.5835 FCC Statement This device complies with Part 15 of FCC Rules. Operation is subject to the following two conditions: 1. This device may not cause harmful interference, and 2. This device must accept any interference received, including interference that may cause undesired operation. ©2011 Celestron All rights reserved.