INSTRUCTION MANUAL
INTRODUCTION .......................................................................................................................................................4 WARNING ..................................................................................................................................................................4 ASSEMBLY .................................................................................................................................................................
Filter Limits...................................................................................................................................................................... 23 Direction Buttons ............................................................................................................................................................. 23 Goto Approach ........................................................................................................................................
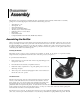
Congratulations on your purchase of the Celestron NexStar! The NexStar ushers in a whole new generation of computer automated technology. Simple and friendly to use, the NexStar is up and running after locating just three bright objects. It’s the perfect combination of power and portability. If you are new to astronomy, you may wish to start off by using the NexStar's built-in Sky Tour feature, which commands the NexStar to find the most interesting objects in the sky and automatically slews to each one.
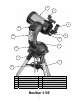
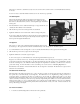
1 2 3 12 4 11 5 6 10 9 7 8 1 Optical Tube 7 Tripod 2 Star Pointer Finderscope 8 Accessory Tray / Leg Brace 3 Eyepiece 9 Tilt Wedge Plate 4 Star Diagonal 10 ON/OFF Switch 5 Focuser Knob 11 Hand Control 6 Battery Compartment 12 Liquid Crystal Display NexStar 5 SE 5
The NexStar 5 comes completely pre-assembled and can be operational in a matter of minutes.
make it more convenient to attach the necessary accessories as well as remove the front lens cover and install batteries when they are needed. You are now ready to attach the included visual accessories onto the telescope optical tube. The Star Diagonal The star diagonal diverts the light at a right angle from the light path of the telescope. For astronomical observing, this allows you to observe in positions that are more comfortable than if you were to look straight through.
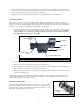
2. Slide the mounting track at the bottom of the Star Pointer over the dovetail portion of the bracket. It may be necessary to loosen the two screws on the side of the mounting track before sliding it over the dovetail. The end of the Star Pointer with the glass window should be facing out towards the front of the telescope. 3. Tighten the two screws on the side of the mounting track to secure the Star Pointer to the dovetail bracket.
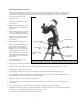
Attaching the NexStar to the Tripod The Celestron NexStar tripod is a sturdy, heavy duty mount on which to place your NexStar 4/5" telescope. This tripod can go anywhere, from your backyard to a remote observing site and can hold your NexStar in Alt-Az or can be polar aligned with the use of the built-in equatorial wedge tilt plate. The tripod comes completely assembled and only needs to have the center leg brace / accessory tray put in place. To set up the tripod: 1.
The NexStar has a removable hand controller built into the side of the fork arm designed to give you instant access to all the functions the NexStar has to offer. With automatic slewing to nearly 40,000 objects, and common sense menu descriptions, even a beginner can master its variety of features in just a few observing sessions. Below is a brief description of the individual components of the NexStar hand controller: 1. 2. 3.
4. Catalog Keys: The NexStar has a key on the hand control to allow direct access to each of the catalogs in its 40,000 object database. The NexStar contains the following catalogs in its database: Messier – Complete list of all Messier objects. NGC – Select list of all the deep-sky objects in the Revised New General Catalog. Caldwell – A combination of the best NGC and IC objects. Planets - All 8 planets in our Solar System plus the Moon.
telescope. Finally, EQ North and EQ South alignments are designed to assist you in aligning the NexStar when polar aligned using the tripods built-in wedge. Each alignment method is discussed in detail below. Sky Align Sky Align is the easiest way to get your NexStar aligned and ready to observe. Even if you do not know a single star in the sky, the NexStar will have you aligned in minutes by asking for basic information like the date, time and location.
4. Use the arrow buttons on the hand control to slew (move) the telescope towards any bright celestial object in the sky. Align the object with the red dot of the finderscope and press ENTER. 5. If the finderscope has been properly aligned with the telescope tube, the alignment star should now be visible inside the field of view of the eyepiece. The hand control will ask that you center the bright alignment star in the center of the eyepiece and press the ALIGN button.
6. Based on this information, the NexStar will automatically display the most suitable second alignment star that is above the horizon. Press ENTER to automatically slew the telescope to the displayed star. If for some reason you do not wish to select this star (perhaps it is behind a tree or building), you can either: • • Press the UNDO button to display the next most suitable star for alignment.
Solar System Align Solar System Align is designed to provide excellent tracking and GoTo performance by using solar system objects (Sun, Moon and planets) to align the telescope with the sky. Solar System Align is a great way to align your telescope for daytime viewing as well as a quick way to align the telescope for night time observing. Never look directly at the sun with the naked eye or with a telescope (unless you have the proper solar filter). Permanent and irreversible eye damage may result. 1. 2.
slew the telescope to the displayed star. If for some reason you do not wish to select one of these stars (perhaps it is behind a tree or building), you can either: • • 7. 8. 9. Press the UNDO button to display the next most suitable star for alignment. Use the UP and DOWN scroll buttons to manually select any star you wish from the entire list of available stars. The telescope then asks you to center in the eyepiece the alignment object you selected.
Sync: The Sync feature can be used to improve pointing accuracy in a specific region of the sky. Sync is a very useful feature especially when used in conjunction with the Constellation tour and Identify feature in which you will be exploring smaller areas of the sky. To Sync on an object: 1. 2. 3. 4. 5. 6. Select the desired star (or object) from the database and slew to it. Once centered, press the UNDO button until you are at the main menu.
Slewing to an Object Once the desired object is displayed on the hand control screen, you have two options: • Press the INFO Key. This will give you useful information about the selected object such as magnitude, constellation and fascinating facts about many of the objects. • Press the ENTER Key. This will automatically slew the telescope to the coordinates of the object.
Direction Buttons The NexStar has four direction buttons in the center of the hand control which control the telescope motion in altitude (up and down) and azimuth (left and right). The telescope can be controlled at nine different speed rates. 1 2 3 4 5 = = = = = .
Sidereal Lunar Solar View Time-Site - This rate compensates for the rotation of the earth by moving the telescope at the same rate as the rotation of the earth, but in the opposite direction. When the telescope is polar aligned, this can be accomplished by moving the telescope in Right Ascension only. When mounted in AltAz mode, the telescope must make corrections in both R.A. and declination. Used for tracking the moon when observing the lunar landscape.
Connecting a Camera to the NexStar Mount Your NexStar mount has a camera control port that allows you to connect your camera using the supplied Shutter Release Cable and a firing cable for your model of camera (not included). To connect you camera: 1. 2. 3. Attach the phone jack end of the supplied cable into the camera port on the base of the mount. Plug the 2.5mm mono jack end of your user supplied firing cable into the Shutter Release Cable.
Repeat Count- Allows you to set the number of exposures per object. Exposure Time- Allows you to set the duration of each exposure in seconds. Long exposures – To take an exposure for more than 1 second, your camera must be set to the “Bulb” setting. Then the camera will take the exposure for the amount of time entered into the hand control. Snapshots- If you want to take an image for 1 second or less, your camera should in normal mode and the hand control exposure value should be set to “1”.
Scope Setup Features Setup Time-Site - Allows the user to customize the NexStar display by changing time and location parameters (such as time zone and daylight savings). Anti-backlash – All mechanical gears have a certain amount of backlash or play between the gears. This play is evident by how long it takes for a star to move in the eyepiece when the hand control arrow buttons are pressed (especially when changing directions).
while polar aligned, you would want to set the azimuth approach to the direction that allows the scope to compensate for different load level on the motors and gears when pointing in different parts of the sky. To change the goto approach direction, simply choose Goto Approach from the Scope Setup menu, select either Altitude or Azimuth approach, choose positive or negative and press Enter.
Scrolling Menu This menus allows you to change the rate of speed that the text scrolls across the hand control display. • Press the Up (number 6) button to increase the speed of the text. • Press the Down (number 9) button to decrease the speed of the text. Calibrate Goto Goto Calibration is a useful tool when attaching heavy visual or photographic accessories to the telescope.
NexStar SE MENU TRACKING MODE ALT-AZ EQ NORTH EQ SOUTH OFF RATE SIDEREAL SOLAR LUNAR VIEW TIME-SITE SCOPE SETUP SETUP TIME-SITE ANTI-BACKLASH SLEW LIMITS FILTER LIMITS DIRECTION BUTTONS GOTO APPROACH CORDWRAP UTILITIES LIGHT CONTROL FACTORY SETTING VERSION GET AXIS POSITION GOTO AXIS POSITION HIBERNATE SUN MENU SCROLLING TEXT CALIBRATE GOTO SET MOUNT POSITION WEDGE ALIGN GPS ON/OFF USER OBJECTS GOTO SKY OBJ SAVE SKY OBJ SAVE DB OBJ ENTER RA & DEC SAVE LAND OBJ GOTO LAND OBJ CAMERA CAMERA WIZARD TAKE EXPOSUR
A telescope is an instrument that collects and focuses light. The nature of the optical design determines how the light is focused. Some telescopes, known as refractors, use lenses. Other telescopes, known as reflectors, use mirrors. The Schmidt-Cassegrain optical system (or Schmidt-Cass for short) uses a combination of mirrors and lenses and is referred to as a compound or catadioptric telescope.
Focusing The NexStar's focusing mechanism controls the primary mirror which is mounted on a ring that slides back and forth on the primary baffle tube. The focusing knob, which moves the primary mirror, is on the rear cell of the telescope just below the star diagonal and eyepiece. Turn the focusing knob until the image is sharp. If the knob will not turn, it has reached the end of its travel on the focusing mechanism. Turn the knob in the opposite direction until the image is sharp.
thousand yards. The apparent field of each eyepiece that Celestron manufactures is found in the Celestron Accessory Catalog (#93685). General Observing Hints When working with any optical instrument, there are a few things to remember to ensure you get the best possible image. • • • • Never look through window glass. Glass found in household windows is optically imperfect, and as a result, may vary in thickness from one part of a window to the next.
Up to this point, this manual covered the assembly and basic operation of your NexStar telescope. However, to understand your telescope more thoroughly , you need to know a little about the night sky. This section deals with observational astronomy in general and includes information on the night sky and polar alignment. The Celestial Coordinate System To help find objects in the sky, astronomers use a celestial coordinate system that is similar to our geographical coordinate system here on Earth.
Motion of the Stars The daily motion of the Sun across the sky is familiar to even the most casual observer. This daily trek is not the Sun moving as early astronomers thought, but the result of the Earth's rotation. The Earth's rotation also causes the stars to do the same, scribing out a large circle as the Earth completes one rotation. The size of the circular path a star follows depends on where it is in the sky.
Polar Alignment Even though the NexStar can precisely track a celestial object while in the Alt-Az position, it is still necessary to align the polar axis of the telescope (the fork arm) to the Earth's axis on rotation in order to attempt long exposure astro photography. This is accomplished by using the built-in wedge attached to the steel tripod. This allows the telescope's tracking motors to rotate the telescope around the celestial pole, the same way as the stars.
Based on your current alignment, NexStar will slew to where it thinks Polaris should be. Use the tripod’s tilt plate adjustment to place Polaris in the center of the eyepiece. Do not use the hand control’s direction buttons to position Polaris. Once Polaris is centered in the eyepiece, press ENTER; the polar axis should then be pointed towards the North Celestial Pole. Photography with the NexStar After looking at the night sky for a while you may want to try photographing it.
Finding the North Celestial Pole In each hemisphere, there is a point in the sky around which all the other stars appear to rotate. These points are called the celestial poles and are named for the hemisphere in which they reside. For example, in the northern hemisphere all stars move around the north celestial pole. When the telescope's polar axis is pointed at the celestial pole, it is parallel to the Earth's rotational axis.
With your telescope set up, you are ready to use it for observing. This section covers visual observing hints for both solar system and deep sky objects as well as general observing conditions which will affect your ability to observe. Observing the Moon Often, it is tempting to look at the Moon when it is full. At this time, the face we see is fully illuminated and its light can be overpowering. In addition, little or no contrast can be seen during this phase.
Solar Observing Hints o o o The best time to observe the Sun is in the early morning or late afternoon when the air is cooler. To center the Sun without looking into the eyepiece, watch the shadow of the telescope tube until it forms a circular shadow. To ensure accurate tracking, be sure to select solar tracking rate. Observing Deep Sky Objects Deep-sky objects are simply those objects outside the boundaries of our solar system.
While your NexStar telescope requires little maintenance, there are a few things to remember that will ensure your telescope performs at its best. Care and Cleaning of the Optics Occasionally, dust and/or moisture may build up on the corrector plate of your telescope. Special care should be taken when cleaning any instrument so as not to damage the optics. If dust has built up on the corrector plate, remove it with a brush (made of camel’s hair) or a can of pressurized air.
To verify collimation, view a star near the zenith. Use a medium to high power ocular — 12mm to 6mm focal length. It is important to center a star in the center of the field to judge collimation. Slowly cross in and out of focus and judge the symmetry of the star. If you see a systematic skewing of the star to one side, then recollimation is needed. Figure 8-2 -- Even though the star pattern appears the same on both sides of focus, they are asymmetric.
You will find that additional accessories enhance your viewing pleasure and expand the usefulness of your telescope. For ease of reference, all the accessories are listed in alphabetical order. Adapter, Car Battery (#18769) - Celestron offers the Car Battery Adapter that allows you to run the NexStar drive off an external power source. The adapter attaches to the cigarette lighter of your car, truck, van, or motorcycle.
lights. This includes mercury and high and low pressure sodium vapor lights. In addition, they also block unwanted natural light (sky glow) caused by neutral oxygen emission in our atmosphere. Celestron offers a model for 1-1/4" eyepieces (#94126A). Moon Filter (#94119-A) - Celestron’s Moon Filter is an economical eyepiece filter for reducing the brightness of the moon and improving contrast, so greater detail can be observed on the lunar surface.
Appendix A - Technical Specifications O Oppttiiccaall SSppeecciiffiiccaattiioonn Design Aperture Focal Length F/ratio of the Optical System Primary Mirror: Diameter Coatings Secondary Mirror Spot Size Secondary Obstruction Corrector Plate: Material Coatings Highest Useful Magnification Lowest Useful Magnification (7mm exit pupil) Resolution: Rayleigh Criterion Dawes Limit Light Gathering Power Near Focus standard eyepiece or camera Field of View: Standard Eyepiece : 35mm Camera Linear Field of View (at 1000
Appendix B - Glossary of Terms AAbsolute magnitude Airy disk Alt-Azimuth Mounting Altitude Aperture Apparent Magnitude Arcminute Arcsecond Asterism Asteroid Astrology Astronomical unit (AU) Aurora Azimuth BBinary Stars CCelestial Equator Celestial pole Celestial Sphere Collimation DDeclination (DEC) EEcliptic Equatorial mount The apparent magnitude that a star would have if it were observed from a standard distance of 10 parsecs, or 32.6 light-years. The absolute magnitude of the Sun is 4.8.
FFocal length JJovian Planets KKuiper Belt LLight-Year (ly) MMagnitude Meridian Messier NNebula North Celestial Pole Nova OOpen Cluster PParallax Parfocal Parsec Point Source RReflector The distance between a lens (or mirror) and the point at which the image of an object at infinity is brought to focus. The focal length divided by the aperture of the mirror or lens is termed the focal ratio.
Resolution Right Ascension: (RA) SSidereal Rate TTerminator UUniverse VVariable Star The minimum detectable angle an optical system can detect. Because of diffraction, there is a limit to the minimum angle, resolution. The larger the aperture, the better the resolution. The angular distance of a celestial object measured in hours, minutes, and seconds along the Celestial Equator eastward from the Vernal Equinox. This is the angular speed at which the Earth is rotating.
Appendix D – Maps of Time Zones 45
CELESTRON TWO YEAR WARRANTY A. Celestron warrants this telescope to be free from defects in materials and workmanship for two years. Celestron will repair or replace such product or part thereof which, upon inspection by Celestron, is found to be defective in materials or workmanship. As a condition to the obligation of Celestron to repair or replace such product, the product must be returned to Celestron together with proof-of-purchase satisfactory to Celestron. B.
Celestron 2835 Columbia Street Torrance, CA 90503 Tel. (310) 328-9560 Fax. (310) 212-5835 Web site at http//www.celestron.com Copyright 2006 Celestron All rights reserved. (Products or instructions may change without notice or obligation.) This device complies with Part 15 of the FCC Rule.