
NexStar 4SE Manual

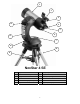
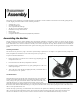


Table Of Contents
- 1235081147_4semanualfrench
- Avertissement
- ( Procédure d'alignement
- ( Sky Align
- ( Alignement automatique sur deux étoiles (Auto 2-Star)
- ( Mise au point
- ( Calculer le grossissement
- ( Indices d’observation générale
- ( Conditions de visibilité
- ( Transparence
- ( Illumination du ciel
- Alimentation portable réf. C 479
- Plots de trépied anti-vibration réf. C 1174
- Annexe A – Caractéristiques techniques
- Annexe B – Branchement RS-232
- 1150227146_11049manual
- Warning
- _
- Assembling the NexStar
- Hand Control Operation
- Improving Pointing Accuracy
- Object Catalog
- Direction Buttons
- Setup Procedures
- Camera –
- Identify
- Precise GoTo
- Scope Setup Features
- Utility Features
- Image Orientation
- _
- _
- _
- _
- _
- _
- _
- Focusing
- Calculating Magnification
- Determining Field of View
- General Observing Hints
- The Celestial Coordinate System
- Motion of the Stars
- Polar Alignment
- Observing the Moon
- Observing the Planets
- Observing the Sun
- Observing Deep Sky Objects
- Seeing Conditions
- Care and Cleaning of the Optics
- _
- _
- Appendix A - Technical Specifications
- _
- Appendix B - Glossary of Terms
- _
- _
- 1235081459_4semanualitalia
- 1235081856_4semanualspanis

A
A
t
t
t
t
a
a
c
c
h
h
i
i
n
n
g
g
t
t
h
h
e
e
N
N
e
e
x
x
S
S
t
t
a
a
r
r
t
t
o
o
t
t
h
h
e
e
T
T
r
r
i
i
p
p
o
o
d
d
The Celestron NexStar tripod is a sturdy, heavy duty mount on which to place your NexStar 4/5" telescope. This tripod can go anywhere,
from your backyard to a remote observing site and can hold your NexStar in Alt-Az or can be polar aligned with the use of the built-in
equatorial wedge tilt plate. The tripod comes completely assembled and only needs to have the center leg brace / accessory tray put in place.
To set up the tripod:
1. Hold the tripod with the head up, away
from the ground.
2. Pull the legs apart until the legs are fully
extended and press it down flat against
the ground.
3. Place the center leg brace over the center
support rod so that the slotted cutout is
directly under the latitude adjustment rod.
4. Tighten with the leg brace locking knob
until the leg brace firmly presses out
against each leg.
5. The tripod will now stand by itself.
Your tripod has height adjustable legs for
proper leveling on all types of surfaces.
The tripod also comes with detached
bubble to assist in accurate leveling. To
adjust the height and level the tripod:
1. Place the bubble level on the top of the
tripod tilt plate. Make sure that the tilt
plate is all the way down and horizontal
to the ground.
2. Locate the tightening screw on the
bottom of each tripod leg.
3. Rotate the knob counterclockwise until
the inside portion of the tripod leg slides out.
Wedge Tilt Plate
Center Support
Rod
Center Leg Brace /
Accessory Tray
Leg Brace Locking
Knob
Telescope Mounting
Bolts
Latitude
Adjustment Rod
Figure 3-5
4. Extend the center portion of the tripod leg to the desired height making sure that the bubble in the bubble level is centered..
5. Tighten the knob to hold the tripod leg in place.
If polar aligning your telescope, it is best to adjust the latitude of the wedge tilt plate before mounting the telescope:
1. Loosen the latitude locking lever (located next to the latitude adjustment rod) and raise the wedge tilt plate until the scale on the latitude
adjustment rod is the same as the latitude of your observing site.
2. Tighten the locking lever to hold the tilt plate securely in place.
3. Set the base of the telescope on the wedge tilt plate so that the hole in the center of the base goes over the positioning pin on top of the tilt
plate.
4. Rotate the base so the holes under each rubber foot line up with the mounting bolts attached to the tilt plate.
5. First thread in the mounting bolt closest to the latitude adjustment rod, then align the other two holes and thread in the remaining mounting
bolts. Check that the latitude locking lever is still locked down tight.
Your NexStar is now securely attached to the tripod and ready for use.
9