
PWI Telescope Control Software Manual


4
3. Connecting via WiFi
If you are using the SkyPortal WiFi module or if your mount has internal WiFi, there are two ways you can connect via WiFi: Direct
Connect mode or Access Point mode. Direct Connect mode is meant for close range wireless control. This is only ideal if you are
physically near the telescope with your computer (within 10-20 feet). Access Point mode is meant for remote wireless control. This
is useful for backyard or remote observatories where the direct wireless connection won’t suffi ce for a long-range WiFi connection.
Unlike Direct Connect mode, Access Point mode allows you to connect to the internet and use CPWI to wirelessly control your
telescope at the same time.
If your mount does not have integrated WiFi, start by plugging the SkyPortal WiFi module into an AUX port on the mount. If you are using
a Celestron mount with WiFi, the module is not needed.
Direct Connect – Set the WiFi module switch to the Direct Connect position. Go to the wireless network settings on your computer
and connect to the WiFi module. It will be identifi ed as “Celestron-___”. Once connected, you are ready to open CPWI and connect
to the WiFi module directly.
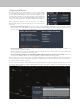
Access Point – To use access mode, you will fi rst need to
connect to the WiFi module in Direct Connect mode to enter your
home network SSID and password. To do this, fi rst, set the WiFi
module switch to the Direct Connect position. Go to the wireless
network settings on your computer and connect to the WiFi
module. It will be identifi ed as “Celestron-___”. Once connected,
open CPWI, and select “Start” from the opening screen. Next,
go to the Utilities menu on the left side of the screen, and select
“WiFi WLAN Confi g...”. A pop-up window will appear, and you
can enter your home network SSID and password here. When
completed, press “Send WiFi Confi guration”, and this data will
be stored in the WiFi module.
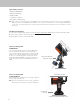
There are three ways you can connect your computer to your mount.
1. Connecting via USB
(CGX / CGX-L mounts only)
You will need a USB 2.0 Male Type A to Male Type B cable. Plug the
Male Type A connector into the computer and plug in the Male Type
B connector into the USB port on the mount.
NOTE: USB 3.0 Type B cables are NOT compatible with CGX mounts;
the 3.0 Type B connector is bigger and will not physically plug
into the mount.
NOTE: If you are using the optional Celestron Focus Motor and it
is connected to the mount’s AUX port, then it is possible to
connect via USB to the mount through the focus motor’s USB
port.
2. Connecting via Hand Control
You can connect to the mount using the port at the bottom of the
Celestron hand control. Newer NexStar+ and StarSense hand
controls have a Mini USB port at the bottom, while older NexStar+
and StarSense hand controls have a serial port at the bottom.
i. For newer hand controls with Mini USB port, you will need a
Mini USB cable (Male Type A to Male Mini B).
ii. Older hand controls with serial port will need the RS-232 cable
combination listed in the system requirements above. Connect
the RS-232 ports together from each cable, then take the USB
end of the cable and plug it into the computer. Next, take the
serial end of the cable and plug it into the bottom of the hand
control.
Connecting your Computer to your Mount
Auto Guide port
USB 2.0 Type B port