
PWI Telescope Control Software Manual


6
CPWI Overview
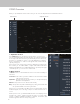
When you open CPWI, there are two main sections you can control, the SkyViewer Section and the Menu Section.
1. SkyViewer Section
In the SkyViewer section, shown in the screenshot above, you can use your
cursor to click and drag the model of the night sky to move it and see what stars
are currently visible. This is also where you can manually search for stars, deep
sky objects, or constellations. Zoom in or out of the SkyViewer by scrolling the
mouse or selecting the + or – buttons on the right side of the screen. Select an
object by clicking on it.
In the top left corner of the program, locate the “SkyViewer” drop-down menu.
Here is where you can enable, disable, or adjust certain features that will be
displayed in the SkyViewer. You can adjust SkyViewer to only show specifi c types
of celestial objects, or you can choose to show them all.
2. Menu Section
The Menu section is on the left-hand side of the screen. There are initially four
sub-menus:
Connection - This is where you start to establish a connection between CPWI
and your telescope mount.
SkyViewer - As mentioned previously, this is where you can adjust the display
parameters of the SkyViewer.
Utilities - This provides access to advanced functionality.
Help - This provides help with understanding the pointing model details and
also provides detailed version history information.
Use the pin icon (located above the Menu section) to hide the Menu. To have
the Menu reappear, click on the edge of the pin icon that can still be seen on
screen.
At the top of the screen, you will fi nd the Data bar. This section displays current
information at a glance, including universal time (UTC), local time (LST),
pointing coordinates (in RA/Dec and Alt/Az coordinates), mount status, and
number of alignment references in the pointing model.
SkyViewer SectionMenu Section