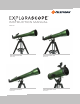
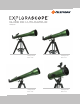
INSTRUCTION MANUAL ENGLISH EXPLORASCOPE 60AZ Model #22100 EXPLORASCOPE 80AZ Model #22102 EXPLORASCOPE 70AZ Model #22101 EXPLORASCOPE 114AZ Model #22103
WHAT’S IN THE BOX We recommend saving your telescope box so it can be used to store the telescope when it is not in use. Unpack the box carefully as some parts are small. Use the parts list below to verify that all parts and accessories are present.
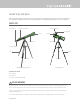
ASSEMBLING YOUR TELESCOPE THE MOUNT The ExploraScope mount and tripod come fully assembled, so setting it up is easy. 1. Remove the tripod and mount from the box. 2. Loosen the hand knobs at the bottom of each leg and extend the inner section of the leg to the desired length. Tighten the knobs to secure the legs, being careful not to over tighten. 3. Stand the tripod upright and pull the tripod legs apart until the center brace snaps into place. Fig. 1 4.
THE EYEPIECES Your telescope comes with two eyepieces, a low power (20 mm eyepiece) and a higher power eyepiece (4 mm eyepiece). Whenever you set up your telescope, always start with the 20 mm eyepiece. Once you have your target centered in the 20 mm eyepiece, you can switch to your higher power 4 mm eyepiece to get a more detailed view. To install an eyepiece on the 60 mm, 70 mm, or 80 mm refractor: 1. Loosen the setscrews on the open end of the star diagonal. 2.
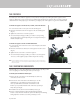
ALIGNING THE STARPOINTER FINDERSCOPE The StarPointer finderscope helps you aim your telescope by looking through its round glass window and covering your target with the red dot projected in the window. The first time you assemble your telescope, you’ll need to align the StarPointer with the main optics of the telescope. Although this step can be done at night, it is significantly easier during the day.
YOUR FIRST ASTRONOMICAL OBSERVING SESSION THE MOON Now you are ready to take your telescope out at night and do some real observing! Let’s start with the Moon. The Moon takes about one month go through a complete phase cycle, from New Moon to Full Moon and back again. Try observing it at different points during this cycle. While you can observe the Moon any time it is visible in the night sky, the best time to view it is from two days after a New Moon up to a few days before a Full Moon.
CELESTRON TWO YEAR LIMITED WARRANTY A. Celestron warrants your telescope to be free from defects in materials and workmanship for two years. Celestron will repair or replace such product or part thereof which, upon inspection by Celestron, is found to be defective in materials or workmanship. As a condition to the obligation of Celestron to repair or replace such product, the product must be returned to Celestron together with proof-of-purchase satisfactory to Celestron. B.
FCC NOTE: This equipment has been tested and found to comply with the limits for a Class B digital device, pursuant to part 15 of the FCC Rules. These limits are designed to provide reasonable protection against harmful interference in a residential installation. This equipment generates, uses, and can radiate radio frequency energy and, if not installed and used in accordance with the instructions, may cause harmful interference to radio communications.
GUIDE DE L'UTILISATEUR FRANÇAIS EXPLORASCOPE 60AZ EXPLORASCOPE 70AZ Modèle n 22100 Modèle no 22101 EXPLORASCOPE 80AZ EXPLORASCOPE 114AZ Modèle n 22102 Modèle no 22103 o o
CONTENU DE LA BOÎTE Nous vous recommandons de conserver votre boîte de télescope afin de pouvoir l'utiliser pour le rangement du télescope lorsqu'il n'est pas utilisé. Déballez le contenu de la boîte avec soin, car certaines pièces sont petites. Utilisez la liste des pièces ci-dessous pour vous assurer que toutes les pièces et tous les accessoires soient compris.
ASSEMBLAGE DE VOTRE TÉLESCOPE LA MONTURE Le trépied et la monture de l’ExploraScope sont livrés entièrement assemblés, facilitant ainsi son installation : 1. Retirez le trépied et la monture de la boîte. 2. Desserrez les molettes au bas de chaque pied et étendez la partie intérieure du pied à la longueur souhaitée. Serrez les molettes pour fixer les pieds, en veillant à ne pas trop les serrer. 3.
L’OCULAIRE Votre télescope est vendu avec deux oculaires, un de faible puissance (oculaire 20 mm) et un de puissance plus élevée (oculaire 4 mm). Chaque fois que vous installez votre télescope, commencez toujours par l’oculaire de 20 mm. Une fois que votre objectif est centré dans l’oculaire 20 mm, vous pouvez le remplacer par l’oculaire de puissance plus élevée 4 mm pour obtenir une vue plus détaillée. Pour installer un oculaire sur le réfracteur de 60 mm, 70 mm ou 80 mm : 1.
ALIGNEMENT DU CHERCHEUR STARPOINTER Le chercheur StarPointer vous aide à pointer votre télescope lorsque vous regardez par sa fenêtre ronde en verre en couvrant votre cible avec le point rouge projeté sur la fenêtre. La première fois que vous assemblez votre télescope, vous devrez aligner le chercheur StarPointer avec le système optique principal du télescope. Bien que cette étape puisse être effectuée pendant la nuit, il est beaucoup plus facile de l’effectuer en plein jour.
VOTRE PREMIÈRE SESSION D’OBSERVATION ASTRONOMIQUE LA LUNE Vous êtes maintenant prêt à installer à l’extérieur votre télescope et faire quelques véritables observations pendant la nuit! Commençons par la lune. Les phases de la lune s’étendent sur un cycle complet d’environ un mois, de la nouvelle lune à la pleine lune et vice versa. Essayez de l’observer à différents moments au cours de ce cycle.
GARANTIE LIMITÉE DE 2 ANS DE CELESTRON A. Celestron garantit que votre monture de télescope sera exempte de tout défaut de matériaux ou de fabrication pour une période de deux (2) ans. Celestron réparera ou remplacera ce produit ou une partie de celui-ci lorsqu’il a été déterminé, lors d’une inspection par Celestron, que le produit est défectueux en raison d’un défaut de matériaux ou de fabrication.
REMARQUE RELATIVE À LA FCC : Cet équipement a été testé et jugé conforme aux limites établies pour un dispositif numérique de classe B, conformément à la partie 15 de la réglementation FCC. Ces limites sont conçues pour fournir une protection raisonnable contre les interférences nuisibles dans une installation résidentielle.
BEDIENUNGSANLEITUNG DEUTSCH EXPLORASCOPE 60AZ Modell-Nr. 22100 EXPLORASCOPE 80AZ Modell-Nr.22102 EXPLORASCOPE 70AZ Modell-Nr. 22101 EXPLORASCOPE 114AZ Modell-Nr.
LIEFERUMFANG Wir empfehlen Ihnen, die Verpackung Ihres Teleskops aufzubewahren, um das Teleskop bei Nichtverwendung darin zu verstauen. Gehen Sie beim Auspacken vorsichtig vor, da Kleinteile enthalten sind. Überprüfen Sie anhand der untenstehenden Teileliste die Vollständigkeit aller Teile und Zubehörteile.
DAS TELESKOP AUFBAUEN DIE MONTIERUNG Der Aufbau gestaltet sich einfach, da Stativ und Montierung des ExploraScope werden vollständig montiert geliefert werden: 1. Nehmen Sie das Stativ und die Montierung aus der Verpackung. 2. Lösen Sie die Drehknöpfe an der Unterseite jedes Beins und stellen Sie die inneren Beinabschnitte auf die gewünschte Länge ein. Drehen Sie die Knöpfe zum Sichern der Beine an, doch achten Sie darauf, diese nicht zu fest anzuziehen. 3.
DIE OKULARE Ihr Teleskop ist mit zwei Okularen ausgestattet, eines weist eine niedrige Vergrößerung (20 mm-Okular), das andere eine hohe Vergrößerung (4 mm-Okular) auf. Wählen Sie nach jedem Aufbau Ihres Teleskops immer zuerst das 20 mmOkular. Nachdem Ihr Zielobjekt im 20 mm-Okular zentriert ist, können Sie zum 4 mm-Okular mit höherer Vergrößerung wechseln, um ein detaillierteres Bild zu erhalten. Installation eines Okular an einem 60 mm-, 70 mm- und 80 mm-Refraktor: 1.
AUSRICHTEN DES STARPOINTER-SUCHERFERNROHRS Das StarPointer-Sucherfernrohr unterstützt Sie beim Ausrichten Ihres Teleskops, indem Sie beim Blick durch das runde Glasfenster Ihr Zielobjekt mit einem roten Punkt, der auf das Fenster projiziert wird, abdecken können. Nach dem ersten Aufbau Ihres Teleskops müssen Sie den StarPointer an der Hauptoptik Ihres Teleskops ausrichten. Obwohl dies auch bei Nacht vorgenommen werden kann, ist es bei Tag bedeutend einfacher.
IHRE ERSTE ASTRONOMISCHE BEOBACHTUNG DER MOND Jetzt können Sie Ihr Teleskop bei Nacht nach draußen nehmen und ans Beobachten gehen! Fangen wir mit dem Mond an. Der Mond benötigt für einen vollständigen Phasenzyklus vom Neumond über den Vollmond zurück zum Neumond ungefähr einen Monat. Versuchen Sie, ihn zu verschiedenen Stadien dieses Zyklus zu beobachten.
ZWEIJÄHRIGE EINGESCHRÄNKTE GARANTIE VON CELESTRON A. Celestron garantiert, dass Ihre Teleskop-Montierung für zwei Jahre frei von Material- und Verarbeitungsfehlern ist. Celestron wird ein solches Produkt oder Teile davon, wenn nach Inspektion durch Celestron ein Defekt an Material oder Verarbeitung gefunden wurde, reparieren oder austauschen.
FCC-ERKLÄRUNG: Dieses Gerät wurde getestet und entspricht den Grenzwerten für digitale Geräte der Klasse B in Übereinstimmung mit Artikel 15 der FCC-Bestimmungen. Diese Grenzwerte sollen einen angemessenen Schutz vor Störungen in Wohngegenden bieten. Dieses Gerät erzeugt, verwendet Hochfrequenzenergie und kann diese ausstrahlen und kann, wenn es nicht in Übereinstimmung mit den Anweisungen installiert und verwendet wird, Störungen im Funkverkehr verursachen.
MANUAL DE INSTRUCCIONES ESPAÑOL EXPLORASCOPE 60AZ Modelo #22100 EXPLORASCOPE 80AZ Modelo #22102 EXPLORASCOPE 70AZ Modelo #22101 EXPLORASCOPE 114AZ Modelo #22103
CONTENIDO DE LA CAJA Recomendamos guardar la caja de su telescopio para poder usarla para guardarlo cuando no lo use. Desembale cuidadosamente la caja, algunas piezas son pequeñas. Use la lista de piezas siguiente para comprobar que dispone de todas las piezas y accesorios.
MONTAJE DEL TELESCOPIO SOPORTE El trípode y el soporte del ExploraScope se entregan totalmente montados, por lo que la instalación es sencilla: 1. Saque el trípode y el soporte de la caja. 2. Afloje los mandos de la parte inferior de cada pata y extienda la sección interna de la pata a la longitud deseada. Apriete los mandos para asegurar las patas, con cuidado de no apretarlos en exceso. 3. Ponga el trípode de pie y separe las patas hasta que la abrazadera central encaje en posición. 4.
OCULARES Su telescopio incluye dos oculares, uno de baja potencia (ocular de 20 mm) y uno de una potencia superior (ocular de 4 mm). Siempre que instale el telescopio, comience por el ocular de 20 mm. Cuando haya centrado el objetivo en el ocular de 20 mm, puede cambiar al ocular de mayor potencia de 4 mm para obtener una visión más detallada. Para instalar un ocular en el refractor de 60mm, 70mm o 80mm: 1. Afloje los tornillos del extremo abierto de la diagonal estelar. 2.
ALINEAR EL LOCALIZADOR STARPOINTER El localizador StarPointer le ayuda a apuntar el telescopio mirando por la ventana redonda y cubriendo el objetivo con el punto rojo proyectado en la ventana. La primera vez que monte el telescopio, deberá alinear el StarPointer con la óptica principal del telescopio. Aunque puede realizar este paso de noche, es notablemente más sencillo de día. Cuando haya finalizado la alineación del localizador, no deberá repetir este paso a menos que se golpee o caiga el localizador.
PRIMERA SESIÓN DE OBSERVACIÓN ASTRONÓMICA LA LUNA Ahora está a punto para sacar su telescopio de noche y realizar observaciones reales. Comencemos con la Luna. La Luna tarda aproximadamente un mes en realizar un ciclo de fases completo, de Luna nueva a Luna llena y vuelta a empezar. Pruebe a observarla en distintos momentos de este ciclo.
GARANZIA LIMITATA DI DUE ANNI CELESTRON A. Celestron garantisce che il cannocchiale è privo di difetti nei materiali e nella fabbricazione per due anni. Celestron si riserva di riparare o sostituire prodotti o parti di prodotti che, dopo un’ispezione da parte di Celestron, risultino essere difettosi nei materiali o nella fabbricazione. Come condizione per l’obbligo di Celestron di riparare o sostituire il prodotto, il prodotto deve essere presentato a Celestron insieme a una prova d’acquisto valida. B.
Nota FCC: la presente apparecchiatura è stata testata ed è risultata conforme ai limiti per i dispositivi digitali di classe B, ai sensi della Parte 15 delle Norme FCC. Tali limiti sono stati ideati per fornire un’adeguata protezione nei confronti di interferenze dannose in installazioni residenziali. Questa apparecchiatura genera, utilizza e può irradiare energia in radio frequenza e, se non installato e utilizzato in conformità con le istruzioni, può causare interferenze dannose alle comunicazioni radio.
MANUALE DI ISTRUZIONI ITALIANO EXPLORASCOPE 60AZ Modello n.22100 EXPLORASCOPE 80AZ Modello n.22102 EXPLORASCOPE 70AZ Modello n.22101 EXPLORASCOPE 114AZ Modello n.
CONTENUTO DELLA CONFEZIONE Si consiglia di conservare la confezione del telescopio per riporlo quando non in uso. Svuotare la confezione con attenzione poiché alcuni componenti sono di piccole dimensioni. Utilizzare l'elenco dei componenti che segue per verificare che siano presenti tutti i componenti e gli accessori.
MONTAGGIO DEL TELESCOPIO MONTATURA La montatura e il treppiede di ExploraScope sono forniti completamente assemblati, pertanto il montaggio è semplice.. 1. Rimuovere il treppiede e la montatura dalla confezione. 2. Allentare le manopole manuali sulla parte inferiore di ciascuna gamba ed estendere la sezione interna della gamba all’altezza desiderata. Stringere le manopole per fissare le gambe, prestando attenzione a non stringere in modo eccessivo. 3.
OCULARI Il telescopio è dotato di due oculari, uno a bassa potenza (oculare da 20 mm) e uno ad alta potenza (oculare da 4 mm). Quando si prepara il telescopio, iniziare sempre con l’oculare da 20 mm. Una volta che l’oggetto target si trova al centro dell’oculare da 20 mm, è possibile passare all’oculare più potente da 4 mm per ottenere una visione più dettagliata. Per installare un oculare su un rifrattore da 60 mm, 70 mm o 80 mm: 1. Allentare le viti sull’estremità aperta della diagonale stellare. 2.
ALLINEAMENTO DEL CERCATORE STARPOINTER Il cercatore StarPointer consente di puntare il telescopio guardando attraverso la finestrella di vetro rotonda e coprendo il target con il puntino rosso proiettato nella finestrella. Al primo montaggio del telescopio, è necessario allineare lo StarPointer con le ottiche principali del telescopio. Nonostante ciò possa essere effettuato di notte, è notevolmente più agevole durante il giorno.
PRIMA SESSIONE DI OSSERVAZIONE ASTRONOMICA LA LUNA Ora il telescopio è pronto per essere utilizzato di notte per l’osservazione delle stelle! Iniziamo con la Luna. La Luna impiega circa un mese per eseguire un ciclo completo, dalla fase della Luna nuova alla fase della Luna piena e così via. Cercare di osservarla durante le sue diverse fasi.
GARANZIA LIMITATA DI DUE ANNI CELESTRON A. Celestron garantisce che il cannocchiale è privo di difetti nei materiali e nella fabbricazione per due anni. Celestron si riserva di riparare o sostituire prodotti o parti di prodotti che, dopo un’ispezione da parte di Celestron, risultino essere difettosi nei materiali o nella fabbricazione. Come condizione per l’obbligo di Celestron di riparare o sostituire il prodotto, il prodotto deve essere presentato a Celestron insieme a una prova d’acquisto valida. B.
Nota FCC: la presente apparecchiatura è stata testata ed è risultata conforme ai limiti per i dispositivi digitali di classe B, ai sensi della Parte 15 delle Norme FCC. Tali limiti sono stati ideati per fornire un’adeguata protezione nei confronti di interferenze dannose in installazioni residenziali. Questa apparecchiatura genera, utilizza e può irradiare energia in radio frequenza e, se non installato e utilizzato in conformità con le istruzioni, può causare interferenze dannose alle comunicazioni radio.