
Instructions / Assembly


ENGLISH | 3
ASSEMBLING YOUR TELESCOPE
Fig. 4
THE MOUNT
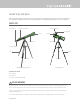
The ExploraScope mount and tripod come fully assembled, so setting it up is easy.
1. Remove the tripod and mount from the box.
2. Loosen the hand knobs at the bottom of each leg and extend the inner section of
the leg to the desired length. Tighten the knobs to secure the legs, being careful
not to over tighten.
3. Stand the tripod upright and pull the tripod legs apart until the center brace snaps
into place.
4. Place the threaded post on the bottom of the accessory tray over the hole in the
middle of the leg support bracket and turn the entire tray clockwise until the tray sits fi rmly against the leg brace (Fig. 1).
5. Make sure the leg hinge bolts are secure by snugging down the black thumbnuts at the top of each leg.
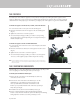
THE TELESCOPE TUBE
To attach the telescope tube to your tripod and mount:
1. Locate the slow motion rod guide on the side of the U-shaped mount.
Loosen the set screw in the guide until the hole through the guide is
unobstructed.
2. Holding the telescope tube above the mount, slide the slow motion
rod through the guide on the mount and gently lower the hinges
on the sides of the telescope tube into the cradles at the top of the
U-shaped mount (Fig. 2).
3. Tighten the set screw on the guide to hold the telescope
in place
4. Insert the two telescope tube mounting bolts through the tops of
the U-shaped mount and into the hinges on the sides of the telescope
tube. Do not over tighten (Fig. 3).
NOTE:
The 70mm refractor is shown, but the 114 mm Newtonian attaches to the mount in the same exact way.
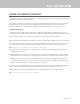
THE STAR DIAGONAL
(FOR 60 MM, 70 MM AND 80 MM REFRACTORS ONLY)
The star diagonal attaches to the back of a refracting telescope that contains a small mirror that refl ects the light at a 90°
angle, providing a more comfortable viewing position. It also gives you a 100% correctly oriented image allowing you to
easily use this telescope for daytime terrestrial observing.
1. Remove the caps from both sides of the diagonal.
2. Loosen the setscrews on the back of the focuser and pull out
the small dust cap.
3. Insert the smaller tube on the diagonal into the back of the
focuser and secure it by tightening the setscrews (Fig. 4).
You can rotate the diagonal to any position by loosening the setscrews.
Fig. 3
Fig. 2
Fig. 1